Thursday, January 31, 2013

Dueling DIY: Get Your (Paint) Strippin' On

Every time I see the progress on the blogs of the other staircase challengers I start to cry.
Then I want to strangle the heat gun
And kick my staircase.

Whose idea was it to strip this mess?!

And then I remember that I love my little old house. That in a hundred years it deserves to be loved at least once, and that I need to do right by it. And there was just no way I could slap yet another coat of paint on those spindles.

So .. I'm still scraping. Still burning my hands because I'm not always paying attention (it -is- a rather, ahem, mind-numbing activity), still filling bag after bag with sheets of old paint.

That stuff is THICK!

Here's a picture to give you an idea of how thick those layers of paint are.
Chunky Monkey!
By the time the paint has cooled off it hardens again and is crunchy like a cookie, and pretty much the same thickness.
Ridiculous!

More chunks.
Paint should not come off in chunks. Nuh-uh.
Yet, it does, and it's amazing how much detail is lost beneath all of those layers, especially on those spindles.
They are taking forever, and I know that all the other challengers will leave me light-years behind in finishing this challenge. Yay you!


I may be done scraping all the baseboards and risers but those spindles ..
They are kicking my butt.

If it weren't for this challenge, I'm pretty sure I'd have abandoned it a week ago (make that two weeks, heh) so here's a big "Thank you" to DIYDiva Kit and all the other challengers for keeping me going!

If you haven't had enough of hearing about my staircase, go on and head over to the other duelists here!

Tuesday, January 29, 2013

Three of Three


This past weekend was a doozy as far as diy-ing and blogging was concerned. Not only are we enjoying an amazingly mild and sunny January with temperatures hitting the high 70s during the day and beautiful breezy nights but we were also completely cut off from the world for three days thanks to a blown port on the utility pole outside the house. Two hours of troubleshooting, new cables and a new port later, we were finally back on the grid on Sunday, but this whole 'cut from the umbilical cord of the internet' teamed up with splendid outdoor weather had us "oot and aboot" instead.


We visited the first "Annual Timucuan Adventure Days" at Fort George, meeting Madagascar Hissing Cockroaches, scorpions, owls and other critters, went kayaking, and shot crossbows. I also got chewed up by gnats and mosquitoes for the first time this year (a regular occurrence; I tend to keep the bug spray industry in business) and only while hopped up on antihistamine am I not scratching myself raw. They itch -so- bad! and I'm polka-dotted where ever skin showed (Thank GOD I wore jeans).

I'm still working on the staircase (D'uh!), the burns are slowly healing, and mentally I'm going over "The List." I think it was Apartment Therapy's "The Cure" that suggested to create a list of three projects per room to finish, and so I went and looked over my master list to assign priorities per room to kick start a more aggressive "get'er done" kind of approach in tackling stuff around the house. It was hard to limit myself to the three "sine qua non" items per room (I have at least half a dozen of "...and one day, I want to ...." projects for each and every one on top of the "...and I really need to do..." list, but here goes

 "Three of Three List"  aka "The Get'er Done" List

(*rooms in no particular order)


Laundry Room
1. paint (cabinets, tabletop and part wall)
2. install door knobs
3. cover the utilities


Kitchen
1. paint window
2. add lighting
3. add backsplash

Diningroom
1. organize drawers
2. paint door
3. Create or buy art for wall opposite of windows


Livingroom
1. paint walls
2. paint baseboard
3. add curtains for both windows


Vestibule
1. organize hall closet
2. window treatments
3. create wall art


Library
1. add more shelving
2. sort books
3. add desk


Upstair's hallway
1. paint door frames and doors
2. hang art over electric panel
3. finish painting stair case


Bathroom hall
1. new flooring
2. update ceiling light


Bathroom
1. install door for closet
2. new vanity light or add cover
3. refinish sink


Guest Bedroom
1. create and hang art
2. different curtains?


Little Man's Room
1. declutter
2. install shelves on either side of the window
3. create a work station
Master Bedroom
1. install fireplace mantle
2. build bed frame
3. paint doors

Dressing Room
1. decide on and install flooring
2. hang window treatments
3. create/hang art


Master Bathroom
1. shower rig
2. replace ceiling light
3. finish shelving in closet

It's still a massive list but here's to focusing on the most important parts rather than getting sidetracked by "Oh, shiny!" moments All.The.Time. because, you know, that's how I roll.(And you won't believe how much my fingers were itching to add points 4 and 5 and 6 to each room ..or maybe it's the mosquito bites, I dunno.)
...
...
Nawww, it's not the bug bites.
I'm just crazy that way.

Friday, January 25, 2013

Shady business

Now that the vanity light fixture is in place and working, we really needed to get some pretty shades.

Blue box to the rescue!
This is what caught our attention in the first place: the incredibly wide variety of light shades for this type of light fixture. While a few years ago, these light fixtures only came with the standard shade, the light fixture business obviously finally discovered the versatility and the fun of coming up with a variety of designs. And since they are pretty much standard sizes, you can even go and switch it up at home if you already have one of those vanity light bars! How cool is that?
Since I couldn't make up my mind right away, I took home the following babies:

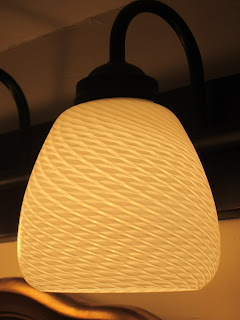
1. white glass shade with a twisted comb pattern

2. frosted glass shade with a clear edge

Back at home, we tried them on for size.

I must admit that I was secretly cheering and rooting for Shade #1 because of the pretty pattern which would pick up on the pattern of the IKEA light fixture in the dressing room (and we are thinking about swapping out the brassy nipple fixture with the same light). Imagine my delight when I discovered that the mirror was not in the way of the shades and that they looked as nice screwed in as I'd hoped!

I returned the other shade to the store and picked up the remaining two shades for a complete set.
And it's D-O-N-E - Done!


It's starting to feel mightily civilized in there. Now all we have to do is plan a trip down to the IKEA in Orlando to pick up the missing link necessary for the installation of our shower curtain rig and our bathroom will be good to go (you know, except for all the other projects I've pinned, just in case).

Left to do:
  • install shower curtain rod
  • hang shower curtains
  • create window treatments
  • decorate (art, plants)


Thursday, January 24, 2013

That sinking feeling

 Here is where we are at with our new cross handle taps for the vintage sink in the upstair's hall bath

[Husband and Little Man assessing the situation]

Yeaaaah ... not good.

There are a few rusted screws that are giving us a hard time.


I'll keep you posted.

Promise!

Wednesday, January 23, 2013

(Almost) Wordless Wednesday

[At the end of the rainbow ...]


Not the best of shots, the drab paint combo looks even worse in this photo than it does face to face, and an old photo to boot (notice the wrought-iron railing that's now gone-gone-gone), but I couldn't resist posting my, ... ahem, pot o' gold ..heh.

Tuesday, January 22, 2013

Switching it up

 Have you seen Apartment therapy's "The January Cure"? It's their 30 day plan to get your house in better shape, you know, like organized, with flowers and framed art on the walls. While I haven't signed up for the deal (I'm following simplicity's year-long declutter calendar instead, and one calendar is more than enough but if you want to, you can go and sign up here), I do read their posts out of curiosity and on the constant quest for inspiration.

 [The husband's desk in the living room]

On day six they suggested you "pick a piece of art and get going on framing it." That's when I realized that I still hadn't changed the art in our livingroom. Waaaay back I created Halloween art inspired by one of my pinterest pins, and yes, you guessed right, it hung for much longer than Halloween ... It hung for -two- Halloweens and then some, and it was really time to change it up a bit. I had even prepared replacement art a while ago but never gotten around to swapping it out.

[Bats and spiders, oh my!]
Shame on me.
Bad procrastinator!
No cookie!

Even worse, the whole swap demanded my attention for maybe ten minutes tops. Both, the husband and I love New York City. He has lived there before, and while I wouldn't want to move there, I love eloping to New York for a quick trip now and then. I'd downloaded a couple of photographs of famous NYC sites, and back when Picnik was still around, had toyed with some of their effects to make them look less like photos.


I'd picked four of the photos I's played: with a sweeping view over Central Park, the Brooklyn Bridge, NYC skyline, and Times Square.

Quick Tip: I always use another frame's glass insert to cut a photo or picture to size. It does double-duty as a ruler and allows you to choose exactly which part to display (and to make adjustments).


I used double-sided tape to make sure they would stay in place and popped them back into their frames.


[See my cheery chevron blankie? That was a Christmas present for me, 
and I love it! It's supersoft and warm and fun!]

Then it was time to put them back onto the wall! I fiddled with their placement for a while until I liked the arrangement and then put them back onto the nails already in the wall.


Tada! Like I said, a ten minute fix, not a lengthy ordeal (staircase *cough* stripping paint from spindles *cough-cough*), and I like how it also added a pinch of color to our Restoration Hardware styled monochromatic living room.

Friday, January 18, 2013

Dueling DIY: Hot Stripping Action

 Oh yeah!
That's right!
I did it!

I came home.
And started strippin'.


 It got real hot at times but that's alright since we had a 20 degrees temperature drop between 2pm and 3pm (no kidding, it's cold again ..gah!)


 Soon, shreds (of paint) were flying left and right! Hot heat gun stripping action.

There are so many %$#@@&*%! layers of paint caked on top of each other, it's not even funny. Citristrip only managed to remove the topmost layers (white latex paint, I assume) and utterly  failed at removing the ominous black layer.
Bane of my existence, that layer of black paint, I'm telling you. It would be nice if you could just paint over that particular stubborn layer but unfortunately it's topping off a mess of more layers, mostly yellowed white ones, in one craggly relief of messy paint job after paint job. So it's got to come off.


 Thanks to my new best friend, El Heatgun, I now have proof that my initial guess at the original color scheme of the staircase was correct: both spindles and newel posts were originally painted a clean off-white/white while a darkbrown stained handrail and newel post tops provided strong and rich contrast.


I tell you, this staircase challenge is not not for the faint of heart.
Burns!
You know, when you get really into stripping, try not to get too carried away and get ahead of yourself. That might occasionally maneuver your hand right in front of the heat gun ... not good.My right hand looks a bit scorched now.


I called it a day at 7pm because Little Man started to inquire about dinner. It was also dark by then which makes for crappy pictures anyway. I'd been stripping for a solid three hours and what do I have to show for it? Not an impressive lot which is why this projects sucks so much that only a crazy challenge gets me going ... ha!

Want to see how the other staircases are coming along? Hop on over to


Thursday, January 17, 2013

On tap(s)

No staircase news YET since even our normal Mondays, Tuedays and Wednesdays are crazy days, always jam-packed with school and work and homework and chores (laundry ...ugh) and sports and other activities and no time (and energy) to love on the house. Most of our projects happen on the weekends ... I did, however, go shopping, so here goes:

Shortly after we moved in and met our next door neighbor John, he gifted us with a vintage cast iron sink as a housewarming present. We were very excited about any vintage touches we could bring back into our Ugly Duckling House which had suffered many ... ahem, updates, some of which had removed a lot of its 1914s charm, and we gratefully accepted the awesome present!

It weighs about a metric ton, takes two men (or one Sam) to haul up the stairs, and has quite a few years of service left. There is some rust around the drain and near the overflow, and I refinished it with one of those DIY kits from the box store The results were really nice and the new finish has held up over the past year, but slowly the rust is creeping through again This time I'm considering having it professionally re-glazed. I'm hoping that our awesome neighborhood sounding board has a good recommendation for me. It's one of those things I really love about my 'hood. Word of mouth is golden here.

Anyways, the vintage sink features a two tap set-up, one for hot and one for cold. Lately, these two faucets had started to develop 'issues.' They started to leak, and you had to crank them close really tight to stop the water from running. That was pret-ty painful because the edges of the handles are rather sharp, and finally enough was enough.

Time to go shopping!

Taps are more difficult to find than regular faucets, mainly because we they are old-fashioned. While you cannot adjust running water to whatever temperature you prefer, you can mix it in the basin which conserves water in the long run, and electricity since you end up washing your hands with cold water instead of warm.

I started looking ,and I scored at Van Dykes' Restorers of all places! I love browsing their catalog and their webpage, we bought our vintage door bell there and some of our window hardware, and their customer service, shipping and handling have always been great.


 On top of that, their "Restorers Lavatory Faucet with hot and cold cross handles" was on sale: reduced from a very reasonable $74.99 to just $67.50!
Score!
They also sell a vintage tap set with levers instead of cross handles for the same price (look here).


Only a week later the VanDykes package arrived!
 Those taps are just lovely! Surprisingly heavy and solid, and much nicer looking than the price tag would suggest.


They are a bit more substantial than the old ones. Taller and reaching more into the sink they will also work much nicer than the old ones, let alone be much more comfortable to handle.


Very sweet! I love the cross handles with their label for hot and cold. I can't wait for the husband to install them!

Wednesday, January 16, 2013

Wordless Wednesday


It's more like "Speechless Wednesday"...

My little blog doesn't have the biggest audience, but page views are steady and way more than I ever expected, you know, since I created this blog really only to keep family and friends up-to-date on how things are going renovation-wise. It also works great in keeping me accountable for steady progress because if I ain't posting, I obviously ain't really working on the house.

Imagine my surprise at yesterday's spike in views!

Find the nearest bunker!
The Russians are coming!

Thanks to some lovely comments the mystery was easily solved - my comment on Kit's blog "DIY Diva" and her staircase throw-down challenge with Sarah from "The Ugly Duckling House"  (read more about it here) had gotten me into trouble ...err, the list of crazy participants in the epic Staircase Challenge. At least, I'm in good company, so if you haven't, go visit the other kicka$$ ladies and their staircases:

I'm waaaaaay behind some of these ladies so here is my to-do-list for the stair case at our  little old house

  1. finish stripping spindles
  2. sand spindles, handrail and baseboard
  3. strip 4 more risers
  4. prime everything
  5. paint everything
  6. install dust corners
 Of course now that I'm chomping on my bit like a race horse in the starting box, I realize I won't have time to do anything on it until tomorrow at least. Whaaahahaaa! Madness!


Have a staircase that needs work?
Have you put it off for a while now?
Need to get that done?
Join us!


Tuesday, January 15, 2013

Vanity, oh vanity

We decided we'd lived long enough with that nifty blue plastic box above our bathroom vanity ... or maybe we finally realized that that was where a light was supposed to go - you pick. At first, with the bathroom marginally ready to be used, I was too shopped out and tired of making decisions and simply pushed this one back to the bottom of the pit ... list. Then, with winter approaching, the thought that "a little more light here would be nice" started to sneak into my brain. And yet, I -still- wasn't sure what kind of light to pick. 

You see, it's like this. I just pretend I know what I'm doing talking, style and design as if there was nothing to it (ahem ...cough-cough) when really all I'm doing is blundering about, stealing ideas (Thank you, blogosphere and Pinterest) and trying to make the best of it. Heck, I don't even know what my style really is! Or if I have one (chances are slim). 

Enough with the whining and back to the vanity light.


Oh, wait! More whining! Ha!

Much to our dismay (and here's a "lesson learned" for when you are constructing, rebuilding, renovating, etc. because I wish I'd noticed it sooner) the electric box isn't centered above the sink. You'd think it is, but it's off by about 2 inches.
Not a whole lot, but enough to notice it.

Not feeling the desire to g into rewiring, running into studs and other possible issues, we tried to come up with a way to deal with this problem. A light with a wider base would provide coverage and allow us to adjust the fixture placement, and so we started to search for a light fixture that would do just that.

We really liked the option that the lighting aisles at the blue box presented: they are offering sconces, vanity bars, etc. in various finishes with shades sold separately.


Here's the husband installing the light fixture plate to which the cover attaches We had to drill a few extra holes in order to adjust the discrepancy between the light box position and the center of mirror and sink, but it wasn't difficult at all and you don't see it unless I point it out to you Promise!


Tada! This is an awful picture and it took real artistic skill to make it look like everything is centered but the sink. I blame the swoop of the basin and an odd angle, and missing window treatments. Heh ... It's centered, though, I promise.

We have light! Huzzah!

We do, however, not yet have shades. There are so many options to choose from that I developed a serious case of "DIYer Block"; I keep going back and forth between two shades that I like, waffling over which would be better. I figure I'll buy one of each, try them on, and decide then, so stay tuned for another vanity light update! (There's no end to it. Ever. Ahhhhh!)

Monday, January 14, 2013

Not So Wordless Wednesday on Monday


 The Bostwick Building in its heyday (source)

"A building does not have to be an important work of architecture to become a first-rate landmark. Landmarks are not created by architects. They are fashioned by those who encounter them after they are built. The essential feature of a landmark is not its design, but the place it holds in a city's memory. Compared to the place it occupies in social history, a landmark's artistic qualities are incidental." 
Herbert Muschamp

The Bostwick Building today (source)

I had originally planned to use the picture of the Bostwick Building aka the Jaguar Building for my "Wordless Wednesday" post but I thought this building deserves more publicity, more public outcry, more love and support, more of us.

The Bostwick building is one of the few remaining historic buildings downtown Jacksonville. It's on a very prominent location, occupying the corner of East Bay Street and Ocean Street. Chances are you have seen it, especially since the crouching jaguar painted over its boarded windows is so eye catching. Built in 1902 it stood silent witness to the Great Fire and has remained in its family's hands.

You would think that's a good thing.

While in most cases it's the houses that are passed from hand to hand, from uncaring investor to short-time owner, that suffer the most, the Bostwick Building has been ignored and neglected by its family like an unwanted stepchild. Go here for a look at what it looks like on the inside.

It has stood empty for the past 25 years. It is as good as gutted, hunkering down under a failing roof, and bidding its time waiting patiently for a kind hand that would restore it to former glory.

The Bostwick family? The family who has owned the building since its construction has applied for a demolition permit. They want to tear it down, adding yet another overgrown empty lot to our downtown's ravaged landscape.

...because nobody is willing to pay their current asking price of $325,00 (for a small lot with a condemned building)
... because nobody has been willing to pay their past asking price of $1.000.000 in past years (for a small lot with a neglected, condemned building).
They have received bids.
Bids for -double- the appraised value of the lot (which is $76.000).
Bids by people who even want to restore the building, no matter the cost of the restoration.
But, oh no, that's not enough. That's not enough money to those who are currently  incurring several hundred dollars in daily fines for code violations, would have to pay about $40.000 in demolition costs and in the end would sit on an empty, weedy lot like so many others in downtown Jacksonville, leaving this city one historic building poorer.

Oh, and do the math. Just for kicks and giggles.
You would think that a family who prizes themselves as the original owners would realize the value in finding somebody who is willing to undertake the costly and arduous restoration of such a building but noooo .... on Tuesday, January 17, 2013, we will hear both, the Bostwick family appealing the denial of the demolition and the Historic Preservation Committee's application of Landmark status of the Bostwick Building.

Care to raise your voice for the Bostwick Building?
Email these committee members and let them know how important, how truly non-negotiable the preservation of our historic buildings is

Redman@coj.net
LBoyer@coj.net
MattS@coj.net
Gulliford@coj.net
WAJones@coj.net 


"We will probably be judged not by the monuments we build  but by those we have destroyed."                 
                                            New York Times Editorial

I'd rather be known as somebody who spoke up for preservation of our city's heritage. How about you? 
                   

Friday, January 4, 2013

Scraping by

Here's what I'm up to when you aren't watching ...


It's a slow and tedious job.


Sure, it will be very rewarding to see the staircase in all its vintage glory again but considering that just stripping one.single. spindle takes more than an hour, you know I must be a glutton for punishment. (And really, how many posts titled "Scraped another spindle - yay!" can you write ...or stand to read?)


There are 28 spindles.
And three sections of handrails.


I'll keep you posted but it'll likely take me a while.

Thursday, January 3, 2013

New Year - New Luck!


Last year, I gave you this neat little list of projects we wanted to tackle in 2012 (refresh your memory here). We had great plans, all revolving around the exterior of our little old house, and they were all based on the assumption we'd be done with most of the interior projects my the end of spring.
Big wop-wop-whoop.
That didn't happen.
The HGTV curse struck again, and here we are,are still stripping and painting doors and frames and baseboards.

But let's take a look at the list:
  1. Replace-A-Rail                                                                                                                     Check! We did replace the old rusted and haphazard wrought-iron railing with an appropriate and way chunkier wooden railing. And what a different it made (see here)!
  2. Picket Fence Fun                                                                                                                           Plans are drawn up and paperwork is ready to go to the Historic Preservation Committee for approval.
  3. Upfront Landscaping
    Our front yard is still a barren and boring wasteland. 
  4. It's Raining Paint - Hallelujah!
    We still need to paint the Ugly Duckling but at least we now know which color. That's a start!
Aside from hitting a really low 'low' as far as our DIY spirit was concerned, the ...hmm, threat ... possibility of moving north put a cramp into our style and a lot of projects on hold (like adding a bee hive to the yard). Now that we are back in the game, we are back at crossing items off from our to-do-list which means our re-ordered list for 2013 looks more like this:
                                                                                                                           
  1. It's raining (exterior) paint!
  2. Picket Fence Fun
  3. Upfront Landscaping
Of course, there is always stuff happening/needing to happen on the 'interior' as well so we are sure to stay busy - no problem!

Wednesday, January 2, 2013

Wordless Wednesday


Today, January 1, 2013, marks the first (that is if my calculation tallies are correct!) calendar year with NO, ZERO, NADA, ZIP demolitions in Historic Springfield. 
 
While we sit on over 440 days without a demolition, 2012 is surely a mile marker in the quest to save the houses. 
 
Historic homes stood strong surrounded by a neighborhood of passionate, unwavering people, making it the first year since designation in 1987 without a demolition. Preservation prevails.