Thursday, April 26, 2012

A little something

 While picking up lumber for a cub scout project (Nope, no kidding), I snuck out and mosied through the garden center as well. This particular blue box home improvement store has an unusually nice selection of distressed and/or discounted plants, and I spied some lovely orchids with a pot for just $4!

So, I decided that the master bathroom was starting to look civilized enough for the first purely decorative touches and snagged one.

At home, I couldn't leave well enough alone and whipped out the ... not, not the faux gold leaf ...pshaw! .... but the trusted Krylon spray paint and gave the pot a quick update.

Before, the pot was a simple terracotta pot that had been white washed. Not a bad look but it didn't really flow with the new glam look of our bathroom.

Ahh, but after a coat of Krylon gold things started to look deliciously glamorous. Definitely good enough to eat!


While I don't have the greenest of thumbs as far as indoor plants are concerned (plus we have a cat who thinks that any plant is just a fancy version of cat grass and so placement needs serious considerations), orchids seem to work for me. When I was living in Germany (up north in Hamburg), I shared my bedroom with an orchid that just bloomed and bloomed and bloomed.


Did you spraypaint a little something lately? What about your thumb? What shade of green is it?

Tuesday, April 24, 2012

A new color in town

Last week I talked about our plans of turning our stark-white master bath into a calm and soothing retreat by making a couple of changes which would - along with more changes to our dressing room/walk-through closet and master bedroom - turn our three-room master suite into a more cohesive unit rather than a jumbled threesome of connecting rooms. You can read about that here and here.

One of those changes included a common wall color in all three rooms (along with lots of crispy white trim, batten and board and maybe, one day, bead board). I wanted to tone down the stark contrast in the bathroom without going to white and after many pictures of very neutral, light and airy bedrooms had caught my eye on Pinterest, I knew that an off-white, light beige would probably fit the bill for all three rooms.

Paint chips to the rescue. I made a quick trip to every available hardware store in the area and returned with a bucketful of paint chips in all shades and hues of beige:

In the end I 'winged' it. I dropped into the store, grabbed a beige paint chip that seemed to fit the bill and called it a day. Call me Mrs. Spontaneous. If anything, I have learned that no matter how bad the paint fail, you can always paint over it so choosing a paint color does not give me a headache. At all. "Cultural Colonial Beige" looked great - a soft greige that wasn't too close to our beloved Woodlawn Colonial Grey.
Meet "Before".

Initially, after demoing what used to be the upstair's kitchen, installing new subflooring, building a wall to create two rooms and tiling the master bath, we just gave the walls a fresh coat of white paint to make them look and feel clean. While it did just that, it also turned our bathroom into a cold white box.
Progress!

I started with the wall with the most fixtures because I felt like this would give me a better idea if I liked it or not. Truth be told, at first I didn't like it at all but after our experience with the dining room (I did not like the color at first either, but husband convinced me to finish the room first before changing our mind and whaddayaknow, in the end I loved it! And not because I didn't want to repaint the room ...) I decided to paint the room until the bitter end.

Surprise - as I rolled on the paint, it began to grow on me.

This is probably the truest color representation. There's no mistaking it for anything but beige but light has an interesting effect on the color. In bright sunlight (of which we have lots) it's a soft light greige. With fading light it progressively warms up to a true beige which means that a brighter overhead light has moved up in priority ... heh.

Finally: "After".

Compared to the white walls before, the soft greige color on the walls make the room feel slightly smaller and cozier and brings out the moldings whose bright white pop against the warmer color on the walls. It also picks up nicely on the off-white hue of the tile and the fixtures.

Classy-sassy :o) Even mixing the metals is working!

While I'd have never thought I'd paint any room in our house beige (after living with off-white and builder's beige in rentals for too long), seeing how this is all coming together is making me very happy!

Monday, April 23, 2012

Not all that glitters is gold ...

Alright, here it is: my latest craft fail.

CRAFT FAIL, that is.
In all caps.

As you might have read here in 
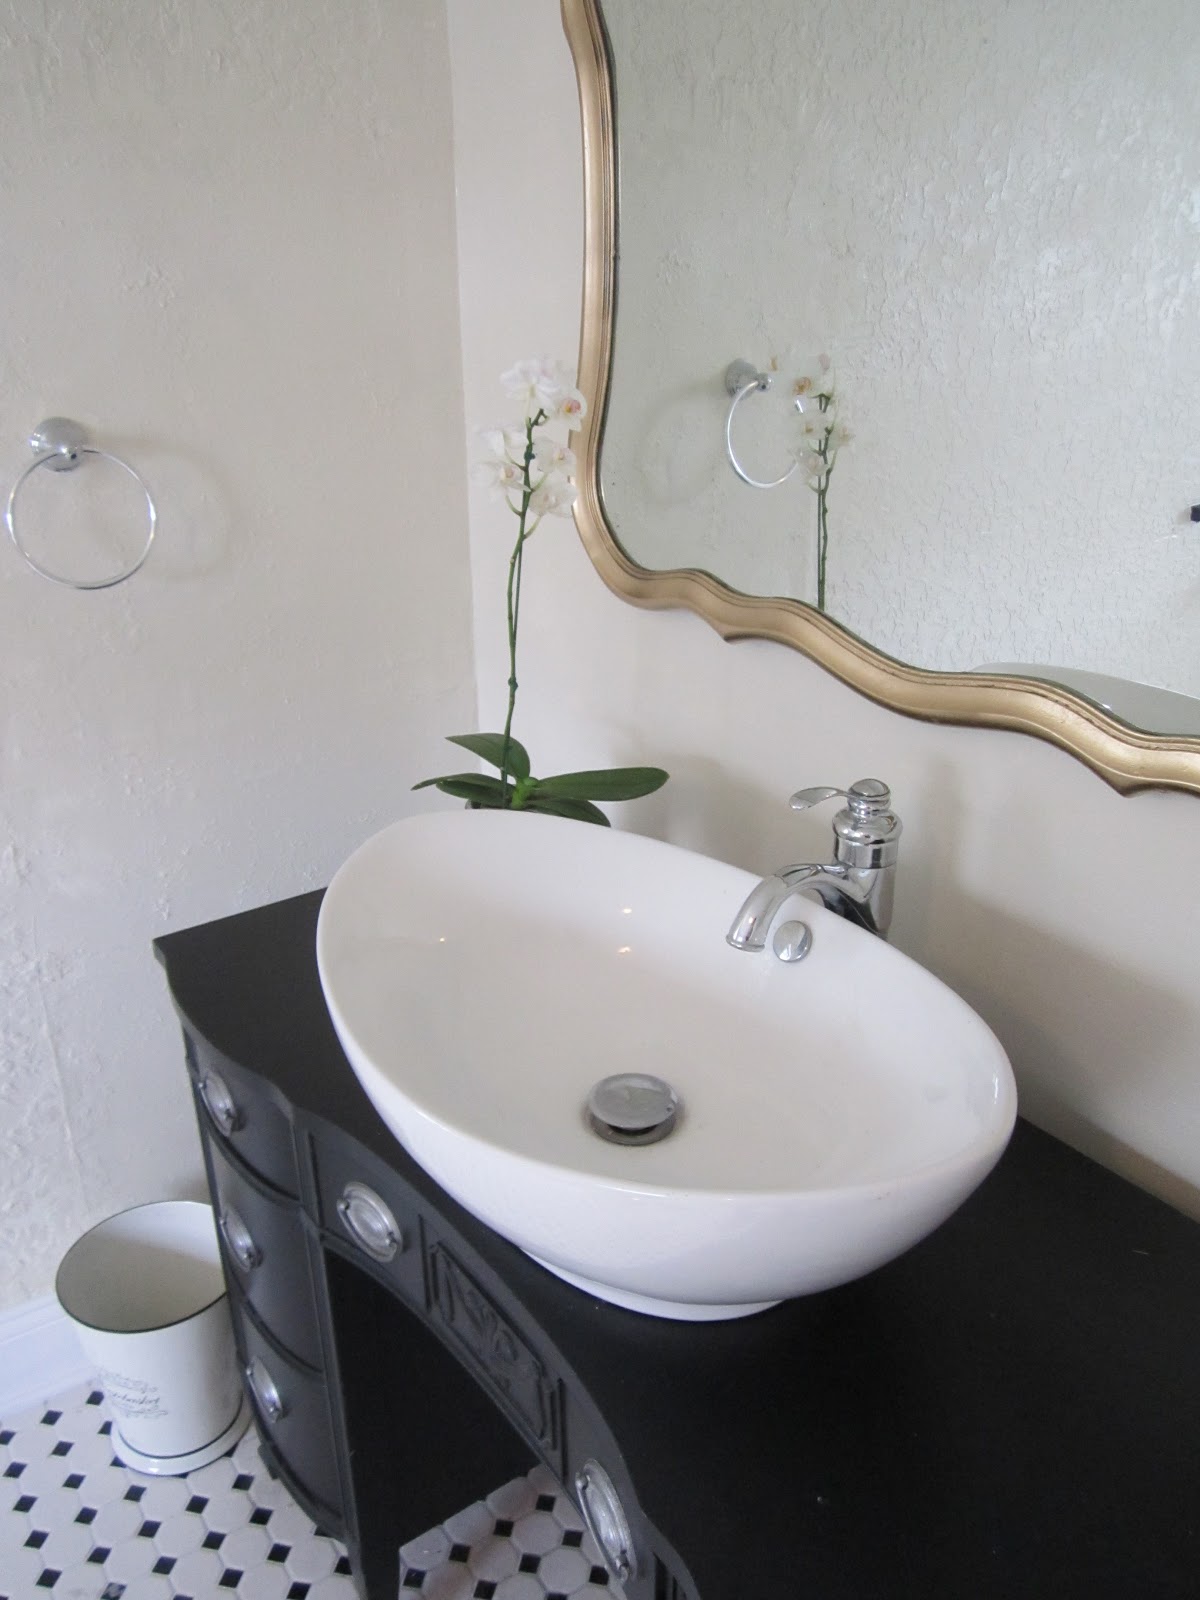
this post about the redesign/tweaking of our master bathroom, the softer color scheme had me adding a gold framed mirror. The current mirror in our bath, however, is black. Nothing a little paint can change, right? While browsing the shelves at the local craft store, I ended up chatting with one of the employers who recommended I try the faux gold leaf instead of paint.

Now, I have used gold leaf before. REAL gold leaf. Lovely, 23K gold leaf with that unrivaled rich, warm, honey sweet glow of precious metal.
23K gold leaf that goes on like BUTTA.
Heck! Better than BUTTA!.

You see, I love medieval calligraphy and illumination aka medieval book illustration and was honored with several awards to boot for my creations. Gilding is the crowning glory of any manuscript and piece of art. It sounded so much better than using spray paint.

Home I went with a book of faux gold leaf.

Here it is: mod podge, faux gold leaf and a sponge brush. Not pictured is a soft make-up brush to brush off excess gold.

Gilding, whether it's done with the faux stuff or real gold, is surprisingly simple and straightforward. Eseentially it's gluing thin sheets of metal to another object (paper, etc.) and polishing it. It only gets tricky when you're using medieval recipes and techniques or, in this case, faux gold leaf. 


First you brush some glue on. I used Mod Podge and as far as glue is concerned, it worked really well. You want a thin layer of glue, just tacky enough for the gold to stick but not wet.

You cut off a piece of gold leaf using the transfer paper to hold it so it won't stick to your fingers. -Real- gold will stick to anything including itself, faux gold - not so much.

You lay it gently onto the sticky parts and smooth it against the surface.

Rinse and repeat.

I have gilded a bunch of artwork using real gold but I have always stayed away from the faux stuff. I don't know why I believed the employee but man, faux gold leaf still stinks.


Real gold leaf will literally melt against your skin or any other surface. It's powdery soft, once it touches anything but the transfer paper.
Faux gold leaf?
Well, I think it's best described as yellow aluminum foil. It went on all wrinkly and stiff and no amount of polishing (burnishing) would iron out those wrinkles. Gah! You could achieve the same effect covering everything in cheap aluminum foil and spray-painting the whole thing.

Grumble-grumble.

After grumbling over this CRAFT FAIL for a couple of days, I did what I should have done from the start (other than gilding my mirror with 23K gold leaf): I sanded the messy part and then spray-painted it with Krylon Gold spray paint.

So. Much. Better.

Sunday, April 22, 2012

Gettin' down and dirty

Last year we enjoyed two Florida growing seasons over at the Springfield Community Garden; I wrote about that here and occasionally made mention of the home-grown bounty we brought home if we didn't forget to swing by, water and harvest amidst the initial renovation chaos.

At the end of the second growing season we decided - with a laughing and a crying eye as we Germans say - to offer up our plot to another neighbor wanting to try community gardening. We really enjoyed working in the community garden, meeting old and new neighbors, taking classes and listening to Amanda's advice but truth be told, we were and still are pretty much tied up at our little old house. Fortunately for us, one half of our small yard gets great sunlight (with a honking big holly providing beautiful afternoon shade in the other half to help us brave those hot Florida summers) over enough hours of the day to raise veggies right here! We built a small raised bed between our two a/c compressors but last weekend we whipped up a new and bigger one in an even better spot.
Granted, I did drive the husband a little crazy sending him to the blue box with hardly any instructions aside from "let's built a raised veggie bed" so lots of phone calls ensued while I was losing my last nerve over another project here at the house. But in the end, the husband came back with the planks we needed and 8 countersunk screws later I had my planter box. After digging up the weeds we covered the bottom with layers of newspaper and added half-ready leaves, compost and shredded leaves to keep the evil nematodes at bay (they live in Florida dirt and stunt your plants' growth). After that we filled up the bed with yummy, rich, lovely potting soil enriched with some more compost and manure.

We planted a variety of veggies and fruit square-foot-gardening style, and between both beds we have
- bunching onions
- Arugula
- lettuce mix
- green bell peppers
- three types of tomatoes
- Cantaloupe
- Cucumbers
- squash
- sugar snap peas
- green beans
- Basil (Thai Basil and Sweet Basil)
- corn

Quite a list, eh? Hopefully this year we won't be growing the $64 tomato but get to try most of the veggies and fruit we planted. Last year's squash season was cancelled due to an invasion of squash bugs, it got too hot too fast before we could grow sick of tomatoes, and the cantaloupe withered and died for no apparent reason.

Can't go wrong with lettuce though!
If you can grow weeds, you can grow lettuce!


Last year's pepper plants seem to be much happier in their new spot this year. So far we're looking at three peppers already! Who knew they overwinter :o) If only we had a bit more yard and permission to keep chicken - I'd so get some silkies to rock my urban farmstead.

How's your urban farming coming along? Anything promising  sprouting yet?


Friday, April 20, 2012

Spicy Garlic Bok Choi

The family and I love to hunt for produce over at the Beaver Street Farmers market, Jacksonville's oldest farmers market according to their webpage which you can find here . The selection and quality is great, the prices are good and it's just fun to browse the market stalls and look at the colorful displays, hear the banter and chatter in not just English and negotiate your dinners for the week.

Last time, we picked up some lovely baby bok choi at my favorite market stall run by a wisp of an Asian lady who rules her minions with an iron hand but has customer service down to an art. She will peek into your bags to determine whether that basket you chose had indeed enough potatoes, beans, okra, mushrooms, tomatoes, whatever - and if it falls short, just toss in another handful. She is also willing to cut you a deal, say, when you are whipping up a medium truckload of broccoli salad for 20+ hungry cub scouts and need more than just one of anything.

So this past weekend, she had some lovely lovely baby bok choi that had to come home with us! All three of us love Asian cuisine and so I whipped up a batch of spicy garlic bok choi with chicken:


Ingredients:
3 baby bok choi, cut into chunks
3-4 cloves of garlic, cut into slices
1/2 tsp (or more, depending on taste) red pepper flakes
1 tbs brown sugar
1 tbs apple cider vinegar
ginger
1 cup soy sauce
vegetable oil
optional: chicken, beef, pork or shrimp (we used chicken)

Add a tablespoon of vegetable oil to a wok or deep pan and heat it up. Add your garlic making sure not to burn it. As soon as it starts to soften, add your chicken/beef/pork/shrimp. Add soy sauce, apple cider vinegar, red pepper flakes, brown sugar and dust lightly with ginger. Toss in the white, chunky parts of your baby bok choi and turn down heat. Don't cover; the bok choi gives off a lot of liquid and covering will just turn it into a soupy mess. Once the chunkier pieces start to soften, add the leaves and cook until wilted. Done!

If you like your sauce a bit thicker, just thicken it with a bit of cornstarch. Serve over rice or noodles. Omnomnom!

Thursday, April 19, 2012

In the Mood

... for more mood boards!

Yep, you heard that right. More mood boards!

On the quest for a more cohesive look for our sweet master suite consisting of bedroom, dressing/walk-through closet and bathroom, the husband and I have been digging through various sources of inspiration such as a slew of catalogs from Pottery Barn, Ballard Design and Restoration Hardware, board after board on pinterest as well as movies, TV shows and of course the creme de la creme, other DIY and House blogs. Well, okay, -I- have been trolling these sources and then presented the husband with my findings for a final "yay!" or "nay!"

In the end, both of use seem to gravitate to a style that can be best described as "NYC Loft meets Farmhouse Charm" or "Restoration Hardware goes Country"... heh!

With that in mind, both dressing room and bedroom - so far white with lovely dark teal accents - got a quick and rather simple make-over: off-white/light tan for the walls, white trim, black window casings to up the industrial feel of the ugly 80s aluminum windows we are not yet going to replace, wood and wicker and touches of vintage brass.

On Pinterest - the mother lode of all things inspiration - I discovered a lovely pin utilizing a screen door to separate rooms and LOVED it so we'll be doing that for our bathroom (possibly adding opaque plexiglass for privacy in and on the 'loo).

Dressing Room:
dressing room

To-Do:
- paint walls off-white/tan
- lay dark cork floor
- re-upholster existing bedroom chair with linen
- add rug
- add light fixture (love those gilded accents; maybe I can create the look on a natural shade?)
- add wicker hamper
- install screen door to bathroom

Master Bedroom:


Bedroom Take 2


To-Do:
- paint walls above batten and board off-white/tan
- re-upholster headboard in linen/burlap
- new curtains (have idea - will diy)
- add rug
- find bigger, brassier lamps for night stands
- get a tripod lamp

Wednesday, April 18, 2012

Hard(ware) to stomach

Our diningroom credenza is a beautiful old three-drawer dresser with vintage pull ring knobs. Unfortunately, two of those knobs are missing and while we've been making do with a ...ahem, screwdriver angled cleverly into the drill holes for the missing hardware to pull the bottom drawer out, it's about time I get going on replacing the missing knobs.

Not too crazy about the available pull ring knobs at Van Dykes (Bummer that! I love to shop there!), I finally ended up on Ebay. Browsing the listings of vintage hardware, I stumbled across one that I simply HAVE to share:

Raggedy Ann Pull Knobs

For all I know this is a once-in-a-lifetime find (for $20 plus shipping, and since it didn't sell, you have a second chance to snatch'em up!) and worth gobs of money, but frankly, these things creep me out. On a piece of furniture they would give me the heebeejeebees, and I might never again try to pull open a drawer ...

Don't believe me? I mean, look at them! Up close ...

Creepy ...

Not even a coat or two of ORB would make these better ...

Sunday, April 8, 2012

Happy Easter!

From me and mine
to you and yours


Friday, April 6, 2012

Evolution of a Moodboard

Yesterday, as I was adding a second coat of white paint to the baseboards and door molding, my mind started to wander.

It does that all the time when I'm painting trim and lately I have had the greatest ideas during those seemingly endless sessions of painting things white. Most of them revolve around painting things any other color than white.

Right now, our masterbathroom is - in its unfinished state - a room of rather stark contrasts: black vanity and white vessel sink, black tiles and white tiles, black window frames and white walls. It sure could use some softening up (nevermind, that I still don't know how to tie those three adjoining rooms - bathroom, dressing room and bedroom) together without letting go of our beautiful dark teal wall color in our bedroom. Oh well, one step at a time.

Once Little Man was in bed, I decided to dig up the good ol' Polyvore account to dabble with a mood board. I'm all about visuals, and even though I tend to have a decent idea of how things will look together, nothing beat 'seeing' it.

So, here's the old mood board, thrown together more than a year and a half ago (Gasp! It's been -that long? Good gracious, time does fly!)

[Master Bath - Old Mood Board]

Back then, I had a thing for black penny tile which we passed on in favor of a more budget-friendly vintage black and white tile since our bathroom is a whopping 220sqft. We -did- diy our vanity from an old desk, decided on one larger vessel sink instead of two, I found a lovely vintage mirror and the wainscoting is still on the list of things to tackle. I liked the stencil and was having visions of some really funky wallpaper effect but now, now I'm not so sure anymore. The stark, clean, uncluttered room has somewhat grown on me, but yet ... I crave some soft undertones.

Polyvore to the rescue!
Link
I know some people like to use other programs (even Windows Paint), but Polyvore and I, we're tight. Pinterest helped me find some inspiration for vintage-style bathrooms and thanks to Polyvore I'd tweaked my old mood board in no time.

Wanna see?


[Master Bath Mood Board- Improved]

We loooove our shag rug in our livingroom, so after trying several rugs - with patterns and without - I settled on a soft ivory shag rug. Thanks to a coupon code, this 3x5 squishy squooshy ivory softness for $44.00 (and free shipping!) from Rugs USA will make an appearance soon. I picked up on the sporadic use of gilded items in vintage style bathrooms and decided to give our mirror a virtual make-over trying it on in gold. Guess I'll break out the gold leaf this weekend 'cause I'm really REALLY loving it!

I have had a wall earmarked for a fireplace ever since the inception of the bathroom, so that just got added. Yes, there will be bubble baths within direct line of sight of a crackling fire. Hmm-mmm-mm ....!

And I'll also need an upholstered bench with curvy legs to help soften the look further so I'll keep my eyes open on craigslist or on thriftstore trips.

The bathroom will continue to read calm and clean, but with some really understated elegance (I'm the gal with dirty, naked feet digging in the yard, y'know, I don't really do 'elegance') and a little softer around the edges.

Thursday, April 5, 2012

Cue Cricket Chirp

It's been a week since my last update and I'm sure at least some of you are wondering if this time I fell off of the face of the earth for real.
Nuh-uh.
Still here.
Chipping away at "The List".

I just don't know how many more times I can write about painting trim without losing the last shreds of my sanity.

Suffice it to say, when not taking care of business at work and home, chauffeuring Little Man to his activities, taking the puppy to puppy class, hosting an Easter Party for the German playgroup and getting the kitty spayed, I've been painting trim.

Business as usual.

It's coming along tho', and that's a good thing because it means that soon, soon, VERY soon I'll have more time for funner projects.

You know, like a kitchen seating area or even a back splash. Some updated lighting and maybe new pillows and curtains. Or going stencil crazy in the guest bedroom.

Just get over and done with the whole %$#@%*& trim painting business...

Bleh.

I'm telling you, the next time we're buying a house the No. 1 selling feature will be trim that doesn't need painting!