

Sunday, March 31, 2013
Thursday, March 28, 2013
Three of Three: The Kitchen Edition
With the laundry room all finished and wrapped up, it's time to move on to the next room on the list. And since the closest room to the laundry/mudroom is our darling kitchen, what better room to tackle next on my "Three of Three" list than that!
We simply love our kitchen and everything we put into it. When we bought our little old house, the place was a hot mess: dirty, outdated, awkward, non-functioning.

We tore out -everything-. For such a small room, we had a major list of updates and upgrades. Here is our list of completed projects so you can see for yourself:
Kitchen:
- ripped out old cabinets
- ripped out linoleum
- repaired heart pine floors
- refinished heart pine floors
- re-plumbed kitchen
- updated electrical wiring
- hung new drywall
- finished new drywall
- prepped, primed and painted walls
- repaired base molding and add quarter rounds
- prepped, primed and painted ceiling
- installed ceiling fan
- installed new kitchen cabinets
- installed new appliances, sink and faucet
- installed cabinet hardware
- prepped, primed and painted base molding
- prepped, primed and painted trim around doorway to breezeway and to laundry room
- created open shelving with brackets and boards
- created and hung window treatment
- added a chalk board on door to laundry room

Without the help of our contractors in the beginning we wouldn't have been able to complete all of this with our sanity still (mostly) intact. Amazing how after this long list, though, I still have plenty more ideas and projects for it on my wishlist! But ...all in the spirit of wrapping some things up, here is my "Three of Three" for the kitchen for this year:
Three of Three - The Kitchen
1. paint window frame
2. add lighting
3. add a backsplash

I really, really want to add a No. 4: "Create an eat-in nook," but we'll have to see how that all will fit into the budget. We -are- gearing up to paint the exterior of our house and that will siphon off quite a few of our project dollars so some of the 'flourishes' inside the house will have to wait. No worries, I have plenty of more points to add to my list. I can do that "three of three" game for a couple of years without having to rack my brain just yet!
We simply love our kitchen and everything we put into it. When we bought our little old house, the place was a hot mess: dirty, outdated, awkward, non-functioning.

[The ugly truth: Before]
We tore out -everything-. For such a small room, we had a major list of updates and upgrades. Here is our list of completed projects so you can see for yourself:
Kitchen:
- ripped out old cabinets
- ripped out linoleum
- repaired heart pine floors
- refinished heart pine floors
- re-plumbed kitchen
- updated electrical wiring
- hung new drywall
- finished new drywall
- prepped, primed and painted walls
- repaired base molding and add quarter rounds
- prepped, primed and painted ceiling
- installed ceiling fan
- installed new kitchen cabinets
- installed new appliances, sink and faucet
- installed cabinet hardware
- prepped, primed and painted base molding
- prepped, primed and painted trim around doorway to breezeway and to laundry room
- created open shelving with brackets and boards
- created and hung window treatment
- added a chalk board on door to laundry room

[Hard to believe it's the same room: After]
Three of Three - The Kitchen
1. paint window frame
2. add lighting
3. add a backsplash

I really, really want to add a No. 4: "Create an eat-in nook," but we'll have to see how that all will fit into the budget. We -are- gearing up to paint the exterior of our house and that will siphon off quite a few of our project dollars so some of the 'flourishes' inside the house will have to wait. No worries, I have plenty of more points to add to my list. I can do that "three of three" game for a couple of years without having to rack my brain just yet!
Tuesday, March 26, 2013
Three of Three: Laundry room - Semi-Finals!
I know, I know.
Bad blogger!
Not only have I skipped several days worth of entries but I also seem to have fallen off of the staircase challenge wagon.
You see, I usually work on house projects on the weekends. During the week life sometimes just gets too busy to accomplish much. Two weeks ago I went on a trip to Tampa and spent some time with a friend, and this past weekend we went camping with Little Man's Cub Scout pack. Add to that that just thinking about the staircase is giving me hives right now and that I managed to throw out my back so squatting on my butt on the floor sanding spindles was painful in more ways than one, and you have a pretty good idea of why there was next to no progress here at the little old house.
Monday I went to see the chiropractor who snapple-crack-popped my back back into alignment and things started to look up. Still not crazy about the idea of taking on the staircase again, but I did put in some hours in the laundry/mudroom.
 Here we go: last I checked in with you I'd started to paint the door to the backyard and the then exterior, now interior wall still sporting the siding. Both had been painted a drab grey that seemed to suck the light out of the tiny room.
Even with just a coat of primer, both tied in better into the room and gave it much more space by visually receding. Phew! Just what the doctor had ordered for our little laundry/mudroom!
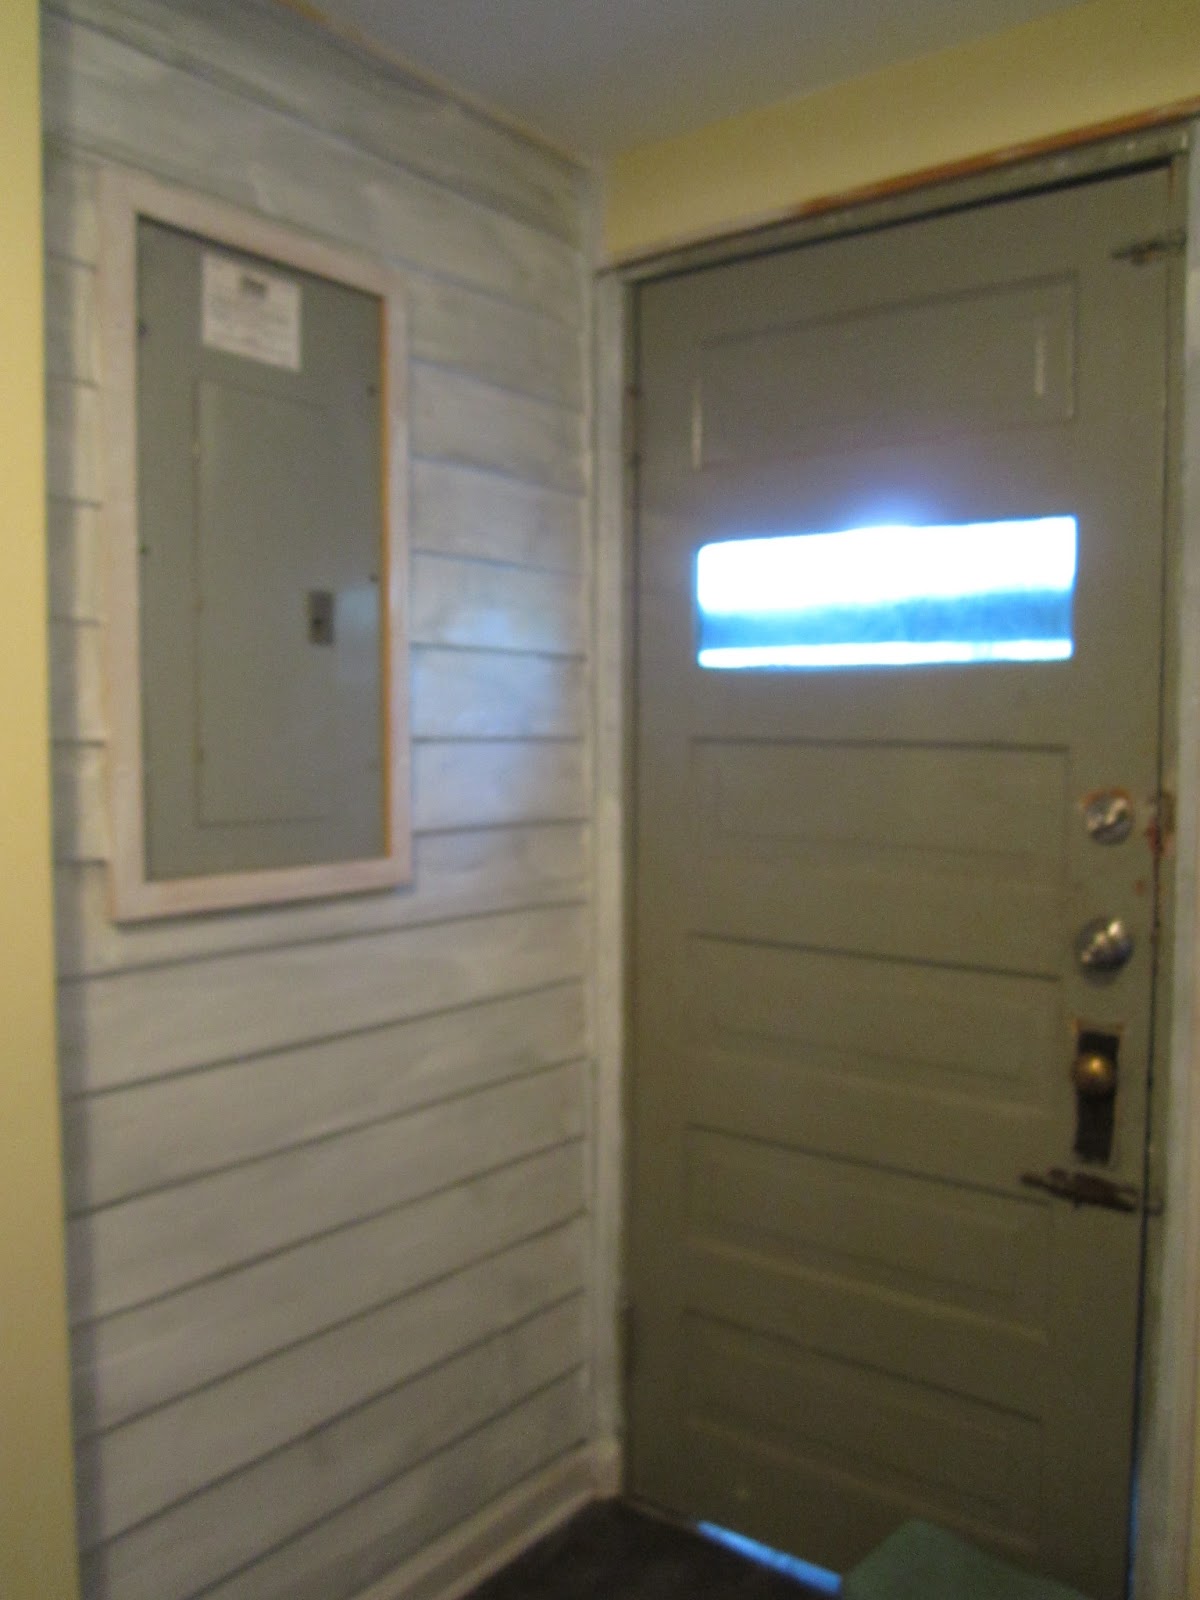
 Here we are with the final coat of glossy white for the door and frame around the breaker box, and the same soft yellow we used in our kitchen and all other laundry room walls on the wall.
So. Much. Better!
Another quarter turn pointed me to another project in the little room: the backside of the door to the kitchen. Yes, I'd painted the other side of the door (the one toward the kitchen) at some point with no concern for the backside.
Heh ... shame on me.
Time to rectify this shortcoming!

First, the door needed a serious scrubbing. Then I went and removed the hardware, and filled up the holes left behind by yet another set of latching locks; they were -everywhere- throughout the house, and on some doors we removed several sets. Ugh!

Time to rough it up! As if the old door wasn't beat up enough already (character - it's character! not to mention solid wood) I gave it the special treatment with the sander. I did take out a few bumps too and smoothed a couple of rough spots.
The few remaining dings are just indicators of the door's age and don't bother me at all. After a hundred year and more than two dozen families calling our little old house home, you get to have a few nicks and wrinkles.

I primed and then painted the door and frame. Paneled doors are painted from the inside out: you start on the inside of the panels, then you paint the horizontal parts of the door and finally the vertical lines.
Three coats of white glossy paint later and some quick touching up with sun-washed yellow along the door frame and we can call this project "DONE"!

Painting the wall to match the others and giving the doors a fresh coat of glossy white paint make a HUGE difference in this tiny room. It feels so much bigger and brighter, my mind boggles!

So, where are we with my "Three of Three" for the laundry/mudroom?
Laundry Room
1.paint (cabinets, tabletop and part wall)
2.install door knobs
3. hide the utilities
Now it's time to get creative and come up with something to hide the breaker box and our electric water heater from sight.
Bad blogger!
Not only have I skipped several days worth of entries but I also seem to have fallen off of the staircase challenge wagon.
You see, I usually work on house projects on the weekends. During the week life sometimes just gets too busy to accomplish much. Two weeks ago I went on a trip to Tampa and spent some time with a friend, and this past weekend we went camping with Little Man's Cub Scout pack. Add to that that just thinking about the staircase is giving me hives right now and that I managed to throw out my back so squatting on my butt on the floor sanding spindles was painful in more ways than one, and you have a pretty good idea of why there was next to no progress here at the little old house.
Monday I went to see the chiropractor who snapple-crack-popped my back back into alignment and things started to look up. Still not crazy about the idea of taking on the staircase again, but I did put in some hours in the laundry/mudroom.

Even with just a coat of primer, both tied in better into the room and gave it much more space by visually receding. Phew! Just what the doctor had ordered for our little laundry/mudroom!

So. Much. Better!
Another quarter turn pointed me to another project in the little room: the backside of the door to the kitchen. Yes, I'd painted the other side of the door (the one toward the kitchen) at some point with no concern for the backside.
Heh ... shame on me.
Time to rectify this shortcoming!

First, the door needed a serious scrubbing. Then I went and removed the hardware, and filled up the holes left behind by yet another set of latching locks; they were -everywhere- throughout the house, and on some doors we removed several sets. Ugh!

Time to rough it up! As if the old door wasn't beat up enough already (character - it's character! not to mention solid wood) I gave it the special treatment with the sander. I did take out a few bumps too and smoothed a couple of rough spots.
The few remaining dings are just indicators of the door's age and don't bother me at all. After a hundred year and more than two dozen families calling our little old house home, you get to have a few nicks and wrinkles.

I primed and then painted the door and frame. Paneled doors are painted from the inside out: you start on the inside of the panels, then you paint the horizontal parts of the door and finally the vertical lines.
Three coats of white glossy paint later and some quick touching up with sun-washed yellow along the door frame and we can call this project "DONE"!

Painting the wall to match the others and giving the doors a fresh coat of glossy white paint make a HUGE difference in this tiny room. It feels so much bigger and brighter, my mind boggles!

So, where are we with my "Three of Three" for the laundry/mudroom?
Laundry Room
1.
2.
3. hide the utilities
Now it's time to get creative and come up with something to hide the breaker box and our electric water heater from sight.
Friday, March 22, 2013
Three of Three: Laundry Room - The adventure continues!
With the cabinets all glossy white and be-knobbed aka outfitted with hardware, it was time to move on to the next part of the To-paint list: part of the wall and the door to the backyard.

Our laundry/mudroom was originally a small back porch. At some point in the life of our little old house it was closed in. Even later (or should that be 'more recently'?) it was fashioned into a full bathroom for the downstair's apartment, and when we moved in we turned it back into a laundry/mudroom since we needed a room for our washer and dryer. We also added a new full bath upstairs and kept part of the former downstair's bathroom as the world's smallest half bath, so we wouldn't end up missing on functioning bathrooms.
In total our little old house is a single-family home with 4 bedrooms and 2.5 baths over 2,184 sqft. Not so little, not so old, but ours all the same!
That the laundry-mudroom of our house was once part of the outside becomes super obvious when you see the part of the wall that still sports the exterior siding. After ripping out the old bathroom's tile and painting the new drywall with the same sweet yellow paint we used in the kitchen, the grey siding and door stuck out like a sore thumb.
Since I actually love the look of the siding - people keep putting paneled walls in all the time - and the reminder of what this area used to be before it was closed in, I decided to just paint both wall and door to make them tie into the rest of the room.
 So here I am, priming the wall (and ready to tackle the door next) after scrubbing everything down and giving it a quick sanding.
Even with just the part of the wall primed, the whole room is starting to look bigger and brighter (other than the window in the door there is no window in my laundry room). I figure by the time I'm done, the room will have about doubled in size ;o)

Our laundry/mudroom was originally a small back porch. At some point in the life of our little old house it was closed in. Even later (or should that be 'more recently'?) it was fashioned into a full bathroom for the downstair's apartment, and when we moved in we turned it back into a laundry/mudroom since we needed a room for our washer and dryer. We also added a new full bath upstairs and kept part of the former downstair's bathroom as the world's smallest half bath, so we wouldn't end up missing on functioning bathrooms.
In total our little old house is a single-family home with 4 bedrooms and 2.5 baths over 2,184 sqft. Not so little, not so old, but ours all the same!
That the laundry-mudroom of our house was once part of the outside becomes super obvious when you see the part of the wall that still sports the exterior siding. After ripping out the old bathroom's tile and painting the new drywall with the same sweet yellow paint we used in the kitchen, the grey siding and door stuck out like a sore thumb.
Since I actually love the look of the siding - people keep putting paneled walls in all the time - and the reminder of what this area used to be before it was closed in, I decided to just paint both wall and door to make them tie into the rest of the room.
Even with just the part of the wall primed, the whole room is starting to look bigger and brighter (other than the window in the door there is no window in my laundry room). I figure by the time I'm done, the room will have about doubled in size ;o)
Thursday, March 21, 2013
Mission Cabinets: Day 3
I'm telling you, watching HGTV is one of the biggest mistakes you can make when DIY around your house.
New kitchen in 45 minutes? Check!
Entire house remodel in a weekend? Check!
In reality, everything takes just so much longer (*cough* staircase .... *cough-cough*) and that discrepancy between your HGTV experience and real life can sometimes be overwhelmingly frustrating.
Anyways, I finally got to paint the cabinets a clean, fresh, bright glossy white!

It's nothing really to write home about - no fancy-schmancy design fit for a magazine - but it makes our small laundry-mudroom look so much lighter and feel so much bigger already - something this narrow passageway jam-packed with functions sorely needed.

Here's the other half of the room with the new counter top in place and painted the same glossy white as the cabinets. The utilities aren't pretty to look at and I have ideas to cover them up but I love-love-love our electric water heater (tankthetank.com) - endless hot hot water and a teeny footprint, for the win!

Ages ago I'd picked up some cabinet knobs at Michael's (the craft store), for no particular project really, and I thought they might work in a pinch here, so I marked the drill holes.

And drilled holes into the three cabinet doors. I don't know but there's little more anxiety-inducing than drilling into freshly painted (or new) cabinet doors ... eeep!

Aaaaaand up close and personal. And labeled, just in case you get confused and can't figure out whether to push or to pull to open the cabinet door ... heh.

Looking at my "Three of Three" for our laundry/mudroom
Laundry Room
1. paint (
2.
3. create a 'backsplash' (backing, curtain, something) to hide the utilities
I'm getting really really close to wrapping that room up soon!
Wednesday, March 20, 2013

Friday, March 15, 2013
Mission Cabinets: Day 2
New day, new luck!
On day 2 I started with vacuuming the laundry room to remove all of the sawdust I'd created by giving the doors and frame a thorough sanding.
Some people swear that using Deglosser is enough to get going on repainting but unfortunately I have seen Deglosser fail spectacularly, and while a short-cut would be nice, the past two years of DIY have taught me that there isn't one, really. At least not one that isn't also temporary.
I also added a make-shift countertop to this area holding our beer fridge by simply screwing a board I had on hand to the top. It fit perfectly, and will give me a place to put things when folding laundry. In a pinch it can even serve as a staging area for outdoor eating when we fire up the grill (Soon! Very soon!).

See the box on the wall? That's our electric tankless water heater, and it ROCKS! Not very pretty to look at (and I have ideas about covering up that area) but so much smaller than a standard water heater and endless hot hot water.
Then I finally broke out the primer!

Even with the splotchy-looking coat of primer on the doors and cabinet frame, our small laundry/mudroom is already looking brighter and much more open. The cabinets visually recede and are no longer "in yo face!" with their glossy oak-y-ness.

Getting there!
Thursday, March 14, 2013
Mission Cabinets: Day 1
Our Little Old House had been divided up into a duplex - one apartment downstairs, the other upstairs - and when we bought it, part of our big renovation plan was to return it to its original lay-out as a single family home.
We even went one step further and tore out both existing kitchens, replacing one with a brand-new kitchen from IKEA and the other one with a master bath. Neither kitchen was original to the house, both were gross, and so we didn't shed a tear when we said good-bye to them.
We did, however, save two old kitchen cabinets in the process, one of which we installed in the laundry room for storage (read about it here).

Did you read that post about the laundry room and how we installed the cabinets above the washer and dryer?
Yes?
Did you notice how I talked about the "next step" being paint?
That was in May 2011!
HOLY COW!
TWO years ago I was talking about how next thing I was going to paint those cabinets.
Ahem ... guess something important came up.
Yeah ..or I get sidetracked ... a lot.
I finally got around to painting the cabinets though as part of my "three of three" plan but since DIY and blogging isn't actually what I do for a living, I had to space it out over three days (with a weekend out of town in the middle to boot).
Day 1 of "Mission Cabinets" saw me prepping the area with drop cloths on the floor and old towels on the washer and newly refinished dryer .

Then I removed the doors. Those cabinet door hinges are actually pretty neat and very different from all the other hinges in the house. They sort of clamp onto the cabinet frame and are held in place by one single screw, so taking them down was easy-peasy.
With the cabinet's insides bared to the world, I also realized that there really isn't much rhyme or reason to what and how things are arranged inside the cabinet. It's a random collection of bits and bops (vases, light bulbs, paint testers, etc.).
Time (or opportunity) for some spring cleaning and reorganization, I guess!

The doors and cabinet frame are solid wood, stained and sealed with glossy poly, I believe, so first I had to sand them to make sure the paint would stick for any length of time. Usually just roughing it up a bit is enough, but here the sanding took much longer than expected, interrupted with runs to the bus stop to pick up Little Man after school, drop-off and pick-up of Little Man for Karate class and a mad-dash over to Cub Scouts afterward. Then it was time for dinner and collapsing on the couch before crawling into bed.
Yeah, I love Mondays.
Tuesday, March 12, 2013
Staircase Challenge: This is not the staircase you're looking for
Whaaat?
No progress?
 Nope.
Nope.
None at all.
Instead we spent all weekend in Crystal River, snorkeling up to cuddly Manatees, exploring crystal-clear springs, boating through canals, discovering Native American burial and temple mounds, and eating delicious food at little hole-in-the-wall style restaurants.
Little Man, husband and I (and even the pupster who tagged along for the adventure) enjoyed ourselves a lot on our weekend away from home (and it sweetened the switch to Daylight Saving Time). Photo evidence will follow as soon as our underwater pictures are developed (Wish us luck they did turn out okay!).
Now we're back, and up and at'em, so stay tuned for some kind of project progress here at the Little Old House!
No progress?

None at all.
Instead we spent all weekend in Crystal River, snorkeling up to cuddly Manatees, exploring crystal-clear springs, boating through canals, discovering Native American burial and temple mounds, and eating delicious food at little hole-in-the-wall style restaurants.
Little Man, husband and I (and even the pupster who tagged along for the adventure) enjoyed ourselves a lot on our weekend away from home (and it sweetened the switch to Daylight Saving Time). Photo evidence will follow as soon as our underwater pictures are developed (Wish us luck they did turn out okay!).
Now we're back, and up and at'em, so stay tuned for some kind of project progress here at the Little Old House!
Thursday, March 7, 2013
Three of Three: Laundry Room
In January I talked about "The List" and how I'd been trying to nail the list for each room down to three main projects in order to "git'er done" (refresh your memory here). Here are my "Three of Three" for the Laundry Room

[My little laundry nook in the mudroon]
1. paint (cabinets, tabletop and part wall)
2. install door knobs
3. create a 'backsplash' (backing, curtain, something) to hide the utilities
Starting with project #1 - paint, I decides to add our dryer to the list of items to paint. You see we have had this Kenmore dryer for almost 10 years now (no kidding!) and except for having to replace a broken belt once, this one is still going strong. We got it when Little Man was a baby, and I pretty much run it every other day, sometimes twice a day, or if I have procrastinated on laundry long enough, do a marathon with 4-5 loads until bedtime rolls around. So ...still no need to replace the washer or the dryer, but because they'd been sitting on a half-enclosed backporch while we were still renting, the elements had gotten to them and done a number on our dryer. It had rusty spots on the top, along the edges and around the handle, and it wasn't pretty.

I used "The must for rust" rust remover from Krud Kutter to combat the rust. I must admit this stuff gets me all giddy. You can literally "watch" the rust vanishing. It's pretty neat! I applied it as per instructions, dancing on the spot until all rust was gone.
No need to fear for your hands either - no breaking out in angry rashes, hives or chemical burns when touching the solution. Like I said, very neat stuff.
No need to fear for your hands either - no breaking out in angry rashes, hives or chemical burns when touching the solution. Like I said, very neat stuff.

Once the rust remover had done its magic, I grabbed the sander and sanded off any flaky paint and gave the dryer a good cleaning to boot.

Then it was time for Rustoleum's Appliance Epoxy. I made sure to apply the spray paint in nice even, thin layers and kept the door to the backyard wide open, despite the freezing weather outside ...brrrr! but nothing beats proper ventilation. I also used my handy-dandy face mask because nothing is as weird as sticky nostrils because you have been inhaling spray paint. Not like I would know about that ....ahem.

Tada! Looking good, dryer baby! The paint goes on like a spray paint but it seems to be thicker, and takes longer to dry (it stayed tacky for quite a while). I made sure I finished all laundry for the next 4-5 days before tackling this project so the new coat of paint has a chance to dry and cure undisturbed (and nobody has to go naked at the Little Old House because the laundry didn't get done. It's too cold for shenanigans like that!).

Looking brand-new - not fancy, but brand-new! The cabinets will be next so stay tuned for more Laundry room goodness!
Wednesday, March 6, 2013

Tuesday, March 5, 2013
Staircase Challenge: Getting closer
Knock-Knock!
Who's there?
Orange?
Orange who?
Orange you glad I only post once a week about that staircase at the Little Old House?
Another week has zipped by and here we are again, time to update all y'all on the progress on project "staircase" at the Little Old House.

The weather was PERFECT for stripping paint with the heatgun. Within a week we went from a balmy high 70s to freezing high 30s. Yep, you heard that right, a 40 degrees temperature drop within a week! Brrrrrr!
The heat gun, however, kept me nice and toasty for a couple of hours.

After that it's sanding, priming and finally, finally, paint! I know without this challenge that Kit from "DIY Diva" and Sarah from "The Ugly Duckling House" cooked up in - can you believe it?! - January I'd have happily procrastinated on getting started on my staircase and would have never been so close to checking off this particular project from the big list.
Or have burns on my hands.
And scrapes from trying to fit my hand and the scraper into the area where two parts of the railing overlap.
Who's there?
Orange?
Orange who?
Orange you glad I only post once a week about that staircase at the Little Old House?
Another week has zipped by and here we are again, time to update all y'all on the progress on project "staircase" at the Little Old House.

The weather was PERFECT for stripping paint with the heatgun. Within a week we went from a balmy high 70s to freezing high 30s. Yep, you heard that right, a 40 degrees temperature drop within a week! Brrrrrr!
The heat gun, however, kept me nice and toasty for a couple of hours.
And yes, there is progress! I managed to strip more spindles, and the finishing line is in sight. Only 11 more spindles to go! Hallelujah! Two thirds done (with the stripping)!

After that it's sanding, priming and finally, finally, paint! I know without this challenge that Kit from "DIY Diva" and Sarah from "The Ugly Duckling House" cooked up in - can you believe it?! - January I'd have happily procrastinated on getting started on my staircase and would have never been so close to checking off this particular project from the big list.
Or have burns on my hands.
And scrapes from trying to fit my hand and the scraper into the area where two parts of the railing overlap.
Don't forget to visit the other duelists and their mighty fine looking stair cases!
Monday, March 4, 2013
Nom Nom Nom: Jamaican Curry Shrimp

Our awesome neighborhood comes with a variety of little social groups including a cooking club, the "Springfield Skillet." Once a month neighbors get together cooking up a storm based on a monthly theme and have a great time, enjoying food and company. While I can't make this month's meeting I did some recipe browsing because it's a beautiful opportunity to discover and add a new favorite to your staple dishes. This month's theme is "Jamaican" brought to you by the letter "J." My neighbor Heather found this great Jamaican cooking website on the internet "Cook Like A Jamaican", and their Curry shrimp dish definitely caught my eye.
Ingredients:
- 1 bag of shrimp (peeled and deveined)
- 1 red pepper, sliced
- 1 green pepper, sliced
- 1 small onion, sliced
- 1 tomato, diced
- 1 tsp tomato paste
- 1 1/2 tsp curry powder
- 1/2 can of coconut milk(unsweetened!)
- pepper, salt, garlic, butter
The husband and I finished the entire pan (Little Man is no big fan of shrimp, so he had his beloved fish stick sandwich), and he agreed that this recipe is definitely a keeper. Yum!
Friday, March 1, 2013
Painting Me A Yard
Being so up close and personal with my staircase, hours at a time over weeks, and thanks to sudden cold snaps indicating that spring hasn't officially arrived yet, I'm more in the mood for digging in my yard, planting all kinds of cool, interesting and exotic plants and generally turning my weedy back yard into a beautiful green oasis behind my house (that, and the front yard, of course).
Alas, for the time being this will have to wait; at least until after stripping the last spindle and, you know, maybe painting the house first?
BUT ... I just couldn't help think about it, pin plenty of pretty pictures on pinterest (here, if you want to see what catches my eye) and even check out some books on landscaping small yards from the public library.
 Our back yard is small, and about half of it is taken up by the above ground pool we need to keep us alive and Little Man and friends entertained during the sweltering hot Florida summers. Like ceiling fans, it's not a pretty asset but a necessary one. Anyways, small yard. It's plenty for us and the pup to romp around, have barbecues, grow some veggies, keep some bees, and more while not overwhelming us in sheer size when it comes to maintenance.
 In order to just fiddle and tweak a few ideas I'd seen on the internet and liked very much, I sketched in the fixed points in our yard on a piece of paper:


We are expecting yet another cold snap this weekend with temperatures dipping down as low as 37F at night (Brrrrr ... cold) so I'll spend the next evenings doodling and driving the husband insane with all kinds of crazy new ideas I'll bring home from the Home & Patio Show on Saturday. What are your plans for the weekend? Doing anything fun?
Alas, for the time being this will have to wait; at least until after stripping the last spindle and, you know, maybe painting the house first?
BUT ... I just couldn't help think about it, pin plenty of pretty pictures on pinterest (here, if you want to see what catches my eye) and even check out some books on landscaping small yards from the public library.


- the back door stoop and steps
- the pool
- the ac compressors
- the steps to the shed

Then I slid that sketch into a sheet protector aaaaaand .... grabbed some dry-erase markers so I could doodle and draw and experiment with shapes to my heart's delight without having to re-draw everything!

If a design doodle didn't turn out right, I could just erase it without having to draw up a new sketch - so much easier than digging up that yard again!

Here are a few designs that turned out not looking shabby at all. In this one, for example, I enlarged the current patio to include the area along the house all the way to the side entrance and added a garden swing like this one here in the corner.

In this design I went a bit crazy with the whole circle lawn idea. It's better suited for a bigger yard than mine. It did sound like a good idea when I first thought about it ...

The husband is not a big fan of checker board lawns but I'm still digging them a lot (maybe because I'm the one mowing the current lawn). Maybe it's a bit too contemporary for our Little Old House though. The dotted areas are gravel and the boat-shapes are stand-ins for hammocks. We don't have large trees for that purpose but plugging some sturdy 6x6 or even railroad ties into the corner and adding hooks would work just as well.

We are expecting yet another cold snap this weekend with temperatures dipping down as low as 37F at night (Brrrrr ... cold) so I'll spend the next evenings doodling and driving the husband insane with all kinds of crazy new ideas I'll bring home from the Home & Patio Show on Saturday. What are your plans for the weekend? Doing anything fun?
Subscribe to:
Posts (Atom)