Monday, October 17, 2016

Falling for Fall Colors


Among all the craptastic things Hurricane Matthew brought with him (fortunately not for us; we just had to survive five days without electricity), fall was the best. The days following the big storm have simply been beautiful: bright blue skies, lovely breezes, lower humidity, and - best of all - cool nights. Fall in Florida!


That's the time of the year I think my house loves best - its colors just belong into this season. Earthy fall colors to celebrate the Craftsman detail and lines on our house, warm and inviting. Picking those colors were a decision we did not regret one bit!

This past weekend I tackled a project which was delayed by Hurricane Matthew: painting the front door and touching up the paint job in those areas that were dedicated to our accent color (chocolate brown so we're looking at you crag stones and top rails).


After five years our front door is now a rich chocolate brown, and gosh, do I love it! It's one of those little projects you wish you'd tackled sooner. We loved the red, but it just didn't -reeeeally- go with the new color scheme (but life got so crazy it was one of those things that was easily pushed waaaaaay to the back burner).
An hour later, this is what the front looked like. It seriously reminds me of a chocolate bar, and it's just as delicious! Best husband ever doesn't quite get my excitement, but he does love it too.


And because we're slowly but surely approaching Halloween the front wreath got a little make-over too. Two sprigs of fake flowers from the dollar store, a pack of plastic eye balls, and some hot glue! Voila! Peekaboo, I We see you!

Monday, June 13, 2016

Steampunkin'

And we're back with a little update! Steampunk and industrial chic have been around as home decorating trends for a while now, and because we have pipe (shelf) dreams for our library due to the fact that simple wooden book shelves simply cannot handle our massive load of books I hopped onto the train to Steampunk Town and updated our lighting.

This is Florida and so getting rid of the ceiling fan was unfortunately not an option. That little bit of air movement makes such a difference 90% of the year Ill happily put up with its slightly tacky look. An easy and affordable update to any ceiling fan light, however, is the addition of better looking shades. Both, the orange and the blue box offer a wide variety of smaller shades you could use but I went and ordered light cages through Amazon.com (here). I only needed three but ordering the set of four only sets you back $20 (instead of $25 for three). Now I have a spare ...or an extra for another project!


First step is to unscrew your existing lamp shades. 
(Make sure the light is turned off and maybe even go so far as to turn off the electricity entirely. I only turned the lights back on for photos, not while I was working on it. Be SAFE. Always!)
Next you realize that your cage is too large to screw directly to the light bulb socket. 
And of course it appears to be too narrow to fit over the entire socket. 
Not so fast!


If you unscrew the screws on the neck of the cage and bend it apart ever so gently, it will actually snap right over the wide part and clamp onto it well enough that you don't have to worry about anything.
Crisis averted!


Rinse and repeat three times, and then stand back and admire your handiwork! Careful, this is much brighter than before which is great for the room but not so great for looking directly at it.
Even though it was bright I did notice that the light bulb sockets were a bright white sticking out like a sore thumb so I simply painted them with a bit of black acrylic craft paint.


Fabulous! I really like it!
And what I really like is that it is quirky and farm-y and industrial-y and not frilly and girly.
So the kitchen sink light got a quick update as well, courtesy of the blue box store and a sale on their cage light shades (On sale right now for $15).

Tada!

Wednesday, March 2, 2016

Coffeebar Wunderbar!

Here at the Little Old House we are slooooowly getting back into the DIY groove, and one of the smaller projects with mega effect was what we did to our kitchen.

Ever since we moved in I ..well, we had been waffling over what type of seating arrangement to add to our little kitchen. Banquets were all the rage back then, and they are quite historically correct for a house like ours but our little Duckling house lacked the cute little nook that was just begging to be turned into a breakfast nook.

You see, our kitchen is a square. A small square. Our original plans of opening up the one window and turning that into a French door opening up to a small deck in the backyard had been dashed before we even started with our renovation. Copper thieves had torn apart our AC compressors and the new units had to follow current code which placed them right where we'd dreamed up our deck.

Oh well ...

Anyways, back to seating arrangements. I'm not crazy about islands, especially when they end up sitting smackdab in the middle of a line of traffic, and I was also not crazy about busting out part of the (load-bearing) wall for an open floor plan. I like my kitchen separate from the rest of the public living space, Yeah, I know I'm odd.

We went back and forth between a breakfast corner arrangement and a breakfast bar, and you know what? At some point, the breakfast bar won. Prooobably the last time I ran out of room for munchies and drinks on the diningroom buffet and wished I had more counter space in the kitchen.

So we ordered heavy duty shelf brackets from Rockler and a butcher block counter top and went to town!


Best husband ever and Little Man did most of the work while I supervised (and kept all the pets from photobombing the production and interfering with the work). Tough job but somebody's got to do it!


Yes, two levels. The husband takes measuring and leveling much more serious than I do which is why I'm the creative brain and he gets to lead the execution of plans that require measuring and leveling. We make an awesome team!


Here it is, our new breakfast bar, waiting patiently to be installed. This baby is seriously heavy.


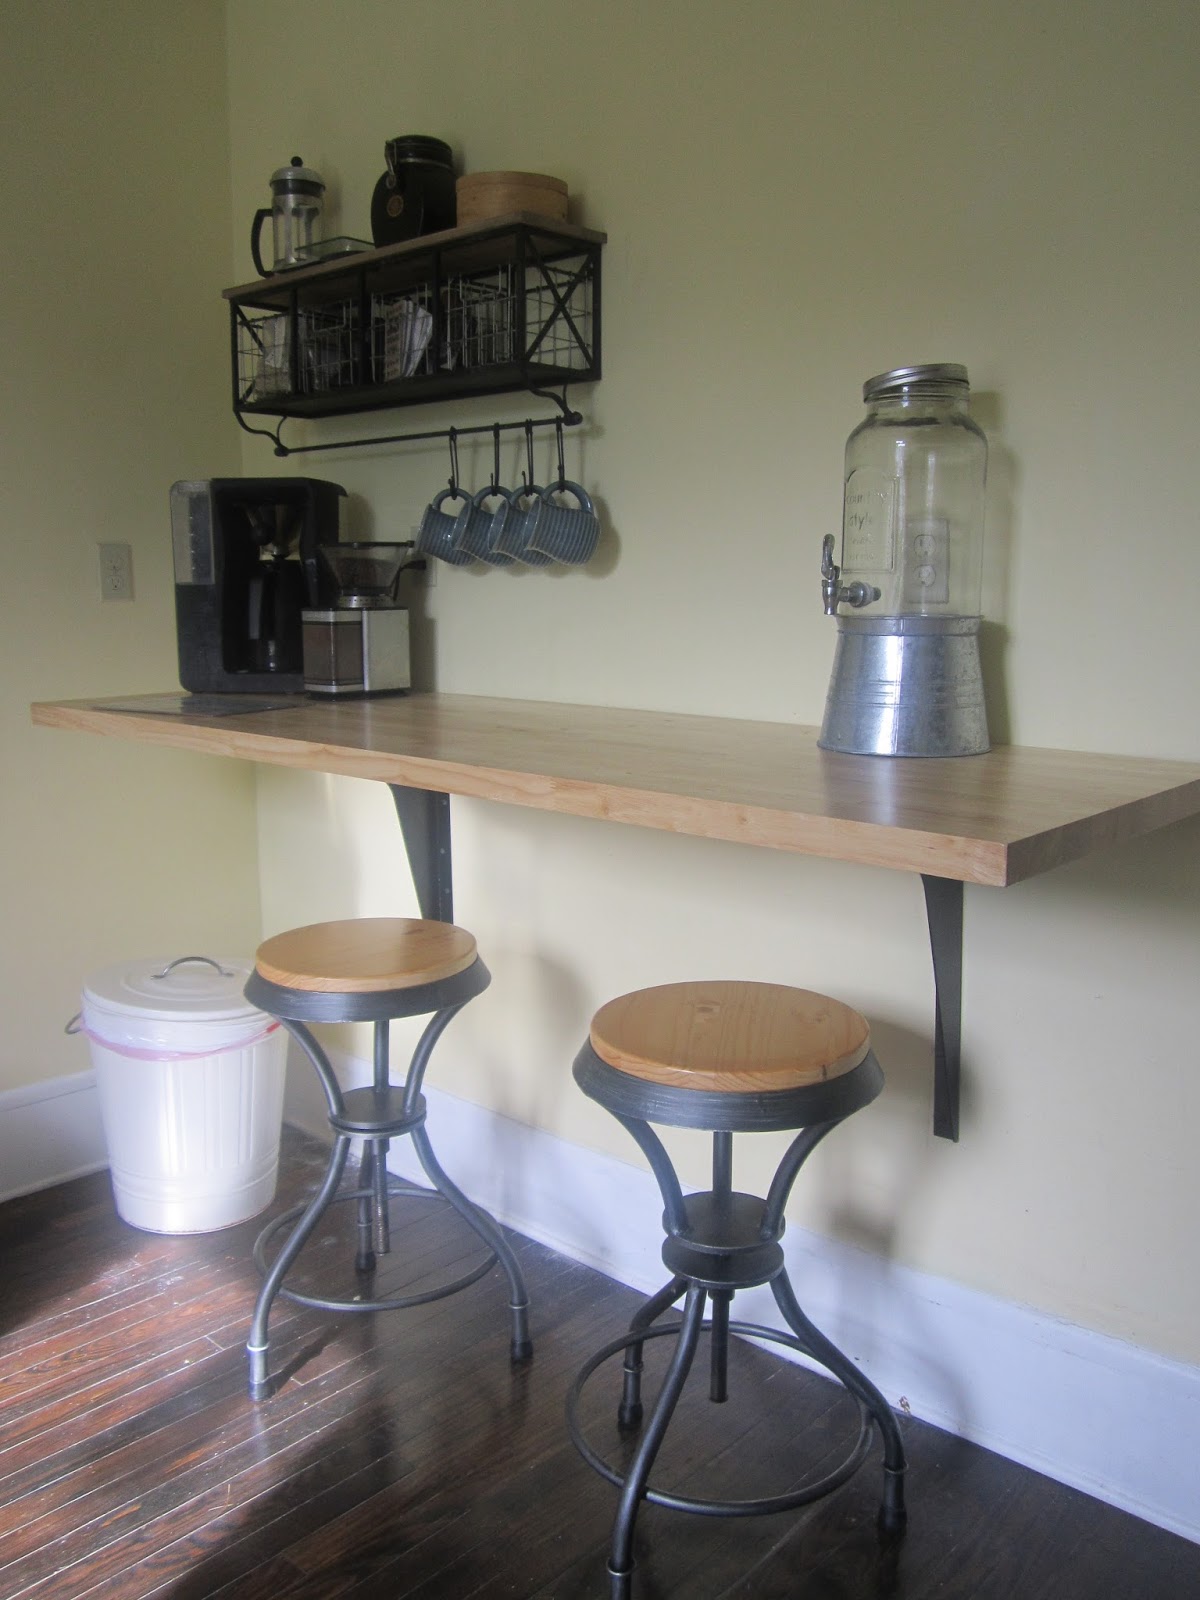
Ta-da! Here it is, our new breakfast bar complete with husband's coffee station. The chairs I picked up ages ago (Two years? maybe even longer ago than that) through Amazon, and aside from having to add rubber feet to keep the hard plastic covers on the feet from scratching the hardwood floors we love them for their sturdiness and industrial 'chic.'


We LOVE our new breakfast bar. This thing was the BEST feature we have added to the kitchen by far. 
Spot to eat breakfast in the morning? Check!
Cup of Coffee/tea and a magazine/newspaper in the afternoon? Check!
Spot for Homework? Check!
More counter space for food prep? Check!
Serving space for parties? Check!
Space for folding laundry? Check!


Why again did we wait this long? Seriously.

Wednesday, February 10, 2016

Never Before Seen Footage

I'm going to squeak in one old blog post before the end of the week, and one with never before seen footage to boot!

You see, I inherited this fireplace mantle from our next door neighbor Mrs. Harriett before she moved into an assisted living facility. We so miss this sweet spunky lady and this little treasure she gifted us with brings back very fond memories of and with her, but we do love our new neighbor!

Long story short, the old computer died and with it the pictures that showed the husband and I spending days stripping this beautiful late 1800s fireplace mantle with the heat gun from layers of mostly bright frog green paint were lost. There is some lovely detailing on the mantle along with some beautiful wood grain that really deserves better pictures one of these days!

Anyways, we put in a lot of time cleaning up this baby and in the end it looked like this in its new spot in our master bedroom. It provides a nice counter 'weight' to our bed directly opposite and a simply great focal point on a wall that was simply plain boring aside from the batten and board treatment I'd given it before we moved in.


It's just a mantle, no actual fireplace, so we covered the opening of the firebox with a panel that we painted black for now. Maybe we'll add shelves for candles or something like that. Later.
However, with the black panel in place it did all look a bit too stark, and the black panel to wood ratio was off. Of course, since there is usually a band of tile surrounding the fire box!


So I went to the orange box and poked around the rile section for a bit until I scored a couple of sheets of this variegated cream and latte mosaic tile. At just $5 a sheet these were a steal, very much in keeping with the type of glazed tile you would see in an original, and fit the overall color scheme of our bedroom. Neat! I also grabbed two small buckets of pre-mixed adhesive & grout in a soft almond color, and went home.


This was an incredibly quick and easy fix. I cut the mosaic tile sheet with a pair of household scissors into wide strips, then spread some adhesive, placed the tile, and so slowly worked my way around the opening of the former firebox.

Oh look! You can catch a glimpse of "The Green" - that's the color the whole fireplace mantle was painted. It was very bright ...and very very green.


After letting it dry, I used the same stuff for grout, and then touched up the paint along the edge where board and tile meet. Done!


Thursday, January 7, 2016

And once more: Happy New Year


Frankly, I just cannot believe it has been a year since I last posted here.
Seriously.
A whole year.
Time really does fly.

Life at  this little old house is buzzing along happily amidst bees and chicken and cats and dogs. While 2015 has not been the grandest of years, we were blessed for the most part. Little Man went off to middle school and is now taller than his mom. His mom did a whole lot of other, non-house crafts, and the Best husband got some much needed quality time in lazying about on the weekends reading and smoking a pipe on the porch rather than checking off items on the honey-do list.

After all this time just doing house and house blog stuff, we apparently needed a year off, both from house projects and blogging about it. And looking at my blog reading list we were in good company. Great company even, seeing that YHL pulled the plug on theirs.
Anyways, long story short, a day before Christmas the Best Husband and I whipped together a small project in the kitchen that we'd been stewing over for -years-. It came together great, we love it, and it has made a -huge- difference in how we use our kitchen. You know, the kind of little update that makes you go "Why the heck didn't we do this sooner?!"

So, I guess we got the bug again. There will be projects again. A few, every now and then, and, thanks to a new camera that arrived today, even blog posts with pictures.

I promise you at least DOUBLE what I posted last year.
Make that triple.
Ha!

Much love,
-M.

Sunday, December 21, 2014

Almost There!

Just a day before my parents arrived for their vacation with us we had reached the following stage (of completion):


Also known as "AD" / "Almost Done" we were almost done with painting. Both body colors were up, and all that is left to do is fine-tuning, trim work, and the porch floor.


That will most likely have to wait until after the holidays provided the weather plays along with days that are nice and sunny and not too cold.


The color?
We love it!
We are ecstatic that it turned out almost better than imagined and envisioned here.


Almost there!

After the holidays we will be back with more exterior goodness, but for now, this will have to do (and it does because, omigod, it's so much better than the flaky peeling blue and grey mess from before).


Monday, December 15, 2014

Color Going Up!

With my parents' impending arrival we were buckling down for good on the last free weekend.
Nothing, absolutely nothing is as inspiring and motivating as your parents coming for a visit. After all, you want to show them a little bit of progress, and we'd been talking long enough about painting the exterior so we wanted that baby done (or as much done as the weather allowed).

While it rained on and off on several days throughout the past couple of weeks, that last weekend was just brilliant, despite a weather forecast that stated the complete opposite.

So we decided to get at least the front painted.
No kidding.
In the beginning we had vowed not to start with the front because we had seen the occasional house where -just- the front had been painted while the rest lingered unfinished and forgotten. It's so easy to get sidetracked, so easy to be swept away by Life. We didn't want to risk that. Since we had hired help (Thanks, Mark!) coming to our rescue, however, we thought we were pretty safe in that we would get all the house painted at some point this year.

So here we go, starting with the front.
We had
scraped
sanded
repaired
and
primed
and now, finally, we got to apply paint!


Here's yours truly atop the front porch roof getting started on painting the upstair's Sherwin-Williams' Oakmoss, a dark, sage-y green, color matched in Benjamin Moore paint.


Yes, I'm crazy excited about painting and seeing how lovely the color is turning out. The husband was mighty proud of me of braving the heights - I usually refuse to work on anything higher than 10ft up, but I felt pretty safe on the big ol' porch roof; it was almost like working on solid ground.

While I was up there, the husband and Little Man were down below.


Since you are supposed to paint 'top down' here's what it looked like after the first of two coats of Oak Moss upstairs:


Isn't it lovely?
Isn't the crisp contrast between the green and the creamy antique white just absolutely delicious?
No, the window frames weren't yet painted - good catch!

The order of painting is
1. Top down (start at the top and work your way down)
2. Details and trim last


While upstairs was drying and putting to use every bit of daylight we tackled the downstairs, first painting the ceiling Antique White, then rolling on the first coat of "Bosc Pear" onto the walls.

The change is drastic, almost more so downstairs than upstairs because Bosc Pear is such a warm, rich color - a huge change from the cool pale grey-blue we used to see.

And then the sun went down and night made it hard to see what we were painting so we called it a day!

The next day we would return for Coat II, paying no mind to our aching arms and backs and feet!

Friday, December 12, 2014

Elfing Around

December arrived, and with it our Elf on the Shelf, "Barrigade." This is our third year celebrating the holiday season with the daily antics of our silly elf, and just as last year I'm wondering if this will be our last. Little Man is now 11 years old and will be headed for Middle School in the summer, and well, how long can you actually keep on believing in a world that bares it all all the time?

So far, so good. There was some empirical testing (he secretly touched the elf only to find out he was still moving through the house and committing his silly pranks at night - results of this test are, as of yet, inconclusive ... heh. Besides, we 'believe' that if you stop believing in Santa or, in my German case, the Christkind, you will only receive socks and underwear as presents) but he was and is still pretty excited to find the elf in the morning.

Husband and I enjoy coming up with crazy ideas to make finding our little elf fun to start off the day. Mind you, we have never used him as a parenting tool and/or in-house creepy stalker secret agent - we have fun with it, and leave the rest to Little Man's imagination.

So here are a few shots of our elf from this year - more to follow! Enjoy!


Rough trip back from the North Pole 
or feeling sympathetic to Little Man's minor foot surgery?


Playing Little Man's least favorite game with Enderman


Worst cookies ever - Do not feed (milkbones) to Santa!


Catching up on the chocolate advent calendar for Little Man - yes, he stole a piece of chocolate when Little Man wasn't up-to-date on opening his advent calendar. Bad elf!

Wednesday, December 10, 2014

White going up!

Much to this short person's frustration, you star painting from the top down. That's the part I cannot reach and where I need the help of strong men who aren't afraid to, you know, wield paint sprayers and rollers at a lofty 20-something feet height and can physically maneuver that beast of a ladder I bought for this purpose.
Me?
I max out at 12' which is a whopping 10' higher now than before we bought our little old house.
Seriously.
I don't do heights very well.
At least not on ladders.

Anyways, since we decided to get rid of the ugly dark trim, Sherwin Williams' "Antique White" colormatched to Ben Moore Exterior paint was the first color to go up.


It's a sweet, soft creamy white - almost beige looking against a bright decorator's white - but it goes on beautifully and will provide just the right amount of clean contrast between our two body colors. Trust me, I know.
I tried.
The first white I'd chosen was just too bright so I mixed my own personal 'right' kind of color which turned out to be a dead match for "Antique White."


See?
Nice and creamy.


It even looked kind of cute with the pale blue-grey that was already on the house ... and for a teeny tiny moment I was torn between continuing with our planned color scheme and just keeping the blue grey. I could see it working with a sea-glass colored porch ceiling, for example.
Very beachy.
Then the sun came out and we went blind.
It was so bright, we felt like vampires skittering into the shelter of the shadows cast by the trees, hiding from the searing burn of the sunlight reflecting off the house.

That made the decision really easy: Oakmoss and Bosc Pear it is!

Monday, December 8, 2014

Primer!

Slowly but surely we are getting closer to color photos! I know this is a rather slo-mo type of reveal but it was a slo-mo kind of project, and that's not even counting the time it took us to figure out the color scheme in the first place (read about it here, and here, and here ...oh, and here).

Unbelievable but true, it took us two whole years to really decide on our exterior paint project (so massive KUDOS to you if you can make it happen faster than that).

After two years of waffling over the 'right' color, squirreling money away, doing research first on professional painters and how much it would cost to have the house painted by someone else, then how to paint it ourselves to save money, and then, finally, buckling down and getting started FOR REAL, we and our little old house were finally (three weeks ago, to be honest) more than ready for

PRIMER!


I know. How exciting!
Well, it was for us.
Seeing the white (for downstairs) and dark grey (for upstairs) primer go up finally made things real for us. We were actually going to get our house painted.
This year!
No more peeling paint.
No more sad dingy blue grey.

Even with just the white primer it looked SO MUCH better already.


I realize I'm an evil tease dragging this process out over so many short posts but this comes preeeeetty close to how 'fast' we progressed, and I knew we wouldn't get anything done during my parents' visit over Thanksgiving.
Bear with me - it'll be worth it (at least that's what we think - we loooove the end product)!

Wednesday, December 3, 2014

A Side Job

Owning a house always comes with a learning curve. Depending on your budget for repairs and updates it is more or less steep.
In our case, and especially in case of huge project such as an exterior paint job, the learning curve was pretty daring and came with new experiences.

For example: siding repairs.


Termites, bad prep work committed by former owners, and weather had wrought quite a number on some of the boards of our wooden siding, and those had to be repaired one way or another.

I filed the paperwork for the Certificate of Appropriateness (COA) to make sure all our siding repairs were legit and sanctioned by our Historic Preservation Commission, picked up a couple of boards of bevelled pine siding matching our own at Carolina Lumber (nicest people ever!), and set the husband up with a couple of videos  and articles on This Old House on how to repair wood siding.


Like this video for example.

We started with a very simple spot - no piecing, no funny monkey business, just plain replacement of one board.


Well, our first trial run cost us three boards in the end since prying the old boards - even the old, rotted, broken one - was harder than we thought and it looked, and before we knew it we'd cracked a second one and a third. Oy! They always make it look so easy on TV!

Fortunately, after that things started looking up (it's like calibrating your feet for a new car and a more touchy pair of brakes), and we replaced a few other spots with no problem at all.
It is rather straightforward process, after all: pry out or cut out broken piece, measure new piece in place, cut, nail, caulk seams. Done!


That being said, when the husband came to fix the siding on the upstairs addition (the area containing our dressing room and master bath) things got difficult again, mainly because a previous owner had used and patched with -three- different types of siding.


In order to make up for the discrepancies in board widths and the resulting gaps, we had to remove quite a few boards - more than we'd originally planned.

That required another trip to Carolina Lumber (not really a hardship at all - they are very close by and really nice and helpful, not to mention surprisingly affordable) and more siding boards. A small blow to our tight budget for our exterior job but no budget buster (unless we hit another crazy snag like this).


The husband spent an entire weekend trying to match things up, fitting boards, measuring, and cutting perched on the roof of our little downstairs (enclosed) porch.
Steep learning curve, I'm telling you! There were quite a few choice words directed at tools and planks, but in the end, he figured things out and made me a mighty proud wife.

Nailed it!


Friday, November 28, 2014

Prep Party Part II

Sad but true we needed two whole weekends - Saturday and Sunday - from Sun up to Sun down to get to the next step in our preparation for the exterior paint job.
Let's break it down again:

1. Wash
2. Scrape
3. Sand
4. Repair
5. Prime
6. Caulk
7. Paint

We only feathered out old patches of paint that wouldn't come loose on the first floor in high traffic areas. We decided early on that we would not try and go for a 'smooth as a bay's behind' look - our house was a 100 years old and we were proud of its marks that tell its story, and we wanted to enjoy the new look in this decade.
So no infra-red paint remover tool for us, no chemical strippers, no heat gun. Just pure elbow grease.
Even so we spent an entire weekend feathering paint and smoothing out the couple of boards that took the hit when we learned to pick the right pressure for the power washer.


 We did wear proper protective face masks to keep from breathing in harmful dust, and we covered the ground with tarps to contain the mess as much as possible.


 In the end we spent -three- whole weekends preparing the house to the point where we could prime. Hallelujah!

Here it is, moments before the paint sprayer dipped into the primer for the first time! We taped off the 'new' aluminium windows only because they are smaller, with narrower trim and as such more prone to over spray.

Other than that, it was "Fire at will!"


Wednesday, November 26, 2014

Prep Party Part I

Nothing provides more motivation to "get'er done' than a visit from the parents.My parents hadn't visited us at our little old house in three years - health issues had thrown us a curve ball, and Germany -is- quite a bit away, and it's not a trip you take lightly, or on a weekend. Not if you don't own your own jet. Which we don't.

So, three years since their last time, and of course we wanted to show some progress in regard to all our grand home improvements plans.
And the biggest project we could possible force into a tight deadline?
Painting the exterior, of course!


We got a helping hand from my co-worker Mose who provided back-up and equipment to power wash our little old house. It helped remove some of the loose paint but really only aimed at washing off the grime and funk of decades. You have to be careful with the old siding since most commercial grade power washers are too strong and cause more damage than good.
You can literally rip your siding planks to shreds washing out the soft wood pulp between the grain. Ugh!


We gave the house a good scrubbing ending up incredibly filthy ourselves. Man! There's nothing that gets you wetter and dirtier than power washing anything. And don't you dare consider power washing yourself - takes the skin right off! Not a good thing!
Here's the husband scrubbing down the stairs. The poncho is really just for show - he was just as dirty and wet as me who skipped the protective gear!


Afterward we scraped.
And scraped.
And scraped.
There was quite a bit of loose paint that had to be removed, carefully, catching and discarding it in bags to contain any possible lead.


More scraping along the front elevation of our little old house. The front, facing mostly north, wasn't bad at all. Here the peeling paint was minimal, really, compared to the rest of the house and especially the western elevation. That one was a -real- mess!
At the front most of the failing paint was along the window frames due to ancient paint build-up.


Little Man was a great big helper, and really enjoyed getting to hang out on the roof of the porch -with- permission from the parental units.
We even ate lunch picnic style out here because the weather was fantabulous and the view is really nice.

After lunch there was more scraping.
And more scraping.
And some more after that.
There was a lot of peeling paint caused mostly where some bright mind had decided to caulk the underside of the siding. That inhibits an old house's natural ability (and need) to breathe, and in the end the moisture that collects there causes the paint to fail. Geee, they could have saved so much money on caulk and time -and- gotten a longer lasting paint job out of it, but no.

We spent a lot of time prying old caulk out of every nook and cranny on the underside of the siding our house. As one contractor once explained to me: " Imagine pushing your house underneath a waterfall. That's how you want to caulk'em."

And caulk we did ... two weekends later!