Thursday, June 30, 2011

Getting your stencil on

With husband working late nights and the Little Man in bed, it was as good a time to get started on stenciling the floor in the dressing room. Here it is, in all its baseboard-removed, grey-painted glory.

[Before ... or is it in-progress?]

I know. It's not really all that much to look at. For now. I armed myself with all the things I'd need, brought a drink and a boombox with some music along and made myself at home.


[Some supplies: Pencil, paper towels, foam roller, stencil]

Not pictured are paint, re-positionable spray glue and a ruler. The hardest thing is usually to get started for good. Where to start? Knowing that none of the rooms in our house are really truly square, starting in a corner wasn't really an option (and isn't something you should really ever consider). If you approach stenciling like tiling, you should find the true center of the room and orientate your stencil this way but I felt that centering the design on the doorway to the bathroom would be the right way to go.


Here it is, the beautiful "Traditional Tin Tile" stencil in its starting position. I decided to re-read the stencil instructions one more time and then poured myself some paint in the small paint pan that came with the high density foam roller.

Stenciling requires many passes with an almost dry brush. That way you won't squoosh (yes, that's a word, just like "Skloosh" is a ride at an amusement park in PA) any excess paint underneath the stencil and ruin the clean lines. So every time you pick up paint with your roller, you roll off as much as possible and add a quick swipe over a piece of paper towel to be safe.


[Here I go a-stenciling!]


[In progress: 3 down, many more to go!]

I'm glad I only decided to stencil the floor in a small room. It's not hard work but definitely falls into the category of the more tedious projects (spray glue, position stencil, roll on paint, repeat). Now I know why Stencilease offers bigger stencils of the same pattern with more repeats to speed up the process!

[In progress: Loving it!]

It's looking great so far! Can't wait to show the husband!

Wednesday, June 29, 2011

So floored - The Dressing Room Saga continues

We're making steady progress on our dressing room and soon the days that our clothes are stashed in baskets and suitcases or rumpled on the floor are coming to an end. I'm counting - trust me. After finishing two floor-to-ceiling shelving units, the floor had to be next.

If you've been following our adventures for a while you might remember my flooring dilemma described here and my lack of desire to commit to any kind of interim solution that didn't win my heart. Husband and I agreed that right now, a painted floor sounded like a really good idea. After looking at a couple of different design options, we found a stencil at Stencilease that we both really really liked
[source: Stencilease "Traditional Tin Tile"]

Shopping at Stencilease was joy: the ordering process was simple and straightforward, there were no computer glitches and within just a few days (my order shipped promptly the next day) we were all set to get started on painting our floors.

I'd already used Bondo and wood filler on the bigger and smaller seams and irregularities and given the floor a quick sanding before priming it. No need to go overboard - it is a temporary solutions and we do like the rustic cottage charm of a more natural wooden floor.

[Floors all painted and ready for some special stencil love]

Since we're going to seal the floor after painting on the stencil we went with some left-over dark grey paint from the livingroom. This will fit in nicely with the dark grey tile we chose for the bathroom floors and help turn our dressing and bathroom part of our sweet master suite a cohesive unit.

I gave our floors a solid 24 hours to dry completely before embarking on the stencil adventure so stay tuned for part 2!

Tuesday, June 28, 2011

Hot Love!

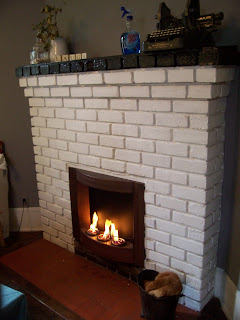
It was a lazy Sunday morning, spur-of-the-moment decision: we took the gel fireplace for a test drive! Not like the weather had taken a turn for the worse. It is Florida summer after all so it's hot and humid with temperatures that hardly constitute the need for a fireplace (unless you want to whip up a batch of indoor S'mores). We were just curious to see what our fireplace make-over would look like in action.

You can read more about our fireplace and related projects here, here and here.


The gel lights quickly so to keep from scorching your fingers using a long electric lighter or a long fire place match is kid of imperative. It crackles and pops and aside from an uncharacteristic sizzle every now and then, it does indeed sound like an actual wood burning fire.

[Ohhh, fire ....!]

It also generates a nice noticeable amount of heat and the dancing flames have the same hypnotic calming effect as any controlled fire I've ever seen. All in all we consider this "What if ..." project a real winner. For less than $100 and some elbow-grease we turned our wall'o brick into a cozy little wanna-be fireplace!

Loooove it!

Friday, June 24, 2011

Window to the world

Another day, another piece of trim. That's the life at the Darling Duckling. And while it is still one of the most rewarding projects (nothing beats the look of freshly painted crisp white trim), it continues to be the one I consider the most boring. It's three coats of white, for heaven's sake! Not to mention the tedious but oh so necessary prep work.

Oh well, I'm plodding along, tackling a bit of trim as often as I can muster the enthusiasm and don't get sidetracked by - Oh shiny! - more fun and exciting projects on the side.

A few days ago - before a "oh shiny" project won me over - I decided to - sigh - continue work on the library. This notion stems from the "finish a room" notion I described earlier this month. My original plan was to finish one room and then move on to the next. When I finished the halfbath downstairs, moving on to the library sounded like the next logical step (until we discovered we really were done living out of baskets and boxes and bumped up the priority for the dressing room a notch or two).

The library/study/man cave has a beautiful double window on the south west wall which makes this not overly large room bright and airy. After the old window unit on the left "walked away" during the break-in in December way before we closed on our house, it became apparent that the trim was in pretty rough shape. Deep gouges and rust stains showed where the old monster of an ac unit had sat, and the rest wasn't any prettier.

[Before: Pretty big window in all its dirty ram-shackled glory]

After removing 7 different sets of curtain and blind hardware (Wanna be a good tenant? Remove any frakkin' curtain and/or blind hard ware not in use ...sheeesh) and a good cleaning, I scraped loose paint like there's no tomorrow.

[Paint scraping in progress]

While so far every scraping has revealed layers of neutral off-white paint over the original varnished dark wood, this window held quite a surprise when the scraping revealed a beautiful shade of aqua. What a great color!


[Ready for some paint!]

The deep gouges required several fillings with wood filler followed by a gentle sanding and the finally priming. Several hours later the double window was finally ready for paint and I ...? Well, I was pretty pooped and didn't feel like painting another 2 coats of white before dinner. So I called it a day.

I did, however, hang the curtains because I wanted to see what the end result would look like. Yep, hung them over an only-primed window. Yep, will have to take them down before finishing up the window but by golly, I needed that little sneak peek as a pick-me-up.

[Almost after: matchsticks roll-up shades for privacy and two simple white curtains on either side for softness]

Yes, that's our neigbor's house you can see through the window. Yes, we're pretty close. Well, our houses are (we hardly know the neighbor on that side since they were gone for a couple of months, it appears). This is an urban neighborhood and often, houses are pretty close together. However, Springfield managed to walk this fine line between privacy and neighborhoodly closeness beautifully and we don't feel at all compromised in our privacy. Our neighbor keeps her blinds closed on that side at all times and now we can do the same if we want to or feel the need to (although we aren't ashamed to flaunt our wealth of books)

[Close-up]

Thursday, June 23, 2011

Off the hook

On one of our trips to the blue ..or was it the orange? ...box we discovered and fell in love with a simple organizing system we envisioned for our former porch turned enclosed shed.

You see, without an organizing tool you're headed face first for failure to keep a storage place tidy and fucnctional. no hook to hang this gadget? Ahh, we'll put it here in the corner ...for now. Need a spot for this gizmo ...ahh, over here on the floor seems to be a good place ...for now. And at some point you notice that "for now" has turned into "forever" and that you can't set a foot into the space anymore because gizmo and gadget and their extended family have taken over the space. Or blocked the door. From the inside. Or both.

Anyways, for just $12 we decided to toss it into the cart and take it home


[Inexpensive and easy to install storage system]

So one early afternoon, left to my own devices what with husband being at work and the little man still at summer camp, I decided that a quick project was in order. Something that doesn't involve white semi-gloss paint. The instructions declare that installing this system takes about 30 minutes so it very much fit the bill.

Armed with pencil, level, drill, screwdriver and the box I unlocked the shed and set to work.
First order of business: locating the studs! That was easy peasy (not like in the library) because in the shed, they're all nicely exposed (and right now this statement has me wondering if blogger will censor this post ...)


[Before: Bare wall and easy to locate studs]


I decided to split the system up into two medium lengths consisting of 2 pieces each, rather than using the full length because one end would have ended up behind the furnace in a hard to reach corner.

I leveled the pieces, then marked the drill holes. Drilling was fun since the studs are rock hard pine but in the end I succeeded creating 4 sweet-smelling drill holes.


[In-progress: Ready for screws]
After screwing the pieces into place and adding end caps for a more finished look, I decided to just use the big cushioned S-hooks on the organizer on the big wall and a combination of S-Hooks and short nubby pins on the wall that has the cabinet. That way I can hang the larger gardening tools like hoe and rake and shovel out of the way on one side of the shed, and the smaller ones like snips and shears on the wall with the cabinet.


[S-hooks in place - the organizer system is ready for some serious organizing]


It really was a 30 minute project, and one that left me feeling very satisfied. The gardening tools are no longer underfoot and getting in and out of the shed is no longer an acrobatic feat!


[The garden gang - back against the wall, lined up and ready for duty]


Oh, by the way, even without each piece being screwed into the wall at mid-point on top of being screwed into the studs (there's no inside wall, obviously, just the siding from the outside) this system is plenty stable and even bears the weight of the weedwhacker easily. Thought I'd mention that.

Wednesday, June 22, 2011

Argh!

I don't know what it is with Blogspot right now but while I can read my blog, write posts, edit and delete them, schedule them and publish them, when it comes to comments right now this is all a major FAIL.

So, just so you know, I love your comments and I value them and I always strive to respond but right now blogspot just. won't. let.me.

Gah!

Anybody else having that problem?

Slimming it

Here at the Darling Duckling, post-moving chaos still reigns supreme. However, we're working hard on remedying this shortcoming. We've installed wall cabinets in the laundry room (here) and are well on our way to an actual dressing room for our clothes (here and here). Another project on our ever-growing list of things to do and projects to tackle is additional storage for our library/study/man cave.

Since the room we delegated to this task isn't the largest (but it's beautifully light and bright) we shelved our books high and wide and discovered a sliver of room for a buffet or dresser. However, most of those were too deep and visually cramped the room's lightness making ti feel tight and chockful with furniture.

That's when we discovered the versatility of wall cabinets. Browsing the local reStore we found a wall cabinet excatly 60 inches wide that would fit our space perfectly, offering storage space whithout hogging all the space.

We strapped it to the top of the Jeep and brought it home. We attached feet (read about that here), then flipped it over and admired our handiwork.


[It really fits like a glove - in this picture it's pulled away from the wall and it's trying to fool you into thinking that it's about 10 inches too long]

Since none of the boards at the store were the right width, we grabbed the widest we could get (12 inch) and added a narrower board (6 inch) to make up the difference. We attached them to each other with metal brackets screwed in from underneath and a dab of wood glue for extra strength. The seam was minimal and after some wood filler and some sanding almost invisible.

We replicated the shape of the shelves above it and used the same stain on it for a cohesive look. It's Minwax's "Provincial" which is a beautiful dark brown with a hint of warm red. Husband initially tried "English Chestnut" and boy, did that turn out orange. "Orange you glad" we only bought a small tin and changed plans after the first try :o)


In order to set it apart from the shelves and to protect it from the inevitable water ring from a drink (and other smaller catastrophes) we decided to seal it with the same waterbased sealant we are going to be using for the floor in the dressing room. Husband's been really good about applying coat after coast with a bit of sanding thrown in for a silky smooth finish.


Today I'll re-attach the door that came loose and attach handles and we're all set to move in our board games and get rid of another stack of boxes. Hurray!


Tuesday, June 21, 2011

One (wall) down, three more to go

No, no! No more demolition! I swear!

Husband and his sidekick Little Man who is now a self-professed "Master" at power sanding finished the first wall of open shelving in our library.

While I'm not the greatest fan of this shelf solution preferring chunky built-ins all trimmed out and of glamorous old world charm (which would have left enough room for the beautiful wallpaper border ...alas, it wasn't meant to be), this is starting to grow on me.


[After: Wall o'shelves and cabinet in place]

We opted to use the studs in the center for the shelf brackets rather than spreading them out; this way they look actually centered on the wall whereas following them to the outside of the shelves would have made them look out of balance in relation to the shelves.


Husband insists on using the Dewy-Decimal system to sort our books thus (and since we have a metric ton of books to begin with) they are lined up neat and tight with no spare room for neat decorative touches. It's a man's world, baby! No room for frills!


Thanks to the double feature of the wall you are also getting a sneak peek of tomorrow's post on the wall cabinet turned dresser! Wheee!

Saturday, June 18, 2011

The Man Cave aka our library

Husband and little man have been working diligently in our libary that is slowly turning into "The Man Cave". While there won't be any wall space left for poster of dubious artistic value and other dorm-style masculine paraphernalia thanks to our sheer wealth in books, it's definitely the one room where man reigns supreme ... and I don't mind at all, especially since I got to pick the wall color.

One caveat I tossed at my men before they got too carried away was the question of storage. Not only do we have a bunch of books, we also have a slew of board games that need to be contained. We agreed that a regular dresser would occupy too nmuch visual space and make the room appear even smaller what with the shelves loaded with books and reaching the ceiling, so we had to come up with another solution.

A trip to the local Habijax store offered us a clever solution: a wall cabinet! Wall cabinets aren't as deep as base cabinets and dressers and still offer plenty of storage. Just by adding legs and a countertop we could create exactly what we needed for this room.

We bought the 60'' long cabinet, strapped it to the roof of the Jeep and took it home.


[Step 1: An upside down cabinet with tools and the first leg of four!]


We picked up 4 wooden legs at the big box store (I forgot whether it was orange or blue) . These already come with a screw attached so all you have to do is drill a hole into the cabinet where you want the leg to go and screw it in. A bit of woodglue helps firm up that joint. There are plenty of leg designs available - husband settled for a simple chunky square leg (I'd have picked a curvy turned leg but I guess that's the girl in me) . If it hadn't been for the very tall base modling I'd have simply screwed the cabinet to the wall and skipped the feet, creating a floating cabinet and avoid having to clean around legs.


[Step 2: Flip cabinet over and maneuver into place]


You can see how perfectly it fits into the space. There's maybe 1/2 inch on either side to spare!


After that, the men decided a change of order was in order and started working on the shelves that they were going to install about the cabinet.


They moved into the back yard, broke out the saw horses and power tools


And went to work!


Friday, June 17, 2011

Holy Smokes

This is what it's been like for the past couple of days when the shifting winds brought even thicker smoke and a flurry of ashes from the surrounding wildfires to the Urban Core of Jacksonville.


Smokey downtown


Ashes on my car


Eerie skies


Thursday, June 16, 2011

Flutter by, little butterfly!

I don't know if you remember but a couple of weeks ago I ordered a "Butterfly & Hummingbird" garden kit from Michigan Bulb Co. I did so despite the many negative reviews of the company's customer service, mainly because there were still a number of customers raving about the first-class service they did receive and the deal was too good to miss to boot.


[Source: Michigan Bulb Co.]


I ordered, waited, watched the delivery date pushed out and finally did receive my order which consisted of the following:


1 Pink Delight Butterfly Bush
1 Blue Wonder Butterfly Bush
3 Scarlet Bee Balm
3 Sweet William Mix
3 Dwarf Columbine Mix
3 Red Coral Bells
3 Sunburst Coreopsis


Since they occasionally have to break up your order into partial shipments, you might receive several boxes like this (and still only pay for shipping once)


[First shipment]


The shipment also included a a planting guide to help you arrange your plants in a pleasing and sensible manner: tall ones in the back, short ones in the front. Sort of like your typical group photo arrangement.


Yes, the plants were teeny tiny which is kind of hard on my patience but they seemed hardy and happy enough and so far we'd had to mourn only one loss. Technically I could get a free replacement for the plant that died from Michigan Bulb Co but after receiving my order without any problems I don't really feel like testing my luck.


They recommend that you plant your little sprouts as soon as you receive them which we did. The smaller part of our front yard to the right of our house is exposed to a lot of sun and made the perfect spot. I also added lantana plant that has been living in a planter box for the past 5 years and moved a couple of wild lantanas into the same spot for a bit of color now - it'll be a while before the other plants catch up and start to look more like actual plants and less like weeds


[Planted, manured and mulched]


I know, I know, it's not much to look at yet and I'm very tempted to go and buy a couple of gallon containers of flowering plants but gardening is all about faith and patience and care. We'll keep an eye on it as summer progresses.


Tuesday, June 14, 2011

Studs R' Us


While that's usually my nickname for HGTV, I thought it'd also make a great title for this wonky blog post.


You see, my husband's design plan for our library/study includes semi-floating wall shelves rather than the book shelves we've been using for the past couple of years. By adjusting the size and spacing of the wall shelves he's hoping to maximize the wall space we have to accommodate as many of our books as possible. Yes, there are that many and yes, finding a house with an extra room to host our extensive library was our mission this time last year.


Since I consider the library also the Man Cave, husband gets a bit more free reign in the decorating department. I'll probably have to give up the cool Victorian mural (*sigh*) but if the husband is happy, I'm happy too. Give and take, baby, give and take. Husband decided he wanted l-brackets with wooden boards for shelves stained a darkbrown to match our floors and for a rustic manly vibe.


One of the first things on his to do list was to locate the studs in the walls and plan out the hardware. Armed with level, ruler, pencil and a studfinder he went to work.


Yeah ... this is how it should have worked. "Should" being the magic word, unfortunately. In a twist of fate some previous owner(s) decided to forgo the expense and effort to restore the original plaster walls and to simply cover them up with modern drywall, all neat and tidy and comparatively inexpensive. This, however, makes the work of your studfinder gadget nigh impossible. The poor thing is now confronted with a layer of drywall, plaster, lathe and behind all of that, the studs.


Our little brave studfinder just couldn't figure it out. We either had no studs, studs 2 feet wide or studs every 2 inches. So we winged it in a crude and brutal manner - with nails.


Yes, we did. We banged nails into the wall in 1 1/2 inch increments turning my beautifully painted wall into a Hellraiser-ish nightmare (remember Pinhead?)


Each possibility - hitting plaster, hitting just lathe (because the plaster had fallen off) or hitting a stud - came with a very distinct hammering sensation and there was no mistaking it for anything else when you managed to find one rock-hard stud.


After some patching, priming and painting the building of shelves can commence!


Monday, June 13, 2011

flowers in the window

Do you pin?

I started pinning just two weeks ago and just love the wealth of ideas, creativity and inspiration packed into one central spot on the 'net! Naturally I poke around on pinterest for ideas to pretty up our Ugly Duckling. One such picture that caught my eye was this one. Can you guess what exactly it was that piqued my interest?


[source: houseobsession.wordpress.com]

Yes, the original molding is beautiful. The door frame is fantastic and the color scheme is so soothing and sweet. An over all lovely lovely room. What I really really love though is the hanging basket with the gently trailing vine in the window. No kidding!

So I stole that idea for our master bedroom 'cause I can! On our old porch we had two hanging baskets with fern. Those two poor ferns did not survive the combination of past winter and remodeling-induced neglect and so all that moved with us to our new residence were the empty baskets.


[Before: Sad empty hanging basket]


This was also a great opportunity to introduce a pop of color to our bedroom. After debating for a few minutes in front of the spray paint rack at a local home improvement store I decided to go with yellow (apple green was a strong contender though).

[The chosen one]


Just a few light and even coats of paint later my hanging basket looked like this


[mellow yellow basket]


Once it was completely dry - which took longer than anticipated on this humid day - I cut a new liner from a white kitchen trashbag to make sure no water would dribble onto my new curtains and the wood floors in my bedroom and relocated some sweet potatoe vines.


[New liner]


[Sweet potato vines]


Sweet potatoe vines are happy campers, even for people with a less than green thumb. They'll grow anywhere anytime and have a cheerful light green foliage. It's also really easy to multiply the number of sweet potatoe vine plants you have but simply cutting off a piece of vine and plunking it into a pot with water. 2-3 days later your cuttings will start sprouting roots and you're set to plant new plants (which means all you ever have to do is buy one single sweet potatoe vine plant to cover your entire yard with it).


[After: mellow yellow planter hanging out in the window]


I'd screwed a hook into the ceiling to hang my planter earlier and with a little help from the stepladder my sweet potatoe vine ended up gracing my bedroom window in no time. Love it, love it, love it! I think it should hang a little lower but that little touch of green is making me really really happy!

Friday, June 10, 2011

Intermission:

When we last left the Master bedroom, things looked cleaner (freshly painted window trim) and more finished but still a ways from being completed.

[Another not-staged photo. Yes, that's a can of paint on


my night stand. What? You don't keep it there? Weird ...]


One day, while shopping at a local department store, I ended up in their fabric department. It's a far cry from what it used to be after years of downsizing and changing to more of a quilter's corner than a general fabric aisle but I simply like fabric and you never know what you'll find, right?


Ready to call it a day and hit the cash register, I spied this at the last moment peeking out from underneath the $1.50/yard fabric.


[Score!]


A simple and sweet white fabric with tealy blue dots woven into rows. This might be just right for our bedroom windows. I hmmm-ed and haw-ed over it for a bit, especially after finding out there were only a mere 11 yards left on the bolt. That meant that in order to have enough fabric for 2 panels for 3 windows I'd have to cut the bult in half lengthwise. Well, to make a long story short, I grabbed the bolt and brought it home.


After a quick stop at "Fred's" (which is sort of like a Big Lots) where I discovered oil rubbed bronze curtain rods for a whopping $6 each and a quick stop at the blue box to pick up some curtain clip rings ($4.95 for 14 small ones), I went home and whipped up some quick curtains. I did not hem the selvage edge - the little fuzzy fringe tickles me pink every time I see it!


[Close up and personal]


There you go - it's amazing how curtains make a room look and feel much more of an actual room and so much more civilized! I'm still planning on installing matchstick shades or similar wooden shades - not so much for privacy since we're "up in the trees" and have no concerns in that regard but to add some texture and to finish the look.

Thursday, June 9, 2011

Coming out of the closet

As sure as rain we wanted a "dressing room" as part of our Master Suite, especially given the amount of space we had to play with once the upstairs kitchen was gone. Just ...what makes a dressing room a dressing room? And why not just a closet? And ...? "Dressing room" is a pretty highfalutin concept, and the husband and I are nothing but pretty simple and down-to-earth-ish. So what are we going to do?


Well, we call it a "dressing room" but look at it more like a walk-through closet. That brings it down a notch and made planning for it a little easier. We were especially inspired by Ana White's closet system


[source: Ana-white.com]


Neat, hm? Some shelving, some rods for hanging, the option to create shoe cubbies and drawers - pretty much perfect for what we had in mind and not impossible to build ourselves.


Off we went to the home improvement store - coupon in hand - and shopped 'till we dropped. Little Man's legs got really tired so he hitched a ride


We'll be kicking off the construction phase in our dressing room with the creation of a floor-to-ceiling shelf tower and two hnaging rods on either side of the door to the bathroom for each of us. This first phase will later be followed by the creation of a dresser-sized cubby system on the other side of the wall for additional clothes storage.


First step was to prepare the plywood that we'd cut to our specifications at the store: husband and little man sanded it nice and smooth and primed it while I mudded, sanded and primed upstairs.

[Husband at work]


Rather than build two towers or stick with the originally suggested size on the Ana-White.com page, we decided to minimize the amount of headache the sloped ceiling could give us by creating true built-ins. We screwed two brackets each into both floor and ceiling, measured each corner point from floor to ceiling and cut the boards that would form the sides of our shelf to exact size.


At first, dear husband wasn't convinced my method would work, but work it did and the sides slid in perfectly. A couple of countersunk screws later and we had the first shell of a shelf!


[Shelf in progress]


It's nice and stable and straight! The rods for hanging clothes will extend from one side of the shelf to the wall on two different levels, high and medium, to maximize the space. Of course, there's still plenty of work left to do before we can move our clothes into the space but we're one step closer!