Saturday, November 24, 2012

New arrivals

 Looky, what I got :o) A new project!

 My first upholstery project since the batting and foam layers are a
bit worn out and the green burlap doesn't really go with our decor.


I could not resist those sexy curvy legs,


 the gentle slope of its tufted back and the soft sweep of the arms.
Or their $0.- price tag
(no kidding; we inherited them from our neighbor. THANK YOU!).

I'm thinking silver grey velvet.
Like these babies from L'Atelier.
[source: L'atelier]

The hunt for fabric is ON like Donkey Kong!

Thursday, November 22, 2012

Monday, November 19, 2012

Color Scheming

Paint is such an easy fix, and often an inexpensive way to sprucing things up, giving old things a new lease on live.
True dat!
I'm not afraid to try new colors, to whip out the spray paint like a triggerhappy Gringo, but when it comes to this one project, I'm a real 'fraidy cat hiding underneath the covers and thinking ...and thinking ...and thinking ...

It's not like you can just repaint the whole exterior of your house if you decide you don't like the colors you picked after all. Well, technically you could, but who - right in their mind - would??

Fact is, the Ugly Duckling needs a fresh coat of exterior paint. A blessing and a curse wrapped into one neat bundle is that there are no requirements, no rules to follow in determining the color scheme on your house in our historic district. None. Nada. Some general guidance - yeah, but no hard and fast help, historic examples, etc. If you want to paint your house Barney purple or Pepto Bismol pink - so be it. Fancy a house with a John Deere color scheme? Have at it! Feel like channeling your inner Rainbow Brite? Rock on!

And if you area historically inclined traditionalist like me, you have some research carved out for you. Thanks to the evergrowing internet this is now easier than it was decades ago. Just a quick little googling provided me with color palettes from 1910-1920 giving me a general idea of which colors were hip back when our Ugly Duckling was built.


This small color palette from 1916 is expecially neat since it gives you suggestions for color combinations (trim and body).


Here is another palette from 1918 (I believe) with more color choices. Hurra!

After browsing a bit online, learning that a proper historic color scheme consists of at least three and sometimes as many as a dozen colors, picking up every available exterior paint pamphlet from the box stores and wrecking our brains just what colors to pick, we also learned that you should consider the houses surrounding your house.
Heh ... now things get really interesting.

You see, our neighbor's house is bright apple green. Bright, happy, glow in the dark green
Anything looks sad and drab right now to it, really, especially our little grey Duckling house with its dark blue-grey on blue-grey color scheme.
The remaining houses on our block are more in keeping with the Craftmanstyle sense of color: earthy browns, brick, sage greens and moody blues.
Then, one day, I came across this particular two-story Bungalow-style influenced house on "The Daily Bungalow.
Cue: angels sing.


It is so so SO pretty! And stylewise, it's related to our Ugly Duckling with its strong horizontal lines, the one over one sash windows, the full front porch and the gable with its sturdy brackets. And the color scheme makes my knees go weak, even though I'm not really a fan of cream colored trim.

I count four colors: a sage green for the body of the house, a light cream for the trim, and two accent colors: a darker cream - ochre on the barckets, possibly the rafter tails and details on the columns and a terracotta color for the porch floor, steps and sashes.


The husband and I are still debating whether to use a sage green as the body color for our Ugly Duckling or to go with our first idea of choosing a muted blue-green instead to bridge the color gap between our happy green neighbor on one side and the chocolate and moody blue bungalows on the other.
 

This is what our block breakdown would look like with the new color scheme applied. It seems to pull the overall street color scheme together really well, doesn' it?

So, we've been busy testing paints traying to nail down that perfect that not-turquoise, not-teal , but perfect shade of blue green we have on our minds.


It's not as easy as it sounds although I do believe we have a really really promising candidate in Valspar's "Sea Port." In order to find the right kind of cream color to go with it though, I think I'll hop over to the paint store and have them color match paints to the Bungalow picture. Maybe we should try a sage green for the body color. Just for kicks and giggles, you know? We have until next spring before having to  startg on this project, one side of the house at a time, and we really want to be sure we pick colors that we will love and that work for the house. Once it's painted, that's it. I don't think I will have any desire to paint it a second time for a couple of years afterward.

Wednesday, November 14, 2012

Rocking the hardware

If you have been following my blog you know I'm a sucker for all things old: old houses, old books, old art, old furniture, and more.
In keeping with that spirit I do hold a not-so-secret love for the old door hardware in our Ugly Duckling. Ages ago I talked about and showed you pictures of how upstairs not one room has matching door hardware and some of it -style-wise - even pre-dates our house which makes you or at least me wonder how and why it ended up here.
Downstairs - between living room, dining room, library, kitchen, laundry room, half-bath and vestibule - our little old house features a total of three different types of door hardware, but at least they are more in keeping with the age and style of our house than the ones found upstairs.

Just like upstairs, however, they have repeatedly been painted over or caked with paint along the edges marring their aged brass patina - a look that is flattering to nobody ever. It's just sloppy.

I was surprised how easily they came off. Despite the fact that some screws were worn down and almost blank on top, I was able to carve a slit deep enough for the screw driver head to find purchase into the top and unscrew them.
After that it was a walk in the park.
Dirt of almost one hundred years had collected between the escutcheon and the door - yuck! - where it had found a way through the keyhole, I guess, including parts of bugs and other unpleasantries. Double yuck! Fortunately, nothing was alive!

 I love love love the look of aged brass patina. There is just nothing that has that same warm honeyed glow and luster.


I didn't want to mar the hardware anymore than necessary by scraping with sharp tools nor loose too much of the patina so I gunked the hardware all up with gobs of stripper. It smells great while you wait for the paint to shrivel up and come off.


Once clean I decided to give the hardware a brief spray-over with Rustoleum's Metallic Brass spray paint. Not a full coat, mind you, just a brief misting to even out the color variations, scratches and other markings while preserving the aged patina.


 This also required only a minimal paint station set-up. I'm telling you, a quick-fix like this - set-up and goal achieved in minimal amount of time - is good for the soul as you pick away at the more Sisyphus-type projects like stripping stair case spindles or the like.

Not like I would know anything about that.
Nuh-uh.


This is the "After" - a vintage escutcheon all shiny. It appears almost new, with enough of the old patina showing through the refresher coat of paint to create the "well-loved through the ages" kind of shine that makes my heart go pitter-patter.

Thursday, November 1, 2012

Candy Hangover

I don't know about your munchkins but after yesterday's Halloween fun Little Man had a hard time crawling out of bed this morning. He and husband went on a hayride through our 'hood to go "trick or treat"-ing last night while I stayed home to make sure the puppy wouldn't go insane over the night's happenings and to hand out candy to whoever made it over to my quadrant.

Much to my delight (and the puppy's horror) we had a whooping 46 ghoolies and ghosties (and princesses and ninjas and super heroes and, and, and) stop by the Ugly Duckling! Woot! I had a ball handing out candy to everybody who stopped by and while I don't mind handing out candy to teenagers without costume, I think for next year I'll reward the ones going all out and dressing up with better candy and some fun things (I had tossed in a few funky pencils into the bowl and, boy, those were a HOT item!).

A few days ago, though, I wasn't feeling Halloween-y at all.
Just not in the mood.
Maybe it was the sudden unexpected cold snap that put me into a grumpy, please let me hibernate mood.


We placed just a few Halloween paraphernalia inside the house and stuck mainly to the fireplace mantle, especially after we ended up chasing a cat and a dog running off with plastic fingers. Out of sight, out of mind and reach! I think my favorite were the orange lights on top of the mantle!


     [Little Man as Mini "Bane"]                                [The zombie-fied Husband]

Thanks to Little Man, though, I pulled myself together and wrangled the box of Halloween decorations from the attic so we could spookify the house a bit.

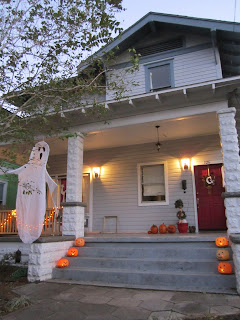
This year we were all about ghosts! They are spooky but not too spooky, especially for those littlest "Trick-or-Treaters" (plus, I don't care for scattered innards, half-rotten carcasses and moldy eyeballs in my front yard either, thank you very much.)


Those plastic pumpkin buckets are still one of my favorite inexpensive Halloween fixes. This year we didn't string them up lantern-style but instead filled them with a handful of sand and stuck a candle in. LOVE IT!

We really enjoyed the fluttering ghost and I'm thinking about running out and picking up a friend or two for him for next year. It ghosted beautifully in front of our house and I'd like to add more.

Florida weather, despite cold snap, is usually not a very healthy climate for carved pumpkins. They grow moldy within days and deteriorate so quickly, it's a shame and a big disappointment. Instead, we paint ours using either acrylic paint or sharpies. They keep much longer that way, you still have the option of using one (or two ..or more) for cooking and once you turn them around, they make pretty harvest and Thanksgiving decoration too. It's  a Twofer! Threefer! Either way, a no-brainer (for us)!


And I really loved how everything came together once the sun set