Showing posts with label projects. Show all posts

Monday, October 17, 2016

Falling for Fall Colors


Among all the craptastic things Hurricane Matthew brought with him (fortunately not for us; we just had to survive five days without electricity), fall was the best. The days following the big storm have simply been beautiful: bright blue skies, lovely breezes, lower humidity, and - best of all - cool nights. Fall in Florida!


That's the time of the year I think my house loves best - its colors just belong into this season. Earthy fall colors to celebrate the Craftsman detail and lines on our house, warm and inviting. Picking those colors were a decision we did not regret one bit!

This past weekend I tackled a project which was delayed by Hurricane Matthew: painting the front door and touching up the paint job in those areas that were dedicated to our accent color (chocolate brown so we're looking at you crag stones and top rails).


After five years our front door is now a rich chocolate brown, and gosh, do I love it! It's one of those little projects you wish you'd tackled sooner. We loved the red, but it just didn't -reeeeally- go with the new color scheme (but life got so crazy it was one of those things that was easily pushed waaaaaay to the back burner).
An hour later, this is what the front looked like. It seriously reminds me of a chocolate bar, and it's just as delicious! Best husband ever doesn't quite get my excitement, but he does love it too.


And because we're slowly but surely approaching Halloween the front wreath got a little make-over too. Two sprigs of fake flowers from the dollar store, a pack of plastic eye balls, and some hot glue! Voila! Peekaboo, I We see you!

Monday, June 13, 2016

Steampunkin'

And we're back with a little update! Steampunk and industrial chic have been around as home decorating trends for a while now, and because we have pipe (shelf) dreams for our library due to the fact that simple wooden book shelves simply cannot handle our massive load of books I hopped onto the train to Steampunk Town and updated our lighting.

This is Florida and so getting rid of the ceiling fan was unfortunately not an option. That little bit of air movement makes such a difference 90% of the year Ill happily put up with its slightly tacky look. An easy and affordable update to any ceiling fan light, however, is the addition of better looking shades. Both, the orange and the blue box offer a wide variety of smaller shades you could use but I went and ordered light cages through Amazon.com (here). I only needed three but ordering the set of four only sets you back $20 (instead of $25 for three). Now I have a spare ...or an extra for another project!


First step is to unscrew your existing lamp shades. 
(Make sure the light is turned off and maybe even go so far as to turn off the electricity entirely. I only turned the lights back on for photos, not while I was working on it. Be SAFE. Always!)
Next you realize that your cage is too large to screw directly to the light bulb socket. 
And of course it appears to be too narrow to fit over the entire socket. 
Not so fast!


If you unscrew the screws on the neck of the cage and bend it apart ever so gently, it will actually snap right over the wide part and clamp onto it well enough that you don't have to worry about anything.
Crisis averted!


Rinse and repeat three times, and then stand back and admire your handiwork! Careful, this is much brighter than before which is great for the room but not so great for looking directly at it.
Even though it was bright I did notice that the light bulb sockets were a bright white sticking out like a sore thumb so I simply painted them with a bit of black acrylic craft paint.


Fabulous! I really like it!
And what I really like is that it is quirky and farm-y and industrial-y and not frilly and girly.
So the kitchen sink light got a quick update as well, courtesy of the blue box store and a sale on their cage light shades (On sale right now for $15).

Tada!

Wednesday, March 2, 2016

Coffeebar Wunderbar!

Here at the Little Old House we are slooooowly getting back into the DIY groove, and one of the smaller projects with mega effect was what we did to our kitchen.

Ever since we moved in I ..well, we had been waffling over what type of seating arrangement to add to our little kitchen. Banquets were all the rage back then, and they are quite historically correct for a house like ours but our little Duckling house lacked the cute little nook that was just begging to be turned into a breakfast nook.

You see, our kitchen is a square. A small square. Our original plans of opening up the one window and turning that into a French door opening up to a small deck in the backyard had been dashed before we even started with our renovation. Copper thieves had torn apart our AC compressors and the new units had to follow current code which placed them right where we'd dreamed up our deck.

Oh well ...

Anyways, back to seating arrangements. I'm not crazy about islands, especially when they end up sitting smackdab in the middle of a line of traffic, and I was also not crazy about busting out part of the (load-bearing) wall for an open floor plan. I like my kitchen separate from the rest of the public living space, Yeah, I know I'm odd.

We went back and forth between a breakfast corner arrangement and a breakfast bar, and you know what? At some point, the breakfast bar won. Prooobably the last time I ran out of room for munchies and drinks on the diningroom buffet and wished I had more counter space in the kitchen.

So we ordered heavy duty shelf brackets from Rockler and a butcher block counter top and went to town!


Best husband ever and Little Man did most of the work while I supervised (and kept all the pets from photobombing the production and interfering with the work). Tough job but somebody's got to do it!


Yes, two levels. The husband takes measuring and leveling much more serious than I do which is why I'm the creative brain and he gets to lead the execution of plans that require measuring and leveling. We make an awesome team!


Here it is, our new breakfast bar, waiting patiently to be installed. This baby is seriously heavy.


Ta-da! Here it is, our new breakfast bar complete with husband's coffee station. The chairs I picked up ages ago (Two years? maybe even longer ago than that) through Amazon, and aside from having to add rubber feet to keep the hard plastic covers on the feet from scratching the hardwood floors we love them for their sturdiness and industrial 'chic.'


We LOVE our new breakfast bar. This thing was the BEST feature we have added to the kitchen by far. 
Spot to eat breakfast in the morning? Check!
Cup of Coffee/tea and a magazine/newspaper in the afternoon? Check!
Spot for Homework? Check!
More counter space for food prep? Check!
Serving space for parties? Check!
Space for folding laundry? Check!


Why again did we wait this long? Seriously.

Wednesday, February 10, 2016

Never Before Seen Footage

I'm going to squeak in one old blog post before the end of the week, and one with never before seen footage to boot!

You see, I inherited this fireplace mantle from our next door neighbor Mrs. Harriett before she moved into an assisted living facility. We so miss this sweet spunky lady and this little treasure she gifted us with brings back very fond memories of and with her, but we do love our new neighbor!

Long story short, the old computer died and with it the pictures that showed the husband and I spending days stripping this beautiful late 1800s fireplace mantle with the heat gun from layers of mostly bright frog green paint were lost. There is some lovely detailing on the mantle along with some beautiful wood grain that really deserves better pictures one of these days!

Anyways, we put in a lot of time cleaning up this baby and in the end it looked like this in its new spot in our master bedroom. It provides a nice counter 'weight' to our bed directly opposite and a simply great focal point on a wall that was simply plain boring aside from the batten and board treatment I'd given it before we moved in.


It's just a mantle, no actual fireplace, so we covered the opening of the firebox with a panel that we painted black for now. Maybe we'll add shelves for candles or something like that. Later.
However, with the black panel in place it did all look a bit too stark, and the black panel to wood ratio was off. Of course, since there is usually a band of tile surrounding the fire box!


So I went to the orange box and poked around the rile section for a bit until I scored a couple of sheets of this variegated cream and latte mosaic tile. At just $5 a sheet these were a steal, very much in keeping with the type of glazed tile you would see in an original, and fit the overall color scheme of our bedroom. Neat! I also grabbed two small buckets of pre-mixed adhesive & grout in a soft almond color, and went home.


This was an incredibly quick and easy fix. I cut the mosaic tile sheet with a pair of household scissors into wide strips, then spread some adhesive, placed the tile, and so slowly worked my way around the opening of the former firebox.

Oh look! You can catch a glimpse of "The Green" - that's the color the whole fireplace mantle was painted. It was very bright ...and very very green.


After letting it dry, I used the same stuff for grout, and then touched up the paint along the edge where board and tile meet. Done!


Thursday, May 1, 2014

Hatching A Coop, Part II

We may have been procrastinating on getting our exterior paint job done or working on other projects for our house BUT we haven't been really all that lazy either.
We've been building stuff - chicken stuff! After our peepers moved into their happy little brooder box, we got started on building their home in the back yard to make sure it would be move-in ready when they were old enough.

It started, of course, with a trip to the blue box to buy lumber and hardware.


Our chicken coop design consists of two stacked boxes, one framed out and with a roof to go on top, and the other one open with hardware cloth as an easy, breeze run, measuring 3'x4' and thus creating a whopping 24sqft of living space for our five ladies (more than the required 15sqft).

Plans all finagled out, we got busy cutting, and my Christmas present - the new compound miter saw - really came in handy! Loving my newest toy!


Then husband got real antsy to play with my new toy and I was delegated to take care of the are of the backyard that would house the coop. Moving the new structure into a place that's in direct line of the kitchen window (Chicken TV!) and five feet from the property line, meant our yard needed a bit of rearranging.


The African irises came up as did the Lantana and the Hibiscus to be replanted in a different area. The plywood board was used to determine the exact location for our coop.

And while I was happily digging in the dirt, Little Man and the husband started building the coop.We created a frame on top of the plywood floor, and then covered the sides with strips of plywood.


I got sidetracked and didn't take too many in-progress pictures but we cut out a trap door from the floor to create a doorway for a ladder down to the ground level, added nest boxes by dividing the front into three 12" sections using cut-offs from a couple of old boards we'd kicking around, and added a roof with vent.


Here it is in all its unpainted, unfinished glory! It's still missing its paint job and the roof vent cover, but it's in its proper place and looking good. I was most impressed by the fact it didn't feel like we just sacrificed 90% of our remaining yard - there is plenty of space around it to play with the dog, have friends over, pitch a tent in the middle of the yard, lounge in the sun, what have you. Sure, I'd like a bigger yard - the only thing I'd like to change about my house - but after mowing and weed-wacking, I'm not sure I really do want a bigger yard. Ha!

Anyways, as you can see the front has some sort of locking contraption and you can see hinges as well. That's because the front folds down for easy access to the next boxes (so we can steal eggs quickly), and the bottom front of the run folds up, so we can rake out chicken poop and , well, access the run part. It's all solid and heavy and not going anywhere!


This is what it looks like when you fold down the front. You peek right into the three nest boxes. Three is more than enough - rule of thumb is one box per five hens - but the math worked out this way and they'll have a choice. Since Silkies don't roost quite like other hens do, we added a low and removable roost to the inside of the coop (it's the block shape in the center). In the back you can see the chain that opens and closes the trapdoor down.


Since our coop design was inspired by the SmartCoop, we included the folding roof, i.e. the roof folds up on both sides for easy cleaning. After reading various articles and books on bedding, I decided on using sand (and so far it's worked beautifully!).


Here it is, primed and ready for paint! On top of the vent cover is Ferbie, our porch kitty, who just couldn't quite figure out what it was we were building and what it was for. She sure did not appreciate the addition of the roof vent cover because it messed up her resting spot (obviously sitting in the sharp edge is not as comfy as lounging on hardware cloth). Primed it looks like a cute little barn and for a moment I was tempted to leave it that way.

However, we decided it would be a great opportunity to test our house color scheme on a small version first and see how we liked it.
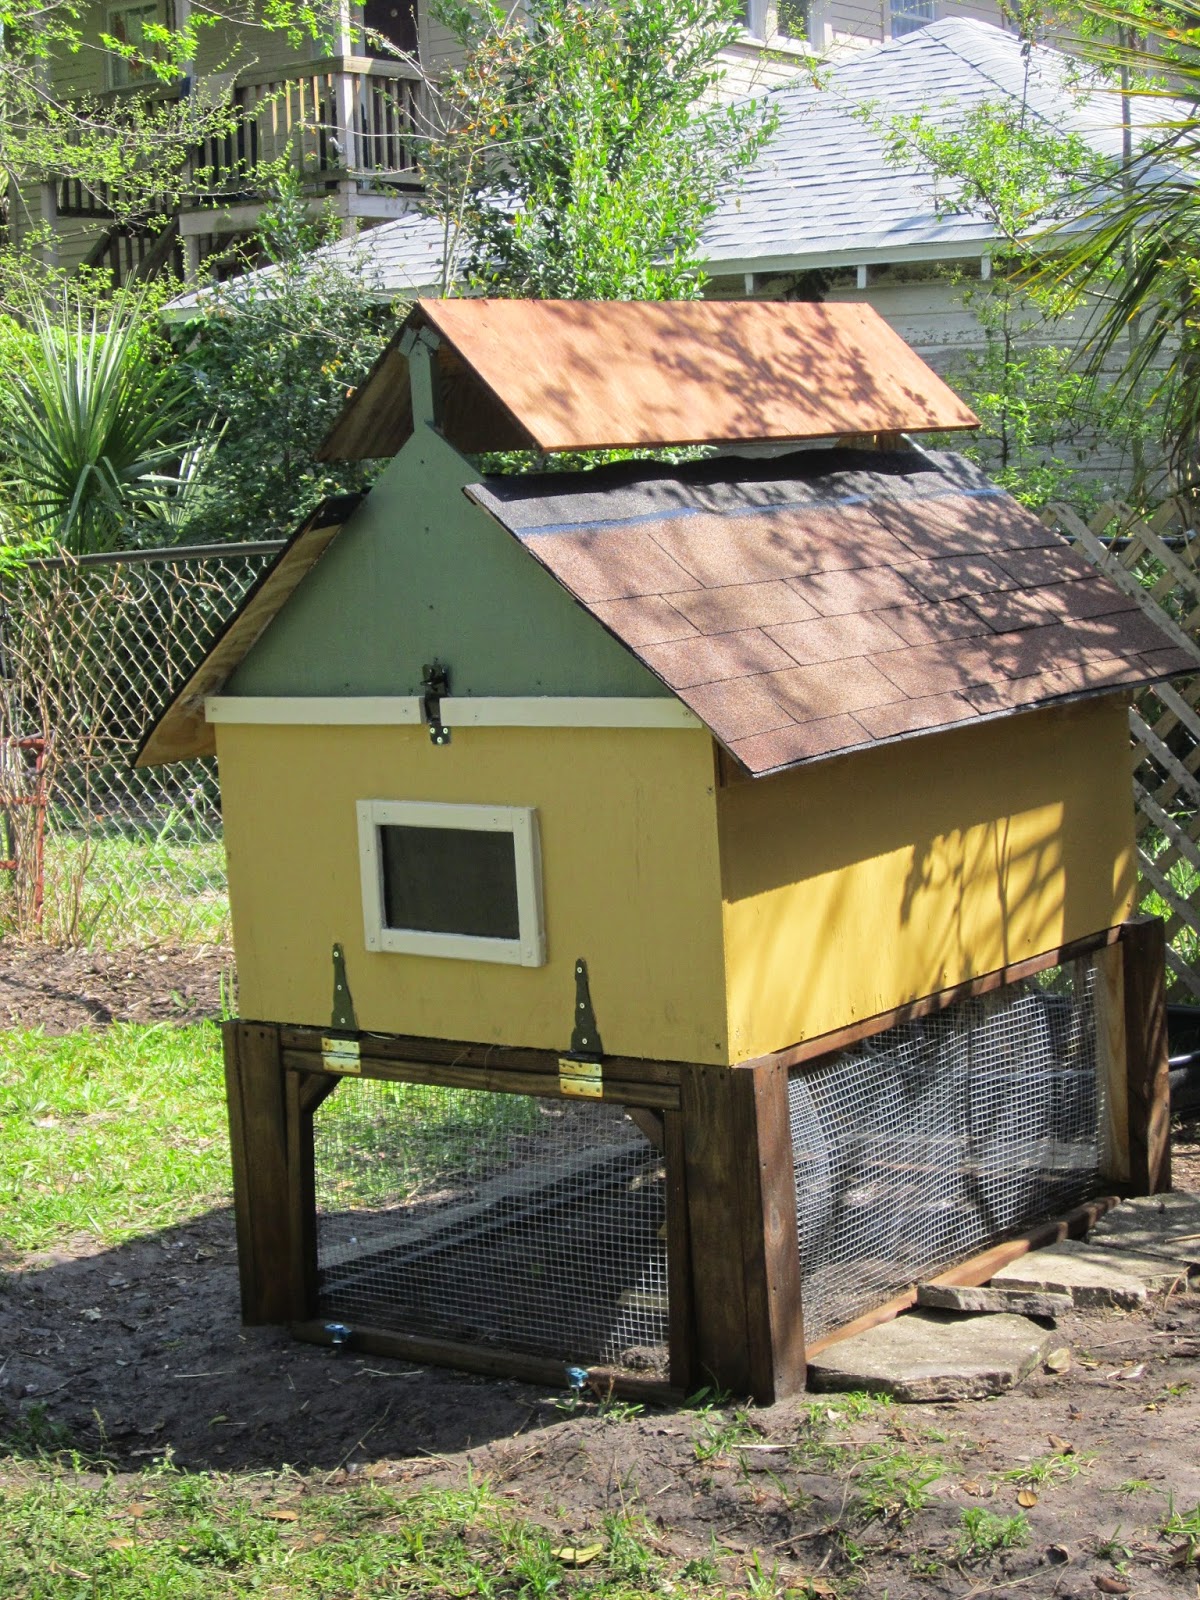
So the frame of the run was stained dark-brown (should have done that first before adding the hardware cloth, but it did turn our okay), the lower half of the coop was painted a lovely golden aka "SW Bosc Pear" (it's not as yellow as it looks in the picture; it's my camera messing with you, I swear!), and the top a soft sage green aka "SW Oakmoss", with a creamy "SW Antique White" trim.

So far, we haven't grown tired of the color scheme - phew! We may have a winner, but we definitely have a chicken coop!

Saturday, April 26, 2014

Hatching A Coop (Part I)

With our chicks safely tucked into their brooder box for the next couple of weeks, it was now time to start planning and building our chicken coop.
Pinterest proved invaluable in collecting information and inspiration. There are so many different types of coops around, from plain and utilitarian to fancy and whimsical, in all sizes, colors, and even architectural styles. After a while your vision goes blurry and your brain will stop working. It's great to have pinterest to collect all the inspiration in one neat spot:

 
(check out my chicken board here)


We really, really loved the Hobbit Hole type of coops, but for our small urban backyard, space considerations played a major role in deciding on a coop design. Since we are required to keep our hens safely fenced in and need to protect them from birds of prey and the cats during the day, we needed to include a run while keeping the coop a whopping 5' away from the property line to boot. Not a small feat when half your yard is already taken up by an above-ground pool and two A/C  compressors - ugh!
That pointed us into the direction of two-story coops, the kind of coop with a run as the ground level and a cute little ladder going up to the second story penthouse!

Like this one.


 (Pin here)


Or this one.


(Pin here)


We also discovered the Smartcoop (tm) online and really, really like its look, but there were a couple of details that didn't mesh with our requirements, for example we wanted a coop with floor for our silkies (they aren't big on flying and roosting due to their fluffy feathers) as well as a separate door to access the nesting boxes, so we didn't go for that one.
However, after building our coop and adding up the expenses I'd say go for it, especially if you aren't handy with tools. Right now they are even offering free shipping!

At the end of the day we decided on a two-story coop with fold-up roof for easy access and clean-up, a separate door for access to the integrated nesting boxes, and a bottom run. Those two stories with a measurement of 3'x4' give us 24sqft of living space for our chicken without additional attached run (future project alert!).

Not wanting to use pallet wood due to its chemical soaked nature we went shopping at the big blue box first! Stay tuned!

Friday, April 18, 2014

The Broody Box

As somebody who considers anything below 79F "sock weather", I can seriously relate to chicks needing warmth to thrive. Hell yeah! Even I would consider a heating lamp over my nest absolutely creature comfort.

So, in preparation for the arrival of our babies (special ordered silkies) we had to create a brooder box for them to keep them warm, safe from cats and dog, and contained.

We started with a large-ish plastic bin. We picked the clear plastic for entirely selfish reasons - we wanted to be able to see our baby birds from every angle, and we're glad we went this route because OMIGOD they are cute!

Our plastic bin came with a handy warning label that you cannot put babies into it with the lid on, so we cut a hole into the lid and covered the opening with some hardware cloth.


We wanted to make sure that neither cat nor dog could get their paws onto the peepers while at the same time allowing for plenty of ventilation. The top was easy to cut with a sharp knife. Not quite like "buttah" but not too bad either. Just stab and slice, and keep going.

Working with hardware cloth is painful - it seems to consist entirely out of sharp edges and stabby spikes - but it is so much more solid and thus safer for your chicks than chicken wire. I used a pair of pliers to tuck back the pointy ends so nobody would get hurt.


I used a drill to drill holes along the perimeter of the opening and then used thin wire to 'sew' the hardware cloth to the top.


Chicken wire should really be renamed to something like Veggie wire; it's good for keeping out birds from your veggie beds but you're not supposed to use it for anything chicken related, really, because it's too flimsy and doesn't offer protection from predators. Go, figure!

I drilled two more and bigger holes into either side of the box and ran a dowel through it for a quick and easy roost.


Final touches were the water bottle which was fashioned from a simple water bottle to which we attached a drinking nipple (drill hole into lid, screw in nipple - done!) and a store-bought feeder. We line our brooder box with paper towels so the peepers don't slip and develop a case of spraddle leg, and then top it off with a layer of pine shavings (Remember - No cedar shavings; they are toxic for chicks).


All set and ready for some baby birds!


Monday, October 28, 2013

Nailing The Landing

 (That's a reference to gymnastics, not to having acquired a nail gun - that toy ...err, tool is still on the wish list)

I blame not having a garage for piles of tools and project supplies dotted strategically ie near the latest project site throughout the house. Especially at risk for such unsightly if handy pile-ups are corners with no actual regular use.
Like our upstair's landing.
Especially since it has that sweet little cantilevered balcony feature. It opens up the hallway between the bedrooms, provides great air flow and light but it's not big enough for ...well, anything useful really. It really makes me wonder how it was used originally seeing that our elders never really wasted space on nothing.

Anyways, our little balcony had become a) a spot for one of our cats' litter-boxes and b) supplies and tools. None of which make your heart beat faster when you lay your eyes on it first thing in the morning.

I knew I wanted to hide the litter-box, and I had seen various modified dressers, benches, and other pieces of furniture turned into litter-box-cozies but up until now I'd never found anything that would work for our little spot.


So we'd been living with -this- for quite a while. Until this past weekend when I had that feeling that I simply -had- to check in at my favorite thrift store. My secret spider senses were tingling, and then I discovered THIS:


A trunk! A square-ish trunk that was deep enough but not too deep to hide a litter-box! It was sturdy and in pretty decent shape, and would work just fine with our overall vintage, Renovation Hardware- knock off style.
SOLD! (for $7.95)

Once home I gave it a quick scrub before cutting out the opening. I'd seen some use kitty doors (our cats never liked these) and other ways to hide the entrance but I left ours plain - it'll take some convincing to get the kitties to use the new box to begin with, I didn't feel like adding challenges like door mechanisms or curtains. Maybe later ...once the novelty wears off.


Yes, I gave the cut-out ears. If you search for 'hidden litterboxes' on pinterest.com you will find a whole variety of options including the stylized cat noggin and a full kitty silhouette (for an under-sink cabinet - too sweet!).


The I decided to refresh the finish of the trunk with a quick coat of dark brown paint I had on hand. I also rubbed some black paint to 'age' the whole shebang, and then let it dry!


While the litterbox-trunk was drying, I decided to paint the part of baseboard on the balcony. It was already primed but had remained hidden behind the pile-up for the past couple of ...uhm, weeks, and you know how it goes: out of sight, out of mind, and there is never enough time to begin with.

Two coats of white paint later, I got to check this baby off of my list! Yay! Golden opportunities, people, golden opportunities!


Because the trunk features nifty brass corners on -all- corners I added felt strips to the bottom of the trunk to protect the finish of our hardwood floors. 


Two down, six more to go.


Here we go. The trunk lid pops open and conveniently stays open thanks to those lock-type hinges which will come in handy for cleaning and changing litter. The box fits perfectly into the trunk with space around it. I'm thinking of adding a hook to the inside to hang the little plastic scooper to keep everything nicely contained.


And here we go, the beautiful, beautiful "After"! I added a plant (Look, Mom, all grown up! Plants! Inside the house!) and found a large wall clock to dress up the empty wall, and we are officially IN LOVE with our cantilever balcony landing!

Yes, I still need to finish stripping and painting the railing but this is starting to come together beautifully and it beginning to look like a real home rather than a perpetual construction site.

Friday, May 3, 2013

Shelf Life

In order to facilitate more organized cramming, I decided the closet needed shelves. One third of the closet extends to the left side of its door forming a nook that would be just perfect for some quick shelves.

Luckily, we also have plenty of pieces of wood kicking around the house and finding two pieces to fit the space was a piece of cake.


I decided to take my new toy - a Kregg jig Jr. -for a spin and use pocket holes to secure the shelves to the walls. What can I say - I LOVE that thing!


Pocket holes are no longer a fantasy. You know, like unicorns and garden gnomes!


I used drywall anchors for my screws and then screwed the shelf boards into the nook on the left side of the closet.


Then it was time for primer on door, shelves and trim. I love how even the splotchy coat of primer gives you an idea of beautiful crisp, clean things to come!