Showing posts with label light fixtures. Show all posts

Monday, June 13, 2016

Steampunkin'

And we're back with a little update! Steampunk and industrial chic have been around as home decorating trends for a while now, and because we have pipe (shelf) dreams for our library due to the fact that simple wooden book shelves simply cannot handle our massive load of books I hopped onto the train to Steampunk Town and updated our lighting.

This is Florida and so getting rid of the ceiling fan was unfortunately not an option. That little bit of air movement makes such a difference 90% of the year Ill happily put up with its slightly tacky look. An easy and affordable update to any ceiling fan light, however, is the addition of better looking shades. Both, the orange and the blue box offer a wide variety of smaller shades you could use but I went and ordered light cages through Amazon.com (here). I only needed three but ordering the set of four only sets you back $20 (instead of $25 for three). Now I have a spare ...or an extra for another project!


First step is to unscrew your existing lamp shades. 
(Make sure the light is turned off and maybe even go so far as to turn off the electricity entirely. I only turned the lights back on for photos, not while I was working on it. Be SAFE. Always!)
Next you realize that your cage is too large to screw directly to the light bulb socket. 
And of course it appears to be too narrow to fit over the entire socket. 
Not so fast!


If you unscrew the screws on the neck of the cage and bend it apart ever so gently, it will actually snap right over the wide part and clamp onto it well enough that you don't have to worry about anything.
Crisis averted!


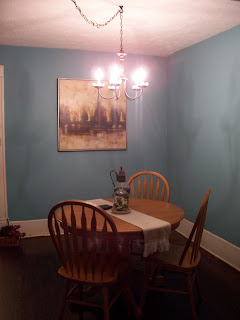
Rinse and repeat three times, and then stand back and admire your handiwork! Careful, this is much brighter than before which is great for the room but not so great for looking directly at it.
Even though it was bright I did notice that the light bulb sockets were a bright white sticking out like a sore thumb so I simply painted them with a bit of black acrylic craft paint.


Fabulous! I really like it!
And what I really like is that it is quirky and farm-y and industrial-y and not frilly and girly.
So the kitchen sink light got a quick update as well, courtesy of the blue box store and a sale on their cage light shades (On sale right now for $15).

Tada!

Monday, November 17, 2014

Dining room Chandelier Make-Over

 The Saga of the refreshing of the dining room look here at the little old house continues with an excursion into lofty heights. Yes, even the chandelier did not get away!

Here is what our dining room looked liked right at the beginning, just 3 years ago. So far we haven't changed much. We added a larger version of our old pedestal table that is more in proportion and keeping with the size of the room than the one we moved in with.
Now the larger dining room table got a mini make over and a new paint scheme.


Now the chandelier. This was an incredible inexpensive find at the Habijax store. Less than $10 for the chandelier, a bit of spray paint to turn the meh glossy brass into oil rubbed Bronze, and those nifty capiz whatchamacallits - done!


Now though I was craving a bit of texture. Seagrass or maybe burlap or something similar.


I did come across a good deal on six burlap mini shades on Amazon, and pulled the trigger!Here they are nicely arranged in a box.


They simply clip onto the light bulb which requires a bit of fine-tuning as you can see since the chandelier comes with chandelier bulbs, and those just aren't straight. You need to rotate the shades slightly, one by one, to account for the twist in the bulb, until they sit straight. Not all cattywampus like in this photo.


The shades dim the light just so to make it look cozy and warm at night while still looking light and airy during the day. I really really like the addition of the shades, even if it means that for some crafts I need to break out the big daylight craft lamp.

I also added a burlap cord cover to our chandelier. It's growing on me although I'm still not quite sold on it. Ergo, the lack of photo evidence. We shall see ....


Friday, April 19, 2013

Let There Be Light!

The husband is switching positions within the company, and thought it would be a good time to take a few days off between taking off one hat and putting on another.

I was being a good wife and did not prepare a "honey-do" list for him but instead let him enjoy sleeping in, a cup of coffee with the morning paper and all the oodling about he could possibly squeeze into the day while I was at work and Little Man at school.
Yes, it was hard.
Yes, I was twitching on the inside biting back 'helpful suggestions' regarding things I'd like to see done that week.
Man, it was hard!

On the other hand, it was all the more rewarding to come home from work to discover he had tackled a project while I wasn't supervising and ...ahem, delegating!


It's a ceiling light! In the master bathroom! I'd picked up another ALÄNG ceiling light fixture at IKEA during my weekend in Tampa a few weeks ago. We liked the look of the smaller fixture we installed in the dressing room so much and thought it would also go beautifully with the texture of our vanity light shades that we decided to replace the shiny brass nipple fixture in our master bath with the larger version (since the bathroom is also much larger; it's a whopping ~12'x13').

So, because Super-Husband installed it as a surprise, there are no 'Before' pictures - no biggie, nobody really needs to see the brassy nipple fixture that wasn't doing anything for our bathroom in regard to light or looks - only 'After'. It's so much prettier and so much brighter now, and we have a more cohesive look between the dressing room and the adjoining bathroom now.

And I didn't have to nag once!
Awesome!

Tuesday, April 2, 2013

Kitchen Edition: Let There Be Light!

Hind sight is 20/20, and it's really true when it comes to your first ever renovation/remodel.

There are a couple of things I wish I'd known/thought about/done differently when we were tearing through our little old house two years ago trying to get it ready enough to move in.

One of them is the light situation in the kitchen. While we have enough electrical outlets to equip a small country, we missed out on the chance to add more lighting right at the beginning. For a while we've been musing about adding a pendant light to the area above the sink, and while squirreling away money, locking down project funds for "The Big Great Painting" and more projects on the list than you can shake a stick at, we thought we could start with a temporary solution.

You know, to see if it'd be a good thing to add a light fixture above the sink and without too much commitment (and holes in the drywall) before calling in the electrician.

Plug-in light fixture to the rescue! I went to Etsy.com to see what other crafty people had created, and found a couple of options that both, the husband and I, really liked.

 
[Source: Portman Workshop]

Those mason jar light fixtures are just sweet and very homey looking, and we both loved the funky Edison bulb!

 [Source: FleaMarketRX]

A colander! How cute is that? And those colors! So bright and cheerful - I love them all! The same etsy store also seems pretty cool tin pan light fixtures and other industrial designs so it's well worth swinging by!

[Source: OVERSPRAYkc]

We both like industrial design and so the wire cage light was just right down our alley and the pop of color from the teal bobbin really caught our eye.

After browsing many many pages of eye candy, we kind of tabled the whole idea and put it on the backburner. It's one of those not-so-important projects/ideas, and life kept us busy until my trip to IKEA when I hopped over to Tampa for the weekend to visit a friend. Before making the long trek back home I hopped into IKEA, and while there, grabbed one of their plug-in light fixture kits in a spur of the moment. Almost at the cash register I spied this cute flower pot, and that was when an idea started to form in my head.

What if ...

While waiting for the primer on the kitchen window frame to dry, I armed myself with drill, pliers and project ingredients.

I marked the center of the bottom of the flower pot with the circle hole I needed to cut to thread my light fixture. Using the drill with a metal tip I drilled lots of small holes along the perimeter of the circle essentially creating a perforated edge. I also gently bent the scalloped edge outward because I liked the way it looked.


It was pretty easy to cut the remaining ridges between the holes by using a screwdriver as a chisel and giving it quick tap with a hammer and finally I was able to pop out the circle shape.

Time to thread the light fixture on!

Voila! I made a light!

The light kit came with a pair of hooks and the light was hung up in no time! I picked up some coax staples and secured the cord along the edge of the ceiling and down one side of the refrigerator cabinet to tidy things up.

It makes a HUGE difference!
It's cute - I'm clearly channeling the shabby chic country girl right now - but it adds a sweet touch to our kitchen, and it provides a surprising amount of light to the sink area which is lovely, especially in the evenings.

The only problem? I wanna make more lights! This was fun!


Friday, January 25, 2013

Shady business

Now that the vanity light fixture is in place and working, we really needed to get some pretty shades.

Blue box to the rescue!
This is what caught our attention in the first place: the incredibly wide variety of light shades for this type of light fixture. While a few years ago, these light fixtures only came with the standard shade, the light fixture business obviously finally discovered the versatility and the fun of coming up with a variety of designs. And since they are pretty much standard sizes, you can even go and switch it up at home if you already have one of those vanity light bars! How cool is that?
Since I couldn't make up my mind right away, I took home the following babies:

1. white glass shade with a twisted comb pattern

2. frosted glass shade with a clear edge

Back at home, we tried them on for size.

I must admit that I was secretly cheering and rooting for Shade #1 because of the pretty pattern which would pick up on the pattern of the IKEA light fixture in the dressing room (and we are thinking about swapping out the brassy nipple fixture with the same light). Imagine my delight when I discovered that the mirror was not in the way of the shades and that they looked as nice screwed in as I'd hoped!

I returned the other shade to the store and picked up the remaining two shades for a complete set.
And it's D-O-N-E - Done!


It's starting to feel mightily civilized in there. Now all we have to do is plan a trip down to the IKEA in Orlando to pick up the missing link necessary for the installation of our shower curtain rig and our bathroom will be good to go (you know, except for all the other projects I've pinned, just in case).

Left to do:
  • install shower curtain rod
  • hang shower curtains
  • create window treatments
  • decorate (art, plants)


Tuesday, January 15, 2013

Vanity, oh vanity

We decided we'd lived long enough with that nifty blue plastic box above our bathroom vanity ... or maybe we finally realized that that was where a light was supposed to go - you pick. At first, with the bathroom marginally ready to be used, I was too shopped out and tired of making decisions and simply pushed this one back to the bottom of the pit ... list. Then, with winter approaching, the thought that "a little more light here would be nice" started to sneak into my brain. And yet, I -still- wasn't sure what kind of light to pick. 

You see, it's like this. I just pretend I know what I'm doing talking, style and design as if there was nothing to it (ahem ...cough-cough) when really all I'm doing is blundering about, stealing ideas (Thank you, blogosphere and Pinterest) and trying to make the best of it. Heck, I don't even know what my style really is! Or if I have one (chances are slim). 

Enough with the whining and back to the vanity light.


Oh, wait! More whining! Ha!

Much to our dismay (and here's a "lesson learned" for when you are constructing, rebuilding, renovating, etc. because I wish I'd noticed it sooner) the electric box isn't centered above the sink. You'd think it is, but it's off by about 2 inches.
Not a whole lot, but enough to notice it.

Not feeling the desire to g into rewiring, running into studs and other possible issues, we tried to come up with a way to deal with this problem. A light with a wider base would provide coverage and allow us to adjust the fixture placement, and so we started to search for a light fixture that would do just that.

We really liked the option that the lighting aisles at the blue box presented: they are offering sconces, vanity bars, etc. in various finishes with shades sold separately.


Here's the husband installing the light fixture plate to which the cover attaches We had to drill a few extra holes in order to adjust the discrepancy between the light box position and the center of mirror and sink, but it wasn't difficult at all and you don't see it unless I point it out to you Promise!


Tada! This is an awful picture and it took real artistic skill to make it look like everything is centered but the sink. I blame the swoop of the basin and an odd angle, and missing window treatments. Heh ... It's centered, though, I promise.

We have light! Huzzah!

We do, however, not yet have shades. There are so many options to choose from that I developed a serious case of "DIYer Block"; I keep going back and forth between two shades that I like, waffling over which would be better. I figure I'll buy one of each, try them on, and decide then, so stay tuned for another vanity light update! (There's no end to it. Ever. Ahhhhh!)

Tuesday, December 11, 2012

Let there be light!

Look what the husband did when I was out playing one of Santa's elves!

He - wait for it! - installed a ceiling light fixture in our dressing room!
And took pictures!
And showed Little Man how it's done!

This project was brought to you by my bestest brother-in-law B. without whom this wouldn't have been possible ...well, not anytime soon, at least. You see, we live a solid 2.5hrs drive away from the closest IKEA store, all highway miles, mind you. Best Bil, however, lives in town with IKEA, and he graciously agreed to swing by with our shopping list and deliver to our door. (He's cool that way ...and he is single. You know, in case you're looking...)

For the dressing room, we settled on the ALÄNG light fixture from IKEA - a modern design with a sweet texture, flush mount for our low-ish ceilings in the addition housing dressing room and master bath and a very affordable price to boot!


Here the husband took a picture of the contents of the IKEA box: shade, fixture, and instructions.


This UFO shaped contraption is the actual fixture, the antennas have little magnets that hold up the shade. No worries, the magnets are surprisingly strong and the shade is holding up really well (and has yet to come down).


Ahh, here we go. There's the hole in the ceiling covered up with an oh so fabulous cover plate ... yeah. Yep, we painted the ceiling in the dressing room the same soft minty blue color like our bedroom.
Ugly Duckling Southern Style!


And here is Little Man lending a helping hand! And you get a better idea of the ceiling color, too! Ignore the splotchy door frame in the background; it's a work in progress, and I'd just started to patch and sand.


It's the Millennium Falcon! On my ceiling!
Well, alright, so it's the light fixture all wired into place and ready for some bulbs and a light shade.


Voila! We have a ceiling light! Ignore the rest!


I warned you! The rest is still a pretty (pretty as in "very")  hot mess. Ceiling and walls have been painted, I'm in the process if installing the remaining base boards, and we have plans for the floor, window treatments and accessories.
Until that's finished, we can always close the doors and pretend it's not there. Right?

Monday, July 11, 2011

Lighting Love

I have a confession to make: Of all the unfinished rooms here at the Duckling, the diningroom is starting to turn into my most favorite. See?


The baseboards and the window frames still need painting, there are no window treatments and so far the Gods of Craigslist haven't shown any mercy in my quest for a buffet or credenza but things are looking UP in the dining room (and we're obviously on a roll in the lighting department).

Up!
See the chandelier?
I'm loving it!
Come a little closer ...


Not bad, eh?
See those little petal-styled dishes?


Just like the chandelier which used to be an awful brassy yellow, those little capiz petal dishes were lucky finds at the local ReStore. I picked up a couple of extras, just in case, and got 10 of these darling little things (What do you call them? Do they have a name?) for a whooping $5. Which was what I paid for the chandelier a few weeks ago.


And for $7.50 and some change (for spray paint, a hook and some extra chain) we have a lovely and unique chandelier! What's your latest steal of a deal?