Showing posts with label kitchen. Show all posts

Wednesday, March 2, 2016

Coffeebar Wunderbar!

Here at the Little Old House we are slooooowly getting back into the DIY groove, and one of the smaller projects with mega effect was what we did to our kitchen.

Ever since we moved in I ..well, we had been waffling over what type of seating arrangement to add to our little kitchen. Banquets were all the rage back then, and they are quite historically correct for a house like ours but our little Duckling house lacked the cute little nook that was just begging to be turned into a breakfast nook.

You see, our kitchen is a square. A small square. Our original plans of opening up the one window and turning that into a French door opening up to a small deck in the backyard had been dashed before we even started with our renovation. Copper thieves had torn apart our AC compressors and the new units had to follow current code which placed them right where we'd dreamed up our deck.

Oh well ...

Anyways, back to seating arrangements. I'm not crazy about islands, especially when they end up sitting smackdab in the middle of a line of traffic, and I was also not crazy about busting out part of the (load-bearing) wall for an open floor plan. I like my kitchen separate from the rest of the public living space, Yeah, I know I'm odd.

We went back and forth between a breakfast corner arrangement and a breakfast bar, and you know what? At some point, the breakfast bar won. Prooobably the last time I ran out of room for munchies and drinks on the diningroom buffet and wished I had more counter space in the kitchen.

So we ordered heavy duty shelf brackets from Rockler and a butcher block counter top and went to town!


Best husband ever and Little Man did most of the work while I supervised (and kept all the pets from photobombing the production and interfering with the work). Tough job but somebody's got to do it!


Yes, two levels. The husband takes measuring and leveling much more serious than I do which is why I'm the creative brain and he gets to lead the execution of plans that require measuring and leveling. We make an awesome team!


Here it is, our new breakfast bar, waiting patiently to be installed. This baby is seriously heavy.


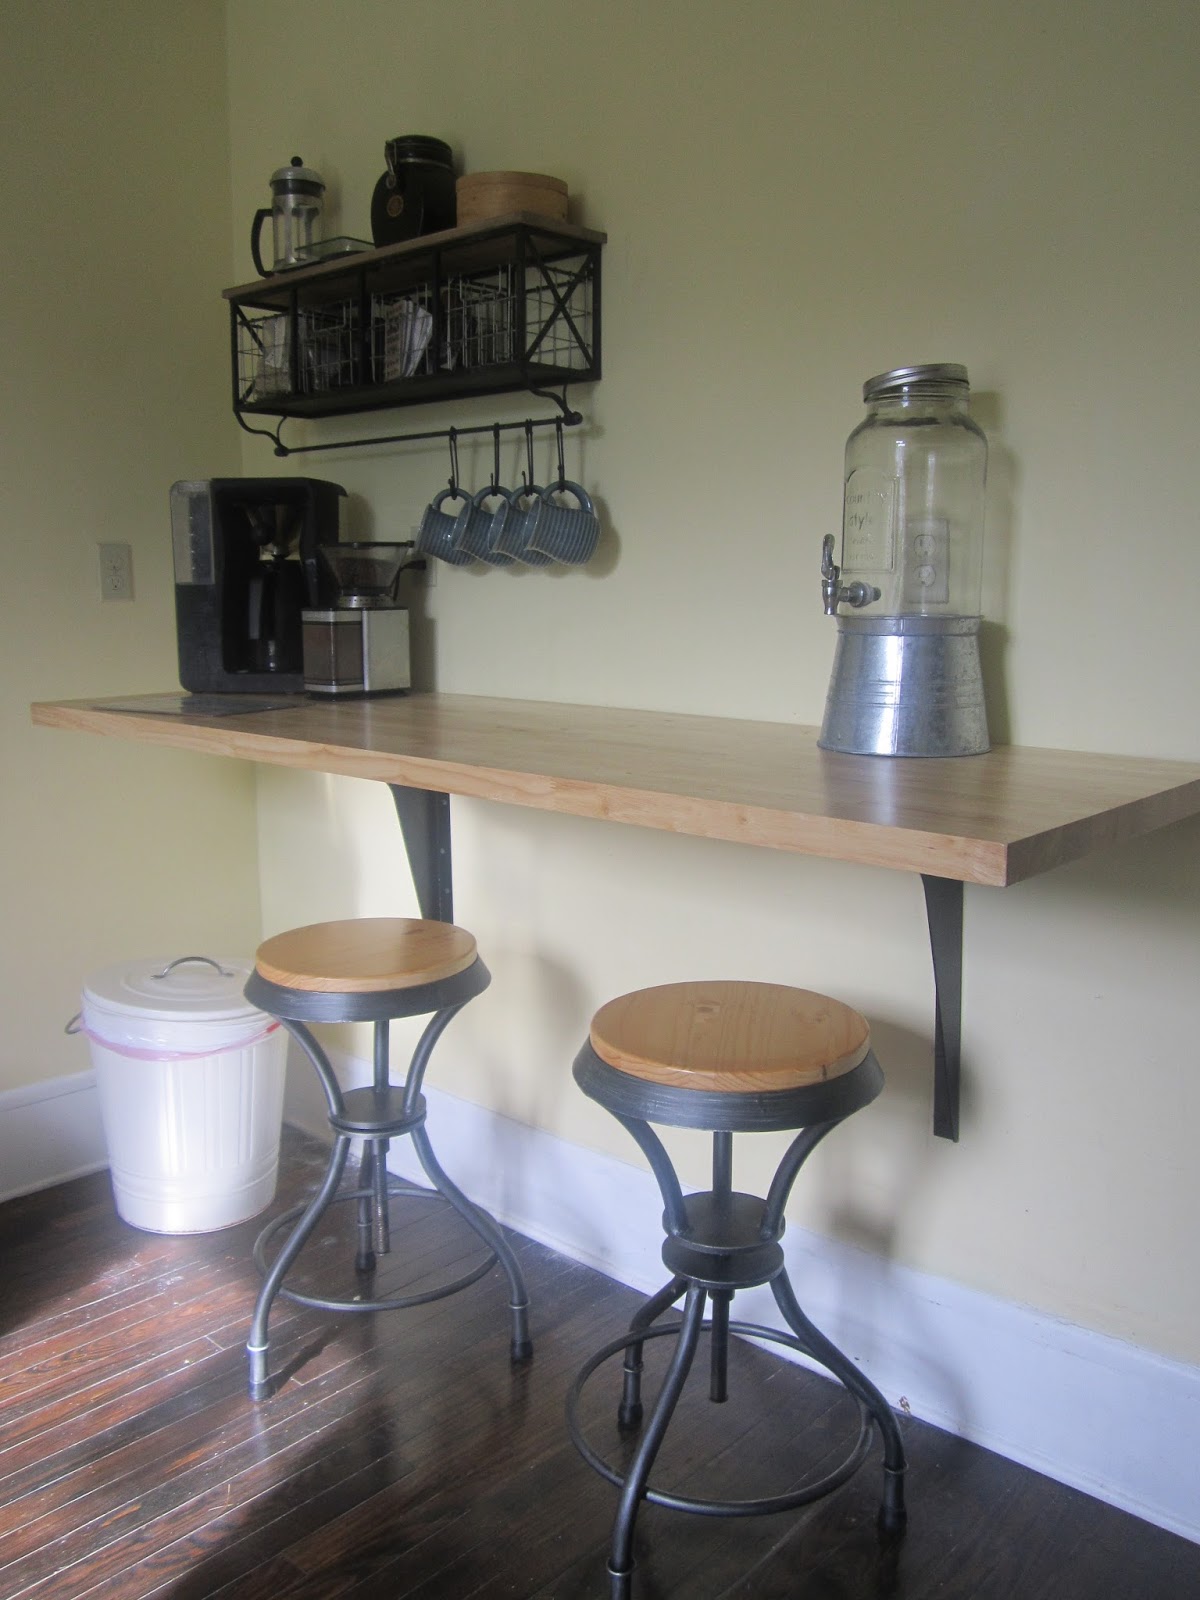
Ta-da! Here it is, our new breakfast bar complete with husband's coffee station. The chairs I picked up ages ago (Two years? maybe even longer ago than that) through Amazon, and aside from having to add rubber feet to keep the hard plastic covers on the feet from scratching the hardwood floors we love them for their sturdiness and industrial 'chic.'


We LOVE our new breakfast bar. This thing was the BEST feature we have added to the kitchen by far. 
Spot to eat breakfast in the morning? Check!
Cup of Coffee/tea and a magazine/newspaper in the afternoon? Check!
Spot for Homework? Check!
More counter space for food prep? Check!
Serving space for parties? Check!
Space for folding laundry? Check!


Why again did we wait this long? Seriously.

Friday, April 26, 2013

Trying It On For Size

Back into the kitchen for a quick peek:

The other day, on a trip to the orange box, I was browsing the tile selection checking out possible options for a backsplash tile that would meet our odd requirement of being less than average tile thickness to work with the reduced relief of our window trim (I shared my backsplash blues with you here) when I was approached by a helpful employee.

I explained my dilemma to him, told him I'd looked at a few glass chip tiles, and after some nodding and chin rubbing, he suggested I looked at those new ekbinnovation stick'n peel tiles they just added to their inventory.

Stick'n peel? Gaaaah ...I had to suppress an involuntary shudder at the sound of that (there are some gel stick'n peel tiles on the market that are touted as the quick cheap fix). He was clearly amused by my reluctance but suggested I gave them a quick look after all.

I'm glad I did!

They had two different types on display: stainless steel tiles (no need for grout) and clear glass tiles (need to be grouted). No cheap gel! And I actually liked the glass mosaic tile quite a bit, so I brought one sheet home.


They are sold just like mosaic tiles in 12x12 inch sheets and cost around $10/sheet. They are mounted to a sticky backing which eliminates the need for thinset which would save us a few precious millimeters in the installation.


We lined it up with the window to see how it would fit , and this could actually work!


I like the crisp white backdrop and the glossy glass finish. On top of that, glass is easy to clean and to keep clean, and I wouldn't have to worry about using a cleaner that ruins the mother of pearl finish/marble/natural stone of the backsplash. No stainless steel backsplash for us though - while it looks stunning in other kitchens and we do have all stainless steel appliances, we feel it clashes with the warm wood tones of our butcher block counter tops.


Not bad, not bad at all. We are not quite ready to pull the trigger yet (mainly because my head is all wrapped up in blue paint chips and paint decks right now) but this is a very strong contender.

Have you tried a stick'n peel product and really liked it? Would you try a peel'n stick tile? Thoughts? Comments? Buehler?

Friday, April 12, 2013

Three of Three: First Recap

On my quest to "Get'er Done" and finish some of the projects we started weeks or months or even a year or two ago and inspired by Apartment Therapy's January event "The Cure," I created the infamous Little Old House "Three of Three" List. You can read more about that list in this post.


I simply took our mega "Master List" of projects in and around our little old house and prioritized the projects in each room, choosing the top three for my "Three of Three" list. The idea is that these three projects would finish their respective room allowing me to move most of our tools and equipment and paint buckets into the storage shed and concentrate on creating a home that doesn't look like a partially exploded construction site.


So far I have tackled two rooms: our laundry/mudroom and our kitchen.In each case I am still missing one project out of the "Three of Three" but, boy, did finishing two top priority projects make a difference already!

Laundry Room
1. paint (cabinets, tabletop and part wall) (read about it here, here, here, here and here)
2. install door knobs (read about it here)
3. cover the utilities


Kitchen
1. paint window (read about it here, here and here)
2. add lighting (read about it here)
3. add backsplash (learn more about my musings here)


It's amazing to see how much of a difference finishing these few projects has made (and how painless they were, really. Unlike a certain staircase project ...ahem). We still need to come up with a clever way to cover up the utilities in the laundry room (hopefully this weekend will see some progress) and, of course, we haven't had the time/funds/chutzpah to install a backsplash yet but at least we have begun the decision making process in earnest and that's at least a mini step into the right direction!

Have you tackled any "Get'er Done" projects lately? Which little project made the biggest difference in (almost) finishing a room?

Thursday, April 11, 2013

Backsplash Blues

The remaining task on my "Three of Three" list for the kitchen at our little old house is "install backsplash." For the past two years our backsplash was merely painted, in part because we allocated the funds for that project to more important areas such as plumbing, electric and more. Another reason was I was completely 'shopped out' and just couldn't make up my mind what I wanted (or whether what I thought what I wanted was really what I wanted to live with for the next umpteen years).

So far, the painted backsplash hasn't worked out too bad. We picked a quality paint that can be scrubbed down and if all else fails, paint touch ups are easy-peasy and done in moments. No wonder the whole backsplash project got pushed even further to the bottom of the to-do list.

There is something really nice and pretty and finished about a 'real' backsplash though, and I caught myself browsing tile sections both online and at the store lately, so it got moved up on the list.


Penny tile is darling and one of my favorites. Since I didn't get to use it in the master bathroom, I've been oogling it for a kitchen backsplash.
Ohh, fancy! Marble is just sooo pretty and classy and would add a nice bit of bling to our more country chic kitchen. I like the nod to our beekeeping adventure in the hexagonal shape of the tiles, too, but wouldn't complain too much if they came in little squares or pennies either.


Beadboard (or even beadboard wallpaper) would fit rather nicely with the overall look of our country kitchen. It's probably the most economical choice so far.

And there is, of course, the classic subway tile that will most likely never go out of style.

The problem with all those choices?

They are too thick!

No kidding. How can they be too thick? I mean, they are standard size tiles. Everybody uses them. What could possibly be too thick about them?
That's where I come back with the old adage "It's not you, it's me."
Heh.
You see, a prior owner drywalled over the existing plaster (and lathe) walls, probably because they didn't want to deal with repairing plaster walls throughout the house. Plaster repairs can be a real pain and it's hard to find real professionals who know what they are doing. So, drywall went over those walls which added insulation to the house but in turn removed quite a chunk of the reveal of the trim. My kitchen window, for example, only sticks out from the wall by mere millimeters.

That really puts a crimp into your style, I'm telling you. The average tile is twice the thickness of the reveal I have available without making my window recede into the wall, and that's not accounting for the thickness of the thinset that needs to go behind the tile. Oy!

More googling and surfing the 'net, however, revealed that there are options even for tricky situations like ours.

I discovered this lovely lovely 'Mother of Pearl' penny tile that is just ...wow! It adds just such a beautiful sparkle to a wall, and comes in all shapes to boot, everything from mini bricks to hexagons to squares.


I think it would go nicely with our butcher block countertops and white cabinets. The price is a bit higher than what I'd like to pay though but, oh well, it is what it is (about $16.50/sqft) but it is very very thin which would be perfect for our awkward situation.

We also discovered that some of the glass mosaic tile at the blue and orange box come in thinner styles which would also work for our particular set up (*cue sigh of relief*).

In the end, we're still on the fence with which option to go. We are thinking along the lines of simple, white or clear, possibly glass for ease of maintenance and timeless appeal.

Thoughts?

Friday, April 5, 2013

All Done!

After stripping, prepping, sanding and priming, it was finally time for a fresh coat of bright white! We have been using Behr's Ultra Premium White for all our trim, moldings and interior doors, and love how crisp and clean it looks.


The exterior of the window is still in need some serious TLC (stripping, sanding, re-glazing and repainting are on the to-do list) but on the inside it's looking mighty nice.


Yep, it's not brand-new, in fact it has all the wrinkles of a 99 year old, but it's gotten a serious facelift and the new make-up ... err, paint looks so much nicer and cleaner and smoother.


Our breakfast station - coffee, tea cups, a toaster - missing in action are our cereal bowls.


And with that the kitchen window is D-O-N-E!

Looking at my "Three of Three" list for the kitchen at our little old house, the finishing line is near!

Three of Three - The Kitchen
1. paint window frame (Done!)
2. add lighting (Done!)
3. add a backsplash

I don't know if the budget will allow adding a back splash right away - it all depends on what we decide to install, so I might have to tide you over with a couple of musings, our decision making process and a "Three of Three" of another room before I have squirrel away enough money to sink into this project.

Thursday, April 4, 2013

The Kitchen Edition: Mo' Window

On Day II of Project Window I gave the stripped window frame a quick sanding and a light coat of primer.
Nothing brings out imperfection as beautifully as a crisp coat of bright white and primer does the same. Once all the scratches, gouges, dings and divots were painfully obvious it was time for a bit of wood filler.


Yes, I use an old zoo membership card as my spatula - it's THE BEST to fill and smooth wood filler. You should try it. Any store/credit/membership card will do.

After drying, more sanding, more patching, more sanding, a dab of caulk, and finally, finally, the final coat of primer.


And tomorrow. Tomorrow will bring a fresh coat or two of beautiful semi-gloss white!

Tuesday, April 2, 2013

Kitchen Edition: Let There Be Light!

Hind sight is 20/20, and it's really true when it comes to your first ever renovation/remodel.

There are a couple of things I wish I'd known/thought about/done differently when we were tearing through our little old house two years ago trying to get it ready enough to move in.

One of them is the light situation in the kitchen. While we have enough electrical outlets to equip a small country, we missed out on the chance to add more lighting right at the beginning. For a while we've been musing about adding a pendant light to the area above the sink, and while squirreling away money, locking down project funds for "The Big Great Painting" and more projects on the list than you can shake a stick at, we thought we could start with a temporary solution.

You know, to see if it'd be a good thing to add a light fixture above the sink and without too much commitment (and holes in the drywall) before calling in the electrician.

Plug-in light fixture to the rescue! I went to Etsy.com to see what other crafty people had created, and found a couple of options that both, the husband and I, really liked.

 
[Source: Portman Workshop]

Those mason jar light fixtures are just sweet and very homey looking, and we both loved the funky Edison bulb!

 [Source: FleaMarketRX]

A colander! How cute is that? And those colors! So bright and cheerful - I love them all! The same etsy store also seems pretty cool tin pan light fixtures and other industrial designs so it's well worth swinging by!

[Source: OVERSPRAYkc]

We both like industrial design and so the wire cage light was just right down our alley and the pop of color from the teal bobbin really caught our eye.

After browsing many many pages of eye candy, we kind of tabled the whole idea and put it on the backburner. It's one of those not-so-important projects/ideas, and life kept us busy until my trip to IKEA when I hopped over to Tampa for the weekend to visit a friend. Before making the long trek back home I hopped into IKEA, and while there, grabbed one of their plug-in light fixture kits in a spur of the moment. Almost at the cash register I spied this cute flower pot, and that was when an idea started to form in my head.

What if ...

While waiting for the primer on the kitchen window frame to dry, I armed myself with drill, pliers and project ingredients.

I marked the center of the bottom of the flower pot with the circle hole I needed to cut to thread my light fixture. Using the drill with a metal tip I drilled lots of small holes along the perimeter of the circle essentially creating a perforated edge. I also gently bent the scalloped edge outward because I liked the way it looked.


It was pretty easy to cut the remaining ridges between the holes by using a screwdriver as a chisel and giving it quick tap with a hammer and finally I was able to pop out the circle shape.

Time to thread the light fixture on!

Voila! I made a light!

The light kit came with a pair of hooks and the light was hung up in no time! I picked up some coax staples and secured the cord along the edge of the ceiling and down one side of the refrigerator cabinet to tidy things up.

It makes a HUGE difference!
It's cute - I'm clearly channeling the shabby chic country girl right now - but it adds a sweet touch to our kitchen, and it provides a surprising amount of light to the sink area which is lovely, especially in the evenings.

The only problem? I wanna make more lights! This was fun!


Monday, April 1, 2013

Kitchen Edition: Strippin' it

Aaaand .... here we go again: stripping and prepping and priming and painting. Those are the steps you just won't get around when refinishing a window ...or a door ...or baseboards ...or any kind of molding, built-ins and yes, even stairs.

From a distance the kitchen window frame didn't look so bad (no, really, it's just my crappy photography and bad timing in regard to light) but up close you were always sorely reminded of generations of wannabe-painters: thick layering of paint, dried up drops, dings and divots. You name it, our window frame sported it like a zit on a debutante's pert little nose.

There were a few areas were I expected to unveil serious termite damage haphazardly 'fixed' by copious amounts of glompy wood filler (or caulk ...or tissue paper or ...something. If you talk to my neighbors, people in the past were awfully creative when it came to quick and cheap ...ahem, fixes).


Armed with my trusted heat gun and scraper I went to work. You know, I'm tempted to blame the fumes from cooking up that old paint but this time I actually enjoyed stripping off paint.

No kidding.


I mean, how could you not when your scraper slices through thick layers of dirty uneven paint to reveal glossy chocolate-colored pine wood with the most beautiful grain?
It also boost morale that the area was straight so zipping up and down with the heatgun and scraper was like flying down an empty highway with a sexy car.

Those areas I expected to be the remains of a termite's snack bar?
Just a bad paint built-up where people had painted over half-removed pitted layers of more paint.
Seriously ... ugh!

Sure, there are a few dings and divots, scratches and some holes from nails and curtain hardware and God knows what, but overall, the trim is in good enough shape to refinish it with a clean-up, some stain and a dash of poly.

I'm, however, not a dark wood trim kind of gal (and I'm not going down that road of refinishing all trim in the house to its original wood, nuh-uh) and love my trim all crisp and white and clean, but if any owners after us decide to go back to the original, all they'll have to remove on this window is one single layer of paint.

When I was done stripping off all of the old crusty paint, I had to call it a day. Dinner was calling - the dog had been reminding me for the past hour by sticking in his head, watching me scrape and oooh and ahhh over the window, and giving me a quick yip - and it was getting late.

More tomorrow!

Thursday, March 28, 2013

Three of Three: The Kitchen Edition

With the laundry room all finished and wrapped up, it's time to move on to the next room on the list. And since the closest room to the laundry/mudroom is our darling kitchen, what better room to tackle next on my "Three of Three" list than that!

We simply love our kitchen and everything we put into it. When we bought our little old house, the place was a hot mess: dirty, outdated, awkward, non-functioning.

[The ugly truth: Before]

We tore out -everything-. For such a small room, we had a major list of updates and upgrades. Here is our list of completed projects so you can see for yourself:

Kitchen:
- ripped out old cabinets
- ripped out linoleum
- repaired heart pine floors
- refinished heart pine floors
- re-plumbed kitchen
- updated electrical wiring
- hung new drywall
- finished new drywall
- prepped, primed and painted walls
- repaired base molding and add quarter rounds
- prepped, primed and painted ceiling
- installed ceiling fan
- installed new kitchen cabinets
- installed new appliances, sink and faucet
- installed cabinet hardware
- prepped, primed and painted base molding
- prepped, primed and painted trim around doorway to breezeway and to laundry room
- created open shelving with brackets and boards
- created and hung window treatment
- added a chalk board on door to laundry room

[Hard to believe it's the same room: After]

Without the help of our contractors in the beginning we wouldn't have been able to complete all of this with our sanity still (mostly) intact. Amazing how after this long list, though, I still have plenty more ideas and projects for it on my wishlist! But ...all in the spirit of wrapping some things up, here is my "Three of Three" for the kitchen for this year:

Three of Three - The Kitchen
1. paint window frame
2. add lighting
3. add a backsplash


I really, really want to add a No. 4: "Create an eat-in nook," but we'll have to see how that all will fit into the budget. We -are- gearing up to paint the exterior of our house and that will siphon off quite a few of our project dollars so some of the 'flourishes' inside the house will have to wait. No worries, I have plenty of more points to add to my list. I can do that "three of three" game for a couple of years without having to rack my brain just yet!

Tuesday, December 27, 2011

Trip Hop Trap

There it is.

Don't you see it?
Come a little closer.

Now?

Still don't see it?

Yeah, that's the problem.

See, I have a small problem. I'm vertically challenged. Short. Fun-sized (or pocket-sized as I have heard the husband say). I measure a measly 5'2" and in order to reach certain cabinet space I need a foot stool. This particular foot stool is of German origin. I picked it up years ago at a fleamarket and have been toting it around ever since. It's solid wood, sturdy and gives me just enough of a leg up to reach what I need to reach without having to fall back on a regular step ladder (I'm afraid of heights and don't do serious ladders). Years ago, when we lived in our rental apartment with its white kitchen and cream colored linoleum floors, I painted it dark chocolate brown. That made it highly visible.

Now, against our beautiful dark walnut heartpine floors, the same rich color renders it practically invisible and turns my helpful step stool into an invisible tripping trap.

After acquiring bruises and bumps in varying shades on our shins over the past couple of weeks, blundering through the kitchen, tripping and accidentally kicking the unexpected obstacle across the room, we'd reached the end of the line.

Enough!
No more!

After a thorough sanding,
a quick wipe down with deglosser, just to be sure the new paint would stick
and a quick coat of paint using the lovely "Lyndhurst Duchess Blue" we painted our dining room, we fixed his ankle biter type of a problem.


A quick fix that helped my foot stool morph from a drab tripping trap to a peppy step! Yay me!

Thursday, September 22, 2011

Kitchen: In for a window treat(ment)

After all the major updates in our kitchen, followed by painting some baseboard and door frame (read about it here) and adding vintage style open shelving (described here and here and here), it was time to tackle another project on our to-do-list for this room in our home.

While I love having a backyard view from my sink, seeing the ratty old mini blinds every morning just didn't brighten my day, nor did it brighten our kitchen. It just had to go. And fast.


[Before: Meh ... miniblinds]

I'd been patiently waiting for another sale at Calico Corners to snatch up a piece of that adorable "Dahlia" fabric (I talked about my fabric shopping woes here) but again, no luck. They didn't have it in stock and ordering it would take another 7-10 business day.

I'm patient, but not that patient.

So I browsed beautiful fabrics for about an hour, petted some lovely Ikats here, fondled some delicious Matelasse there, and then came across this pretty little number:


[What lovely leaves - Robert Allen Collection]


White linen with a scattering of leaves featuring colors that would work well to pull my yellow and white kitchen and my turquoise and white dining room together. Sold!


At home I pulled up my favorite "Miniblind to Roman Shade" tutorial up from the "Little Green Notebook" and got cracking. It worked great so if you feel crafty and need some easy-breezy window treatments check it out here: Miniblind to Roman Shade Tutorial

Following the instructions I cut out the thin strings that allow the miniblinds to tilt, careful not to cut the main string for the up and down mechanism.


[In Progress: Chop Chop!]


Our house cat "Boots" took off with one of the strings, and after she was done playing catch with it for a while she returned to keep a watchful eye on me to see if I'd create another toy for her during my project.


[In Progress: Extra string removed and ready to tackle step 2]


After that, I removed all but 5 slats and re-attached the bottom slat again before laying the shade skeleton on my fabric.


[In Progress: Fabric cut to size and ready to be attached]


I trimmed my fabric - one yard turned out to be the exact amount of fabric I needed for this project and then started glueing the hems. I usually -never- use any of those hemming tapes and glues. Sewing a straight seam through a sewing machine is easy and comes with the guarantee that IT.WILL.STAY.PUT. Something I can't necessarily say about some tapes I have used in the past.


I consider this a test: if it stays, great. It would have been much more difficult to run this through the sewing machine (but not impossible - just quite pin-ful to make sure the fabric doesn't move). If it doesn't, oh well, then I'll have to sew it after all.


[In-Progress: Looking good!]


So far this project had been surprisingly easy and it progressed swimmingly. Hanging the miniblind turned Roman shade back up, turned out to be a bit tricky and required me to drill a new hole into ancient pine but after just a few more minutes my kitchen window looked much improved!


[After: What a "window" treat!]

What a change! Now I really need to take care of the window trim.
And just for kicks and giggles, here's my "Honey Do" list for the kitchen as of today:


Kitchen:
- rip out old cabinets
- rip out linoleum
- repair heart pine floors
- refinish heart pine floors
- re-plumb kitchen
- update electrical wiring
- hang new drywall
- finish new drywall
- prep, prime and paint walls
- repair base molding and add quarter rounds
- prep, prime and paint ceiling
- install ceiling fan
- install kitchen cabinets
- install appliances
- install cabinet hardware
- prep, prime and paint base molding
- prep, prime and paint trim around doorway to breezeway
- create open shelving with brackets and boards
- create/ add window treatment
- add a chalk board somewhere
- prep, prime and paint window trim
- finish trimming out the cabinet above the fridge

Optional/Possible future projects:
- update lighting*
- create built-in breakfast nook *
- add small round pedestal table*
- install back splash*
- add crown molding