Showing posts with label Master Bathroom. Show all posts

Monday, April 22, 2013

Coming Clean!

Taking a shower is such a modern convenience it's hard to imagine a time when all you did was wash up and every once in a while take a bath. Living in an older house you are, however, reminded of this time. Clawfoot tubs are great for taking a hot bath, especially the cast iron tubs that stay hot forever as soon as the water has heated up the cast iron. That taking an actual shower came as an after thought you can easily tell by the awkward curtain rigs and contraptions holding a handheld shower up or extensions to create a shower 'spout' -they are not the prettiest things to look at, especially if the tub is somewhat freestanding (it's not quite to out of place if the tub is tucked into a corner).

When we turned the upstair's kitchen into our master bath one of the must-haves was a clawfoot tub - you clearly can't have a historic home without one! - and we scored an amazing deal on a beautiful acrylic tub with gorgeous chrome feet (more about that here).
All the looks but none of the weight!

Except, no way to shower. After much hemming and hawing we finally discovered the Kvartal curtain track system at IKEA and decided that that might be the best "out of the way/sight" option to add some shower curtains to our bath tub.


The KVARTAL system offers two attachment options: wall-mounted and ceiling mounted. We bought all the pieces to create a 5'x 3.5' large rectangular track system to hang right above our tub. Little Man and husband had a great time putting it together!


We decided for a set-up that is much wider than our tub because after installing the curved shower rod in our hall bathroom we had learned to appreciate the extra elbow space.

No more cold shower curtains sticking to your wet skin!

You definitely need two people to hang the curtain track from the ceiling (one holding, the other marking and drilling and screwing) but in the end the whole project was rather straightforward and simple.


And we now have shower curtains! I picked these up at Wally World months ago because the color scheme matches the ongoing theme in bedroom, dressing room and bath room just perfectly. It really picks up on the seaglass colored ceiling and ties it all together.

I hope they are still selling them because while I bought two, having another one for more overlap would be even better.

[Binky photobombing]

My "Three of Three" for our master bathroom are coming along nicely:

1. Update ceiling light
2. Install shower curtain
3. Create shelving in closet

Now all that's left to do is tackle the closet, frame out a separation and install shelves and I get to check off this room! Woot!

I took me three rooms to notice a certain ...ahem, trend, though: As you can see, the third project on each room's list so far has been the one that is the most involved and will take the longest.So in order to keep this blog hopping, I'll have to continue my room hopping as well.

Let the madness continue!

Friday, April 19, 2013

Let There Be Light!

The husband is switching positions within the company, and thought it would be a good time to take a few days off between taking off one hat and putting on another.

I was being a good wife and did not prepare a "honey-do" list for him but instead let him enjoy sleeping in, a cup of coffee with the morning paper and all the oodling about he could possibly squeeze into the day while I was at work and Little Man at school.
Yes, it was hard.
Yes, I was twitching on the inside biting back 'helpful suggestions' regarding things I'd like to see done that week.
Man, it was hard!

On the other hand, it was all the more rewarding to come home from work to discover he had tackled a project while I wasn't supervising and ...ahem, delegating!


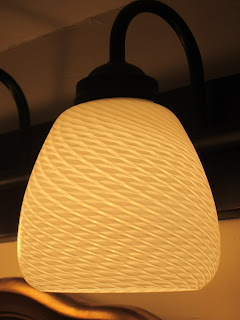
It's a ceiling light! In the master bathroom! I'd picked up another ALÄNG ceiling light fixture at IKEA during my weekend in Tampa a few weeks ago. We liked the look of the smaller fixture we installed in the dressing room so much and thought it would also go beautifully with the texture of our vanity light shades that we decided to replace the shiny brass nipple fixture in our master bath with the larger version (since the bathroom is also much larger; it's a whopping ~12'x13').

So, because Super-Husband installed it as a surprise, there are no 'Before' pictures - no biggie, nobody really needs to see the brassy nipple fixture that wasn't doing anything for our bathroom in regard to light or looks - only 'After'. It's so much prettier and so much brighter now, and we have a more cohesive look between the dressing room and the adjoining bathroom now.

And I didn't have to nag once!
Awesome!

Tuesday, April 16, 2013

Three of Three: Master Bathroom Madness

Well, we're still stewing on our back splash for the kitchen, and covering up the utilities in the laundry room has begun, but in order to keep this blog going with more than one post per week and even more so to keep the current momentum (you never know when that'll fizzle out), we're pressing on here at the Little Old House!

After tackling (or starting on) two rooms downstairs, it's about time we make a big jump and hop on upstairs! On my trip to Tampa a few weeks ago I managed to sneak in some quality time at IKEA and picked up a few things for the house. Since one of those things was something for our Master bathroom, what better room to choose that one next?

So, here we go!

Our upstair's master bathroom began life at closing as the upstair's kitchen of our duplex. Then we tore into it, ripped everything out and have been putting it back together ever since.

Miraculously it went from this ...

 ....to this


It's come a really long way. Since this last picture we have also finally added a vanity light fixture


and we also changed the wall color from just bright white to a pale beige for some much needed warmth. Our master bath is -huge- and we felt the bright white walls which looks so pretty in other bathrooms made our bathroom feel just like a cold, empty, open aircraft hangar. The very light, but warmer color on the walls makes the trim and tile pop and adds much needed warmth to our bath room, making it feel cozy and comfortable.

Of course, there are still things I would like to add to it, and change about it. From the long list of projects and flourishes I picked the following projects for my "Three of Three" list:

  1. replace ceiling light
  2. install a shower rig and curtain
  3. set up the linen closet with shelves
Let the madness begin!

Friday, January 25, 2013

Shady business

Now that the vanity light fixture is in place and working, we really needed to get some pretty shades.

Blue box to the rescue!
This is what caught our attention in the first place: the incredibly wide variety of light shades for this type of light fixture. While a few years ago, these light fixtures only came with the standard shade, the light fixture business obviously finally discovered the versatility and the fun of coming up with a variety of designs. And since they are pretty much standard sizes, you can even go and switch it up at home if you already have one of those vanity light bars! How cool is that?
Since I couldn't make up my mind right away, I took home the following babies:

1. white glass shade with a twisted comb pattern

2. frosted glass shade with a clear edge

Back at home, we tried them on for size.

I must admit that I was secretly cheering and rooting for Shade #1 because of the pretty pattern which would pick up on the pattern of the IKEA light fixture in the dressing room (and we are thinking about swapping out the brassy nipple fixture with the same light). Imagine my delight when I discovered that the mirror was not in the way of the shades and that they looked as nice screwed in as I'd hoped!

I returned the other shade to the store and picked up the remaining two shades for a complete set.
And it's D-O-N-E - Done!


It's starting to feel mightily civilized in there. Now all we have to do is plan a trip down to the IKEA in Orlando to pick up the missing link necessary for the installation of our shower curtain rig and our bathroom will be good to go (you know, except for all the other projects I've pinned, just in case).

Left to do:
  • install shower curtain rod
  • hang shower curtains
  • create window treatments
  • decorate (art, plants)


Tuesday, January 15, 2013

Vanity, oh vanity

We decided we'd lived long enough with that nifty blue plastic box above our bathroom vanity ... or maybe we finally realized that that was where a light was supposed to go - you pick. At first, with the bathroom marginally ready to be used, I was too shopped out and tired of making decisions and simply pushed this one back to the bottom of the pit ... list. Then, with winter approaching, the thought that "a little more light here would be nice" started to sneak into my brain. And yet, I -still- wasn't sure what kind of light to pick. 

You see, it's like this. I just pretend I know what I'm doing talking, style and design as if there was nothing to it (ahem ...cough-cough) when really all I'm doing is blundering about, stealing ideas (Thank you, blogosphere and Pinterest) and trying to make the best of it. Heck, I don't even know what my style really is! Or if I have one (chances are slim). 

Enough with the whining and back to the vanity light.


Oh, wait! More whining! Ha!

Much to our dismay (and here's a "lesson learned" for when you are constructing, rebuilding, renovating, etc. because I wish I'd noticed it sooner) the electric box isn't centered above the sink. You'd think it is, but it's off by about 2 inches.
Not a whole lot, but enough to notice it.

Not feeling the desire to g into rewiring, running into studs and other possible issues, we tried to come up with a way to deal with this problem. A light with a wider base would provide coverage and allow us to adjust the fixture placement, and so we started to search for a light fixture that would do just that.

We really liked the option that the lighting aisles at the blue box presented: they are offering sconces, vanity bars, etc. in various finishes with shades sold separately.


Here's the husband installing the light fixture plate to which the cover attaches We had to drill a few extra holes in order to adjust the discrepancy between the light box position and the center of mirror and sink, but it wasn't difficult at all and you don't see it unless I point it out to you Promise!


Tada! This is an awful picture and it took real artistic skill to make it look like everything is centered but the sink. I blame the swoop of the basin and an odd angle, and missing window treatments. Heh ... It's centered, though, I promise.

We have light! Huzzah!

We do, however, not yet have shades. There are so many options to choose from that I developed a serious case of "DIYer Block"; I keep going back and forth between two shades that I like, waffling over which would be better. I figure I'll buy one of each, try them on, and decide then, so stay tuned for another vanity light update! (There's no end to it. Ever. Ahhhhh!)

Tuesday, December 4, 2012

Little touches

After hitting a really low "low" I feel like my DIY spirit has returned.
To top it off, the in-laws will be visiting in just two weeks and nothing inspires and invigorates quite like the tight deadline of the impending arrival of guests, especially the kind of guests that will notice any kind of progress ...or lack thereof. Ahem ...

So, rather than starting yet another BIG project, I've been busy putting a couple of finishing touches here and there. As you may have noticed we have hit that dangerous level of "almost done." All of our rooms are in that stage of "almost done" where they are usable - comfortably so - albeit not finished.
Maybe the trim needs a second coat of paint.
Per chance an outlet cover is missing.
Perhaps we should install the light fixture.

You know the drill.

Invariably you will run out of steam at some point during your restoration/renovation. No shame in that - we all do it to some degree. I bet a lot of my neighbors know exactly what I'm talking about... heh. Anyways, since our bathroom is the room with the most recent activity (I  changed the color scheme of master bath, master bed and dressing room to create a more cohesive unit rather than a string of rooms), I buckled down and added a few minor finishing touches.

Like escutcheons.
The very pinnacle of little finishing touches.
E ...what?
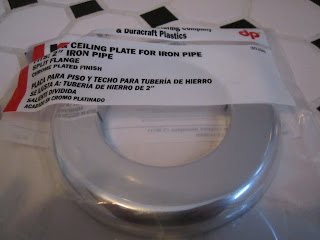
Escutcheon. The little ring that frames plumbing sticking out of walls or floors (or the plate around a key hole, that's also an escutcheon... and the shield shape in heraldry).

There was the case of the drain pipe of our clawfoot tub that was missing its escutcheon. Nothing pressing, nothing life threatening, but definitely one of those things that separates the men from the boys ...err, the finished rooms from the unfinished ones.


Tharr she blows ... unceremoniously the drain pipe dips into the hole in the tiles. Not like you'd see it when you're standing but hey, there are times when crawling and bathroom happen at the same time.

Anyways ...


I went and got an escutcheon at the blue box for a whopping $4 and some change. These babies here are plastic and feature a little per-perforated slit for an opening so you can just slide it over your pipe.

You bend it back and forth gently until it breaks at the indicated line, then - equally gentle - twist it slightly so the ends separate.


With a little bit of twisting and wriggling you slide the escutcheon over the pipe and voila! the drain pipe vanishes in the tile with a bit more style!
I did the same thing using smaller escutcheons on the hot and cold water pipes and the drain pipe of the faucet in less than 10 minutes.
Ta-da!
(Just why on earth does it always take that long until you get around to it?)

Next was the area where our new tile met the floor of the closet. Yep, until we can find a door that fits or can be made to fit the not-so-standard size of our odd bathroom closet, I hung a quick curtain with a tension rod. Clean and simple (and another one of those "less than 60 minutes" projects).


Yeaaah, not cool. The fix was equally simple, inexpensive and quick.


During the same shopping spree at the blue box I'd picked up a simple seam binder threshold. I measured the opening, cut my seam binder to sized (I even shaped it with my Dremel tool to make it fit exactly into the opening following the outline of the trim) and screwed it in with the included screws.

All better!

So here is the remaining to-do list for the master bath:
  • buy and install light fixture for vanity (in progress; need shades)
  • buy and install new ceiling light
  • install shower curtain rod
  • decide on window treatment
  • find art
  • decide on shelving/storage solution
And one crazy day I could see
  • adding wainscoting
  • removing the ceiling and exposing the rafters (that's not scary - what is scary is that husband thinks that's a really cool idea)


Thursday, April 26, 2012

A little something

 While picking up lumber for a cub scout project (Nope, no kidding), I snuck out and mosied through the garden center as well. This particular blue box home improvement store has an unusually nice selection of distressed and/or discounted plants, and I spied some lovely orchids with a pot for just $4!

So, I decided that the master bathroom was starting to look civilized enough for the first purely decorative touches and snagged one.

At home, I couldn't leave well enough alone and whipped out the ... not, not the faux gold leaf ...pshaw! .... but the trusted Krylon spray paint and gave the pot a quick update.

Before, the pot was a simple terracotta pot that had been white washed. Not a bad look but it didn't really flow with the new glam look of our bathroom.

Ahh, but after a coat of Krylon gold things started to look deliciously glamorous. Definitely good enough to eat!


While I don't have the greenest of thumbs as far as indoor plants are concerned (plus we have a cat who thinks that any plant is just a fancy version of cat grass and so placement needs serious considerations), orchids seem to work for me. When I was living in Germany (up north in Hamburg), I shared my bedroom with an orchid that just bloomed and bloomed and bloomed.


Did you spraypaint a little something lately? What about your thumb? What shade of green is it?

Monday, April 23, 2012

Not all that glitters is gold ...

Alright, here it is: my latest craft fail.

CRAFT FAIL, that is.
In all caps.

As you might have read here in this post about the redesign/tweaking of our master bathroom, the softer color scheme had me adding a gold framed mirror. The current mirror in our bath, however, is black. Nothing a little paint can change, right? While browsing the shelves at the local craft store, I ended up chatting with one of the employers who recommended I try the faux gold leaf instead of paint.

Now, I have used gold leaf before. REAL gold leaf. Lovely, 23K gold leaf with that unrivaled rich, warm, honey sweet glow of precious metal.
23K gold leaf that goes on like BUTTA.
Heck! Better than BUTTA!.

You see, I love medieval calligraphy and illumination aka medieval book illustration and was honored with several awards to boot for my creations. Gilding is the crowning glory of any manuscript and piece of art. It sounded so much better than using spray paint.

Home I went with a book of faux gold leaf.

Here it is: mod podge, faux gold leaf and a sponge brush. Not pictured is a soft make-up brush to brush off excess gold.

Gilding, whether it's done with the faux stuff or real gold, is surprisingly simple and straightforward. Eseentially it's gluing thin sheets of metal to another object (paper, etc.) and polishing it. It only gets tricky when you're using medieval recipes and techniques or, in this case, faux gold leaf. 


First you brush some glue on. I used Mod Podge and as far as glue is concerned, it worked really well. You want a thin layer of glue, just tacky enough for the gold to stick but not wet.

You cut off a piece of gold leaf using the transfer paper to hold it so it won't stick to your fingers. -Real- gold will stick to anything including itself, faux gold - not so much.

You lay it gently onto the sticky parts and smooth it against the surface.

Rinse and repeat.

I have gilded a bunch of artwork using real gold but I have always stayed away from the faux stuff. I don't know why I believed the employee but man, faux gold leaf still stinks.


Real gold leaf will literally melt against your skin or any other surface. It's powdery soft, once it touches anything but the transfer paper.
Faux gold leaf?
Well, I think it's best described as yellow aluminum foil. It went on all wrinkly and stiff and no amount of polishing (burnishing) would iron out those wrinkles. Gah! You could achieve the same effect covering everything in cheap aluminum foil and spray-painting the whole thing.

Grumble-grumble.

After grumbling over this CRAFT FAIL for a couple of days, I did what I should have done from the start (other than gilding my mirror with 23K gold leaf): I sanded the messy part and then spray-painted it with Krylon Gold spray paint.

So. Much. Better.

Friday, April 6, 2012

Evolution of a Moodboard

Yesterday, as I was adding a second coat of white paint to the baseboards and door molding, my mind started to wander.

It does that all the time when I'm painting trim and lately I have had the greatest ideas during those seemingly endless sessions of painting things white. Most of them revolve around painting things any other color than white.

Right now, our masterbathroom is - in its unfinished state - a room of rather stark contrasts: black vanity and white vessel sink, black tiles and white tiles, black window frames and white walls. It sure could use some softening up (nevermind, that I still don't know how to tie those three adjoining rooms - bathroom, dressing room and bedroom) together without letting go of our beautiful dark teal wall color in our bedroom. Oh well, one step at a time.

Once Little Man was in bed, I decided to dig up the good ol' Polyvore account to dabble with a mood board. I'm all about visuals, and even though I tend to have a decent idea of how things will look together, nothing beat 'seeing' it.

So, here's the old mood board, thrown together more than a year and a half ago (Gasp! It's been -that long? Good gracious, time does fly!)

[Master Bath - Old Mood Board]

Back then, I had a thing for black penny tile which we passed on in favor of a more budget-friendly vintage black and white tile since our bathroom is a whopping 220sqft. We -did- diy our vanity from an old desk, decided on one larger vessel sink instead of two, I found a lovely vintage mirror and the wainscoting is still on the list of things to tackle. I liked the stencil and was having visions of some really funky wallpaper effect but now, now I'm not so sure anymore. The stark, clean, uncluttered room has somewhat grown on me, but yet ... I crave some soft undertones.

Polyvore to the rescue!
Link
I know some people like to use other programs (even Windows Paint), but Polyvore and I, we're tight. Pinterest helped me find some inspiration for vintage-style bathrooms and thanks to Polyvore I'd tweaked my old mood board in no time.

Wanna see?


[Master Bath Mood Board- Improved]

We loooove our shag rug in our livingroom, so after trying several rugs - with patterns and without - I settled on a soft ivory shag rug. Thanks to a coupon code, this 3x5 squishy squooshy ivory softness for $44.00 (and free shipping!) from Rugs USA will make an appearance soon. I picked up on the sporadic use of gilded items in vintage style bathrooms and decided to give our mirror a virtual make-over trying it on in gold. Guess I'll break out the gold leaf this weekend 'cause I'm really REALLY loving it!

I have had a wall earmarked for a fireplace ever since the inception of the bathroom, so that just got added. Yes, there will be bubble baths within direct line of sight of a crackling fire. Hmm-mmm-mm ....!

And I'll also need an upholstered bench with curvy legs to help soften the look further so I'll keep my eyes open on craigslist or on thriftstore trips.

The bathroom will continue to read calm and clean, but with some really understated elegance (I'm the gal with dirty, naked feet digging in the yard, y'know, I don't really do 'elegance') and a little softer around the edges.

Thursday, March 15, 2012

Fiddling & Tweaking

Slowly, work on our Master bathroom continues, mainly because I'm a little stumped when it comes to finalizing the design. Right now I'm not sure how exactly to pull everything together and make our bedroom, dressing room and bath a cohesive and sweet master suite.

So I turned to Pinterest for a little help in the inspiration department and searched for "black and white bathroom" and "vintage bathroom."

Oh, the lovelies!

Here are two of my favorites that came up during one of those searches. Vintage touches all around + crisp contrast = LOVE!

[source: via pinterest from here]


[source: via pinterest from here ]

What really stood out and captured my interest were the black window frames. How sharp does that look? Would that work for our bathroom? Not like that would immediately pull everything together, but hey, all is fair in the fiddling and tweaking of home decor, right?

It's not like a bit of black paint would ruin these fabulous blah industrial-looking windows circa 1980s, right?

[Before: Plain ... boring ... blah]

So naked and - I don't know - insubstantial. I'm thinking they need window casings, something to beef them up.

Armed with a brush, tape and paint I set to work. I taped off the glass to make sure I got nice crisp lines and wouldn't have to deal with black paint smudges and runs on frosted glass, roughed up the metal a bit and gave it a quick coat of primer.

[In Progress: First coat on - things are starting to look interesting]

Then I held my breath, through caution to the wind and brushed on some nice deep rich black paint.

I couldn't wait to see what it'd look like all done, tape removed and with the usual zink container with towels back in its place on the window sill keeping fresh towels within an arm's reach of the tub.

[After: Me likey!]

I actually like it! A lot! I'm not sure I'd go as far as painting any window casings black as well, but then again, looking at my first inspiration picture I just might. It's paint after all and changed easily enough. Maybe even tape out some faux mullions to create the look of an 8 over 8 or 6 over 6 window? Ooooohh, the possibilities ....

Tuesday, November 22, 2011

The Cat's Meow

Just in case you were wondering who got to take the first bath ever in my beautiful brand-spanking new claw foot tub ...


[So that's where Tim Burton draws his inspiration from ...
Boots looking like the proverbial Halloween cat.

Look for the tail for any indication how fluffy she really is.]

This is Boots, resident feline here at the Ugly Duckling. The bath is part of her regular flea treatment. I don't know about your State but Florida is pretty heavy on fleas and you have to stay on top of it.

Boots came to us almost 8 years ago as a stray, and within no time she moved her soft-pawed self into our hearts and into our home. She's a sweet, gentle roly-poly kind of furball and prefers to sleep next to my pillow on cold nights, provided the sheet is smooth enough to meet her approval. She hates taking a bath, but she's good about it: no claws, no teeth and her escape attempts are half -hearted at best. Afterward, Boots remains upset at me for about half an hour and then she lets me know she's generously forgiven me. Over the past cuple of years she's become more vocal 'talking' to us with unusual almost bird-like chirping sounds and demands treats and attention with something that sounds suspiciously like "Now!".

I never wanted a cat and I HATE HATE HATE litterboxes, but this fluffball is -my- girl, and I don't mind sharing my lovely tub with her.

Tuesday, November 1, 2011

Hook'em up!

The other day, on my way to pick up the Little Man from school, I used the chance to drop into TJ Maxx. It's been forever since I last had had a chance to mosey through the aisles of this store, especially since they closed their store closer to us and moved it out closer to the Beaches, and I enjoyed it thoroughly.

There were a couple of interesting home goods to be found, some sparked ideas for other rooms but in an effort to not get carried away, put unnecessary strain on our house budget and stay focussed on the current project area (well, okay, areas), I window shopped for the most part and only scored two really cool hooks for the bathroom which were on the "to buy" list!

Yay me!

Back at home I couldn't wait to grab drill and drywall anchors with screws to get my new hooks up and at the wall! The husband and I each own a bathrobe and those needed a dedicated space!


Tools of the trade: drill and screw.


Making a guest appearance later: level and pencil


Aren't they pretty???? I love love love our new bathrobe hooks!
They came in at $3.99 a pop and they are quite heavy.


I quickly drilled two holes, hammered in the dry wall anchors and screwed in the screws that the hooks hook into and I was done!


Now our bathrobes have a dedicated place and we have a chance to keep our sweet master suite a little tidier! No more bathrobes lounging around where they shouldn't.


Hooks fit for a king and a queen ;o)


And here's a sneak peek of the "closet project" (don't mind the yet unpainted door frame to the dressing room and the equally unpainted plinths of the closet door frame - I will get there eventually): the open doorframe is one side of the former teeny hallway between the upstair's hallway and our then kitchen, now master bathroom. I have to paint the door frame and then hang the door and it will become a closet for towels and other bathroom paraphenalia!


For that huse "negative" aka open space in the middle of our bathroom I'm hoping to find a nice traditional rug in washed out vintage-looking beiges and browns rather than a blah bath mat and maybe add an ottoman for convenient seating [for like when you're brushing teeth :o)]. I'm also on the hunt for baskets and some charming old wire organizer, all to warm up our crisp and clean white bathroom. And art and window treatments. Good thing Calico Corners is having a Sale coming up next week!

Saturday, October 29, 2011

Preston - Pronto!

The husband and I have begun working on a few projects that are taking a bit longer while not giving much of 'meat' for daily updates. What with work being ca-ray-ay-zee going on two weeks now and the Little Man taking Karate lessons twice a week, Cub Scouts and my Vampire Diary quality time on Thursday nights, I'm a little hardpressed to find some spare time.


Sure, I can find some time to dabble with projects around the house but obviously not enough time to download pictures, upload them to blogspot and post about it. Booo :o(


But don't fear! DIY woman is here!
And projects are continuing at the Ugly Duckling!


Case in point: the master bathroom.


After finishing walls, updating electricity, updating plumbing, painting, trim out, installing doorframes, a vanity, a claw-foot bath tub and a toilet, I have now added *drum roll*


Accessories!


I shopped around online before settling on Moen's "Preston" series in chrome for our bathroom. It' s simple, yet softly curved lines mimic our vintage style faucets and the price could hardly be beat. In case you hadn't noticed, we are very budget conscious. I'd bought Moen in the past and we like the quality. Thanks to Amazon Prime, our packages arrived within three days of ordering, free of charge. Joy!


I'd ordered a double towel rod, a single towel ring and a toilet tissue holder which I installed with the Little Man's help.


We gathered our tools


measured, leveled and installed the mounting brackets. For the toilet tissue holder we had to adjust the screw placement or else we'd have permanentely screwed a drawer closed. We'd deliberated over whether to buy one of those freestanding and magazine hoding toilet tissue stands but in the end I felt a regular holder screwed into the side of the vanity made more sense. All I could think of was ending up doing business with the holder waaaay out of reach ... oy!


After installing the mounting brackets, all you had to do was slide the fixture base over it and screw it tight.


Pretty, no? And functional to boot! And so civilized!


The double towel trod was a little trickier to install and definitely called for a second pair of hands which is where the Little Man came in. While I held the pieces together, he leveled and marked - DIY kid in action! I love the look and how it's keeping our towels in handy-dandy reach when stepping out of the tub.


There you have it: Our Master Bathroom in its current state. Still pretty bare but we're getting there. We have begun using it on a more consistent basis ever since installing the accessories which - all together - make it feel so much more complete. The towels courtesy of my Mom are probably not going to stay in this bath room. We're generally aiming for a softer vintage look (hard to tell from that stark, crisp black and white contrast, hm?) but I wanted towels on the rods when taking the picture. Yaaaaah, staging ... kind of hard with no window treatments, no rug and no art. We'll get there. Really. Some day soon. And I promise you'll hear all about it.