Showing posts with label yard. Show all posts

Thursday, May 1, 2014

Hatching A Coop, Part II

We may have been procrastinating on getting our exterior paint job done or working on other projects for our house BUT we haven't been really all that lazy either.
We've been building stuff - chicken stuff! After our peepers moved into their happy little brooder box, we got started on building their home in the back yard to make sure it would be move-in ready when they were old enough.

It started, of course, with a trip to the blue box to buy lumber and hardware.


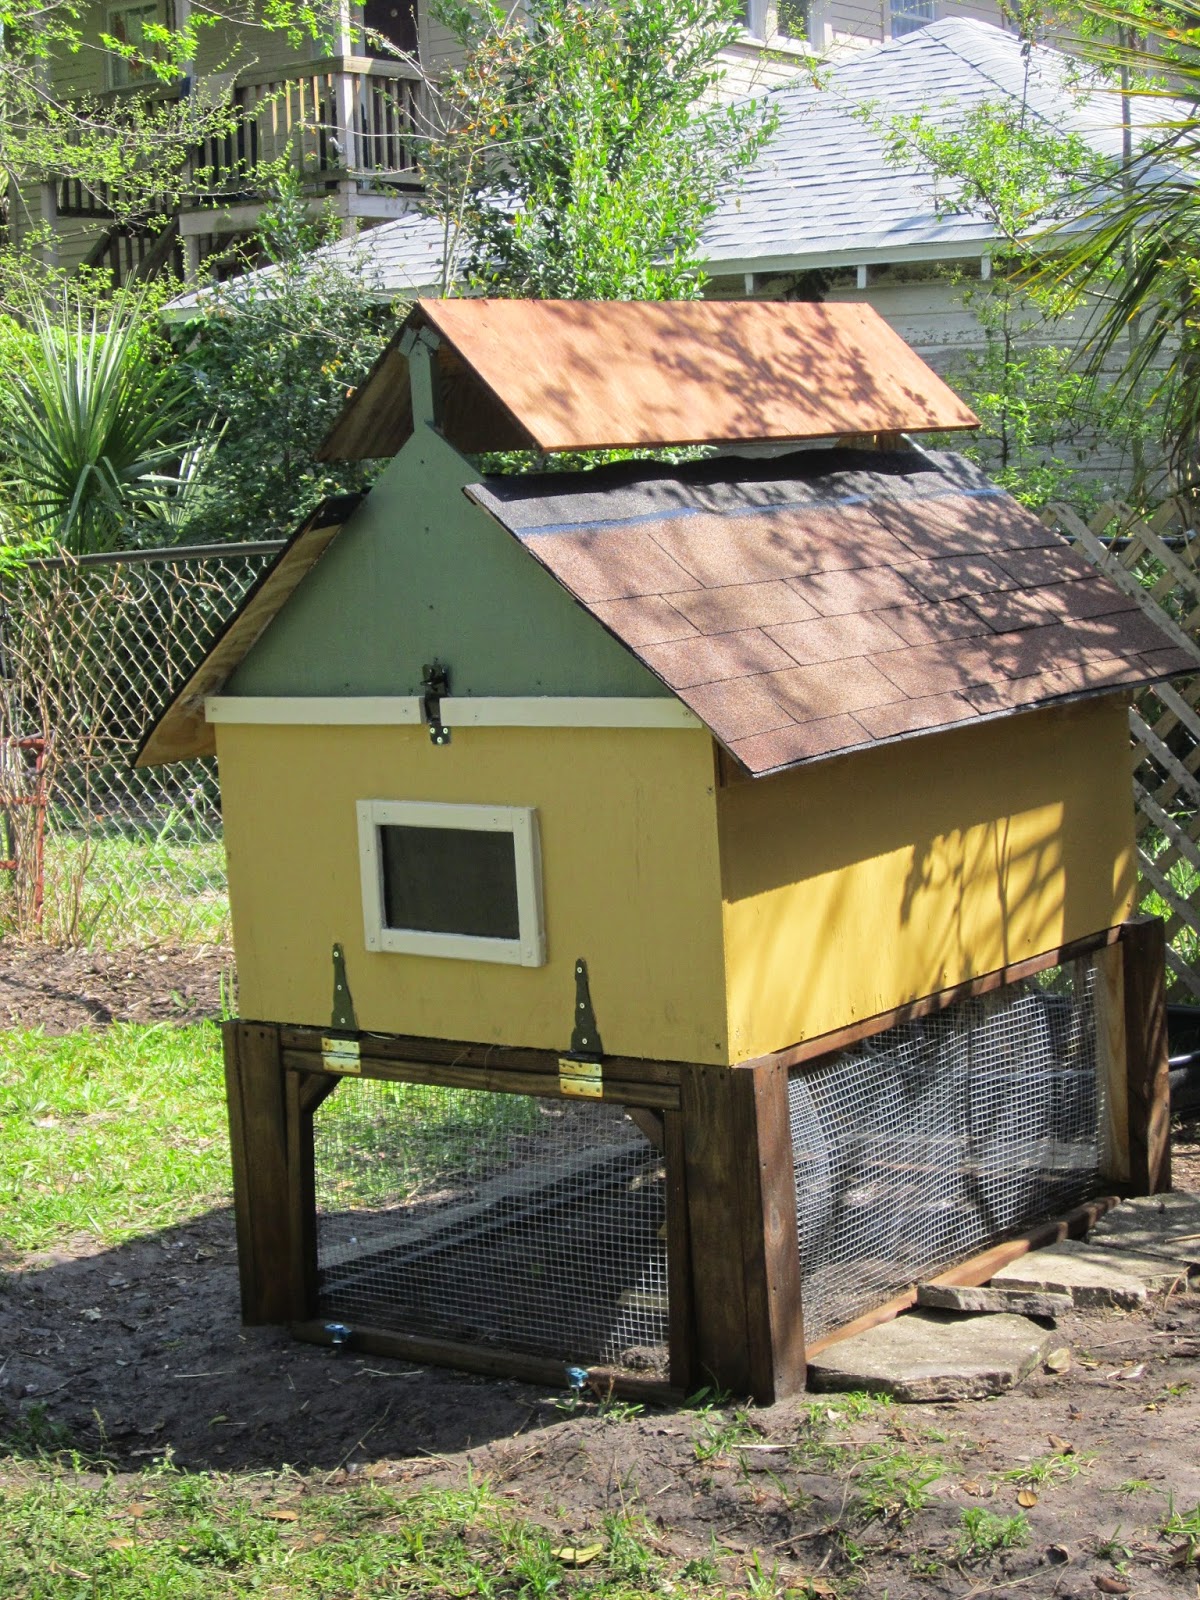
Our chicken coop design consists of two stacked boxes, one framed out and with a roof to go on top, and the other one open with hardware cloth as an easy, breeze run, measuring 3'x4' and thus creating a whopping 24sqft of living space for our five ladies (more than the required 15sqft).

Plans all finagled out, we got busy cutting, and my Christmas present - the new compound miter saw - really came in handy! Loving my newest toy!


Then husband got real antsy to play with my new toy and I was delegated to take care of the are of the backyard that would house the coop. Moving the new structure into a place that's in direct line of the kitchen window (Chicken TV!) and five feet from the property line, meant our yard needed a bit of rearranging.


The African irises came up as did the Lantana and the Hibiscus to be replanted in a different area. The plywood board was used to determine the exact location for our coop.

And while I was happily digging in the dirt, Little Man and the husband started building the coop.We created a frame on top of the plywood floor, and then covered the sides with strips of plywood.


I got sidetracked and didn't take too many in-progress pictures but we cut out a trap door from the floor to create a doorway for a ladder down to the ground level, added nest boxes by dividing the front into three 12" sections using cut-offs from a couple of old boards we'd kicking around, and added a roof with vent.


Here it is in all its unpainted, unfinished glory! It's still missing its paint job and the roof vent cover, but it's in its proper place and looking good. I was most impressed by the fact it didn't feel like we just sacrificed 90% of our remaining yard - there is plenty of space around it to play with the dog, have friends over, pitch a tent in the middle of the yard, lounge in the sun, what have you. Sure, I'd like a bigger yard - the only thing I'd like to change about my house - but after mowing and weed-wacking, I'm not sure I really do want a bigger yard. Ha!

Anyways, as you can see the front has some sort of locking contraption and you can see hinges as well. That's because the front folds down for easy access to the next boxes (so we can steal eggs quickly), and the bottom front of the run folds up, so we can rake out chicken poop and , well, access the run part. It's all solid and heavy and not going anywhere!


This is what it looks like when you fold down the front. You peek right into the three nest boxes. Three is more than enough - rule of thumb is one box per five hens - but the math worked out this way and they'll have a choice. Since Silkies don't roost quite like other hens do, we added a low and removable roost to the inside of the coop (it's the block shape in the center). In the back you can see the chain that opens and closes the trapdoor down.


Since our coop design was inspired by the SmartCoop, we included the folding roof, i.e. the roof folds up on both sides for easy cleaning. After reading various articles and books on bedding, I decided on using sand (and so far it's worked beautifully!).


Here it is, primed and ready for paint! On top of the vent cover is Ferbie, our porch kitty, who just couldn't quite figure out what it was we were building and what it was for. She sure did not appreciate the addition of the roof vent cover because it messed up her resting spot (obviously sitting in the sharp edge is not as comfy as lounging on hardware cloth). Primed it looks like a cute little barn and for a moment I was tempted to leave it that way.

However, we decided it would be a great opportunity to test our house color scheme on a small version first and see how we liked it.
So the frame of the run was stained dark-brown (should have done that first before adding the hardware cloth, but it did turn our okay), the lower half of the coop was painted a lovely golden aka "SW Bosc Pear" (it's not as yellow as it looks in the picture; it's my camera messing with you, I swear!), and the top a soft sage green aka "SW Oakmoss", with a creamy "SW Antique White" trim.

So far, we haven't grown tired of the color scheme - phew! We may have a winner, but we definitely have a chicken coop!

Saturday, November 30, 2013

Under Pressure

One of the first steps on your list of requirements when tackling any painting job is 'cleaning.' Gotta remove all the grime, grease, and dirt that has built up on any surface before you can hope a new coat of paint will actually adhere properly and look good for many years.

For historic houses the recommended way of cleaning the old wood siding is gentle washing with a brush and water from your run of the mill garden hose or a gentle cleaning with your pressure washer to avoid damaging the old wood siding. Newer pressure washers, especially the big industrial, gas powered ones, exert too much pressure and can cause serious damage by removing the softer areas of the wood between the grain. Since we have concrete pavers to clean and maybe, someday in the future, a wooden deck as well (not to mention bikes and cars, and garden furniture), we decided to look at acquiring a low-level electric pressure washer.

I don't know about you but since our budget is small and limited, my first 'poking around' usually involves checking out what Harbor Freight has to offer. We have found that we can often find just the tool we are looking for at a very reasonable price there. Granted, these tools won't last a lifetime. They are not the kind your children will inherit and talk about with gleaming eyes, but for the occasional 'around-the-house' use, they can't be beat.


They were offering the 1650PSI electric pressure washer from Pacific Hydrostar for very little money; with a coupon it came down to a whopping $74.99 - well within the price range we'd decided on and with all the features we wanted. Also, the reviews weren't bad. When I decided to poke around on the internet to see if there were more reviews elsewhere, I discovered that the same pressure washer was also available through Amazon.


For $279.53.
Wait ....WHAT???

Yep, you read that right. I had to take a screen shot because I couldn't believe it. Long story short, I decided to buy the $279.53 pressure washer for $74.99.
It was super easy to put together, the included instructions were easy to follow, and in less than 20 minutes I had our new toy ready to go!

It's really lightweight which makes it easy to lug around and if you make sure to tighten the connectors properly the first time around, it doesn't leak. So we took it for a spin outside, playing with the different nozzle sizes and just familiarizing ourselves with it before embarking on the big adventure of using it to clean our house's siding.


Front yard - we have concrete pavers and this little retaining wall that sets our property apart from the sidewalk - both of which were dirty and in places a little mossy after the especially wet and warm summer we have had.


Yes, that's Halloween decorations - I've been a bit sidetracked lately, obviously. Heh .... anyways, this is one of the fun tools. It's easy to use and comes with instant gratification in discovering that there's a color pattern in your walkway (when you thought they were all the same color) and seeing the crusted dirt of decades wash off and reveal clean, light colored concrete underneath.


"Before" and "After" in the same picture. Isn't the difference mindboggling? Gah! I can't believe it was that filthy (and that we waited so long to deal with it).

After you are done pressure-washing anything, it's you who needs a thorough cleaning.


The backspray covers you, top to bottom, with a layer of mud - wearing wellies might be a good idea. Maybe next time, heh!


Wednesday, September 18, 2013

Backyardigans

Just like our front yard our back yard had exploded over the past couple of weeks! So after cleaning up our front yard we decided to tackle our back yard as well, for good measure.
While we do have some landscaping plans tucked away with a vision of how we want the backyard, well, actually our whole landscaping to look once we're done with it, it's not anywhere near our priority list. Most of the time I grab a plant or two and a bag of mulch perhaps when I'm out and about which makes for very very -very- slow progress but that's okay. We have no plans for moving any time soon so it's all good.

Our yard isn't big. In fact, it's more on the smallish side and there are time when I wish we had a little more outdoor room but once I'm done mowing, weeding and raking I'm convinced that our little yard is plenty big as it is.

There is room for a pool, room to romp around with the dog, room to shoot BB guns and do some archery, room to plant vegetables and to keep bees (and maybe down the line a chicken or two), room for a little patio with table and chairs, and room for a BBQ grill. Really, what more do you need?

There is nothing really pretty about an above ground pool BUT we love it all the same and for summer in Florida, it's the best thing to have in your back yard. Nothing beats a quick splash when it's hot and humid! But visually? Visually these things are just a big blue eye sore. I may have an idea on how to make it tie into the landscape a bit better but for now this is it.

I did, however, add some white marble gravel as well as ferns and Liriope plants to soften the whole deal a bit and make it look a little nicer. Still not great, but a little nicer.

Over the summer, those ferns had gotten out of bounds - they were everywhere! Instead of a clean planter bed with nicely alternating lush ferns and Liriope, lush and green against crisp white rocks, I had FERNS!

So, I ripped them up. Not all of them, mind you, but just the offshoots from the mother plants. That also allowed me to clean up all of the yellow and brown leaves that had gotten trapped in the fern tangle and tidy up the rocks.


Can you believe I removed enough 'fern spawn' to fill -three- hanging baskets? Yeah, I couldn't either.


That's the other side of our yard, opposite our splash zone. As you can see I have begun to add to the perimeter planting slowly moving into the area curving toward the pool and around the Crape Myrtle (not visible) to creating both a pathway from the side into the back yard and an almost circular area in the far left corner as an 'outdoor room'.


It looks very GREEN, but, really, there are plants blooming - there are bright fuchsia Pentas, red Vincas, yellow Florida daisies, pink and yellow Lantanas, two types of Jasmine, orange Bulbines, and more!

Now that front and back are back to looking halfway decent again, it's time to go back to praying it'll stop raining so we can paint the house .... sheesh

Monday, September 16, 2013

Changing Colors

You will hear a lot of people in Florida complain that "there are no seasons." That there is only "hot" and "hot and humid." Well, up here in North Florida that's really not true. Granted you have to look a bit more closely and the signs of seasons changing over aren't quite 'in your face' like further up north, but - newsflash! - we do have four actual seasons.

Right now, we are at the beginning of fall. Summer is in its final death throes throwing heat and humidity at us during the day but clearly running out of steam because the nights have started to cool down again. And the leaves. Ugh, the leaves!

Mrs Massive Crape Myrtle in our front yard has clearly joined the fall movement and is dropping everything. Every.little.discolored.leaf.
And there are a lot of them.

Combined with the heat, humidity and a lot of rain it made our front yard look like crape ...err, crap!


Ugh .... just ....ugh. Brown leaves everywhere, the grass is taking over the crow (or death strip - I really like death strip, heh, so dramatic!) and there are weeds!


More brown leaves, more weeds.
 Ugh!
And the lilies that won't die. No matter how often I cut them back and try to dig them up, they keep coming back. Short of excavating the entire front yard there is just no getting rid of them.


Last weekend I finally found time to take care of the front yard - it was in dire need of a major clean-up - and after picking up a few fresh, bright pink Pentas, buckled down and went to town!

[See the little green Anole taking a sunbath on the flowers?]

Armed with my trusted Japanese gardening knife Little Man and I dug up buckets full of weeds from between the pavers and along the walkway. We raked and swept trying to remove as many brown leaves from between our ground cover plants so they'd have an easier time filling in.

We'd originally considered other types of ground covers such as thyme and even perennial peanut but thanks to those cuttings from a generous neighbor we ended up with this dark-green, daisy-like spreading plant that fares equally well in both shade and sun and even underneath the trees, no matter how much we neglect it. That stuff is definitely a keeper. It's slowly filling in the front, a slow and steady process sped up by my cutting and creating new cuts every now and then.

Once we'd tackled the weeds, things were starting to look up! The Pentas we planted added a nice pop of fresh color amidst all of the lush green and they have the added benefit of being bee-, butterfly- and drought friendly perennials.

Ferns, variegated Liriope, Azaleas and (struggling) hostas make for a nice pattern and texture mix in our planting bed in the front yard.

After the weeds we tackled all of the brown leaves the Crape Myrtle had dumped on our little front yard. Boy, there were a lot of leaves with more still to go. We'll be sweeping for a little while longer.


Husband laughed at me when I bought the leafblower but I love love love how giving everything a quick 'blow' makes it look so nice and clean and tidy! I let him play with it while I was finishing up a quick tidy-up on the porch, and he seemed to be having fun with my toy.


Ta-da! All nice and clean and tidy and fresh! I'm still holding off on changing everything to fall colors and introducing pumpkins and their ilk, because, y'know, it just doesn't feel right yet. I know retail stores are lightyears ahead, the shelves arlready packed with Halloween and Thanksgiving but, man, it's just September ... eh!

Wednesday, June 5, 2013

What's Blooming?

Our backyard is nowhere near what I have envisioned for it and won't be for quite a while but between weeds and scraggly make-shift lawn I love what's been blooming happily. So when I snapped pictures of our knuckle-busting scraping fun, I also turned around to capture a few of my bright happy flowers blooming along the fence.

While we mostly planted bee- and butterfly friendly flowers, and the hive is going gang-buster, we have not noticed an increase in bee activity in our yard. We spy the one or other girl buzzing about the weeds (Spanish Needle and Spiderwort, for the most part), but that's about it, in case you were wondering.


 My favorite corner - Bleeding Heart and a blue Salvia. The colors are crazy bright and contrast so sharply it makes my heart go pitter-patter every time I look at it.


Florida bumblebees are huge, easily measuring two inches, and they are loud. They are also absolutely "NUTSO" about the blue salvia (we also planted another purple salvia and red salvia since they do well in Florida soil, are drought resistant once established and bee/butterfly friendly).


Our Bleeding Heart vine is doing really well in its new corner. After languishing on its trellis in the pot next to our entrance, I moved it out into the backyard. Then I read it loved half-shade. Well, it is planted in full sun, gets more than 6 hours of full sun and is loving it. Weird.


Those darlings with the filigree flowers are a fairly recent addition and I'm madly in love with them. They are "Orange Bulbines" which are great for Florida gardens. Again, they are drought resistant once established which makes them easy to care for, and they are bee and butterfly-friendly.

This year our African Iris finally started to bloom - it's been two years since we planted them - and our red Hibiscus is growing strong. Our banana that I planted last year had her first 'baby' and we have big hopes for all our vines (trumpet vine, Confederate jasmine and Arabian jasmine).

So, what's blooming in your garden?

Friday, March 1, 2013

Painting Me A Yard

Being so up close and personal with my staircase, hours at a time over weeks, and thanks to sudden cold snaps indicating that spring hasn't officially arrived yet, I'm more in the mood for digging in my yard, planting all kinds of cool, interesting and exotic plants and generally turning my weedy back yard into a beautiful green oasis behind my house (that, and the front yard, of course).

Alas, for the time being this will have to wait; at least until after stripping the last spindle and, you know, maybe painting the house first?

BUT ... I just couldn't help think about it, pin plenty of pretty pictures on pinterest (here, if you want to see what catches my eye) and even check out some books on landscaping small yards from the public library.

Our back yard is small, and about half of it is taken up by the above ground pool we need to keep us alive and Little Man and friends entertained during the sweltering hot Florida summers. Like ceiling fans, it's not a pretty asset but a necessary one. Anyways, small yard. It's plenty for us and the pup to romp around, have barbecues, grow some veggies, keep some bees, and more while not overwhelming us in sheer size when it comes to maintenance.

In order to just fiddle and  tweak a few ideas I'd seen on the internet and liked very much, I sketched in the fixed points in our yard on a piece of paper:
  • the back door stoop and steps
  • the pool
  • the ac compressors
  • the steps to the shed
Then I slid that sketch into a sheet protector aaaaaand .... grabbed some dry-erase markers so I could doodle and draw and experiment with shapes to my heart's delight without having to re-draw everything!
 

If a design doodle didn't turn out right, I could just erase it without having to draw up a new sketch - so much easier than digging up that yard again!


Here are a few designs that turned out not looking shabby at all. In this one, for example, I enlarged the current patio to include the area along the house all the way to the side entrance and added a garden swing like this one here in the corner.


In this design I went a bit crazy with the whole circle lawn idea. It's better suited for a bigger yard than mine. It did sound like a good idea when I first thought about it ...

The husband is not a big fan of checker board lawns but I'm still digging them a lot (maybe because I'm the one mowing the current lawn). Maybe it's a bit too contemporary for our Little Old House though. The dotted areas are gravel and the boat-shapes are stand-ins for hammocks. We don't have large trees for that purpose but plugging some sturdy 6x6 or even railroad ties into the corner and adding hooks would work just as well.


We are expecting yet another cold snap this weekend with temperatures dipping down as low as 37F at night (Brrrrr ... cold) so I'll spend the next evenings doodling and driving the husband insane with all kinds of crazy new ideas I'll bring home from the Home & Patio Show on Saturday. What are your plans for the weekend? Doing anything fun?


Thursday, August 16, 2012

Saving Grace

While the husband and I are contemplating picket fence designs and porch railings for the front of the house, we know we are pretty much stuck with the chain link fence in the back that came with the house when we bought it.

It is not pretty.

BUT ...

It's a serviceable fence, it's sturdy and goes all around our property  keeping puppies in and other people's puppies out and well, it's a fence. It also makes it hard for bad people to do bad things hidden from sight and opens up the view to the back alley so there's no sneaking around - at least not along our property line. Also, a new fence in the back is just not in the budget right now with all the other things we want to accomplish (and have to pay for).

So, it stays.

However, there are ways to make it a bit less 'blah'.

Remember how I subtitled one picture of Miss Mattie's make-over with a hint of things to come? Well, one of the little projects we tackled during the make-over was simply BRILLIANT. BRILLIANT, I say.
We spray-painted her chain link fence!
We. SPRAY-PAINTED it.
Black.
It made all the difference!

 [Before]

So, on Saturday, at the crack of dawn as you can see in the picture I snuck (sneaked?) heavily armed with several cans of Rust-o-leum enamel spray paint in black and went to work.

 [In progress!]

Fair warning: it takes a LOT of spray paint, especially when you are also trying to paint the wire mesh, and the cans created a hideous overspray. My feet and arms are still bespeckled with black.
Other than that, the effect is simply beautiful.

[After]

All glossy black, the ugly chainlink fence transforms into something more resembling wrought-iron fencing and looks a lot less "cheapo."


 [After: So glossy!]

It took a whole large can (the one with "25% more content") to spray-paint the small gate so for the remainder of the fence, I decided to skip the wire mesh and just spray paint the main posts instead for now.
Then I put the lattice panel back into place and thought that adding lattice panels instead of painting the mesh might be another idea to pursue and tabled the decision for later. It's a work in progress, after all. Right? For now, I'm pretty happy with my chain link fence make-over.

And so is the husband who is usually not all that excited about his wife spray-painting stuff :o)

Friday, July 13, 2012

Pool Surround

Sure enough - I have prepped and primed molding waiting for two coats of white paint in the dressing room but of course, anything, -any-thing- sounds more fun and is a lot more interesting to do than, you know, painting trim.
Since it seems that I have caught the gardening bug, most of my latest endeavors have been aimed at the yard. There were certain areas that had me itching to do something about them. Case in point: the area around our pool. Last year, I whipped up our little  patio area from pavers found all over the yard, some edging and a couple of bags of pea gravel, and it has held up beautifully and provided us with a nice spot to sit outside in our back yard.
This year, during the big clean-up of the pool when we emptied it out completely and pushed it back about two feet, we ended up with a patio that felt more spacious and less closed in by the pool, but it also left us with a pretty bare spot of dirt between the pool and the patio.


See? That's really nothing worth looking at. An above ground pool is really and truly an eye sore but the benefits definitely outweigh that particular drawback.

One day (this weekend), however, I'd had enough of the crummy looks and decided to just do something about it. After a quick trip to the orange box, I returned with a small car load of marble chips and an armful of plants. I choose to go with Liriope and Ferns for some hardy planst that can deal with the poor soil, partial shade and the abuse they'd experience in those particular spots.

[Six bags later ...]

I alternated my plants, added a stepping stone to get to the pump for easy filter changes and clean feet and then covered everything with the pretty, sparkly, white marble chunks.

So. much. better.

This is much nicer to look at already, and I might even have an idea to ...ahem, prettify the big blue menace at some point.
After I was done and I began to coral the odds and ends we keep on the patio (bugspray, sunscreen, skimmer, etc.), I grabbed an old wire windowbox, zippy-tied it to the fence right between grill and pool and used that instead. It had never worked as an actual planter, not holding enough moisture to keep plants alive baking in the Florida sun, but it had found a new calling.
It's perfect!
No water can pool in there and provide breeding space for mosquitos (they are bad enough as it is already - no need to help them populate the world even more!), yet it holds our patio essentials nicely and works great as a holder for the skimmer with its long handle.


Sooo .... what to tackle next?