Showing posts with label stairs. Show all posts

Friday, January 31, 2014

Cornered!

Remember how thrilled I was when I came across these little guys here in the house on Walnut Court that Preservation SOS loved on to make sure it would be preserved?


 If not, you can read the original blog post here!

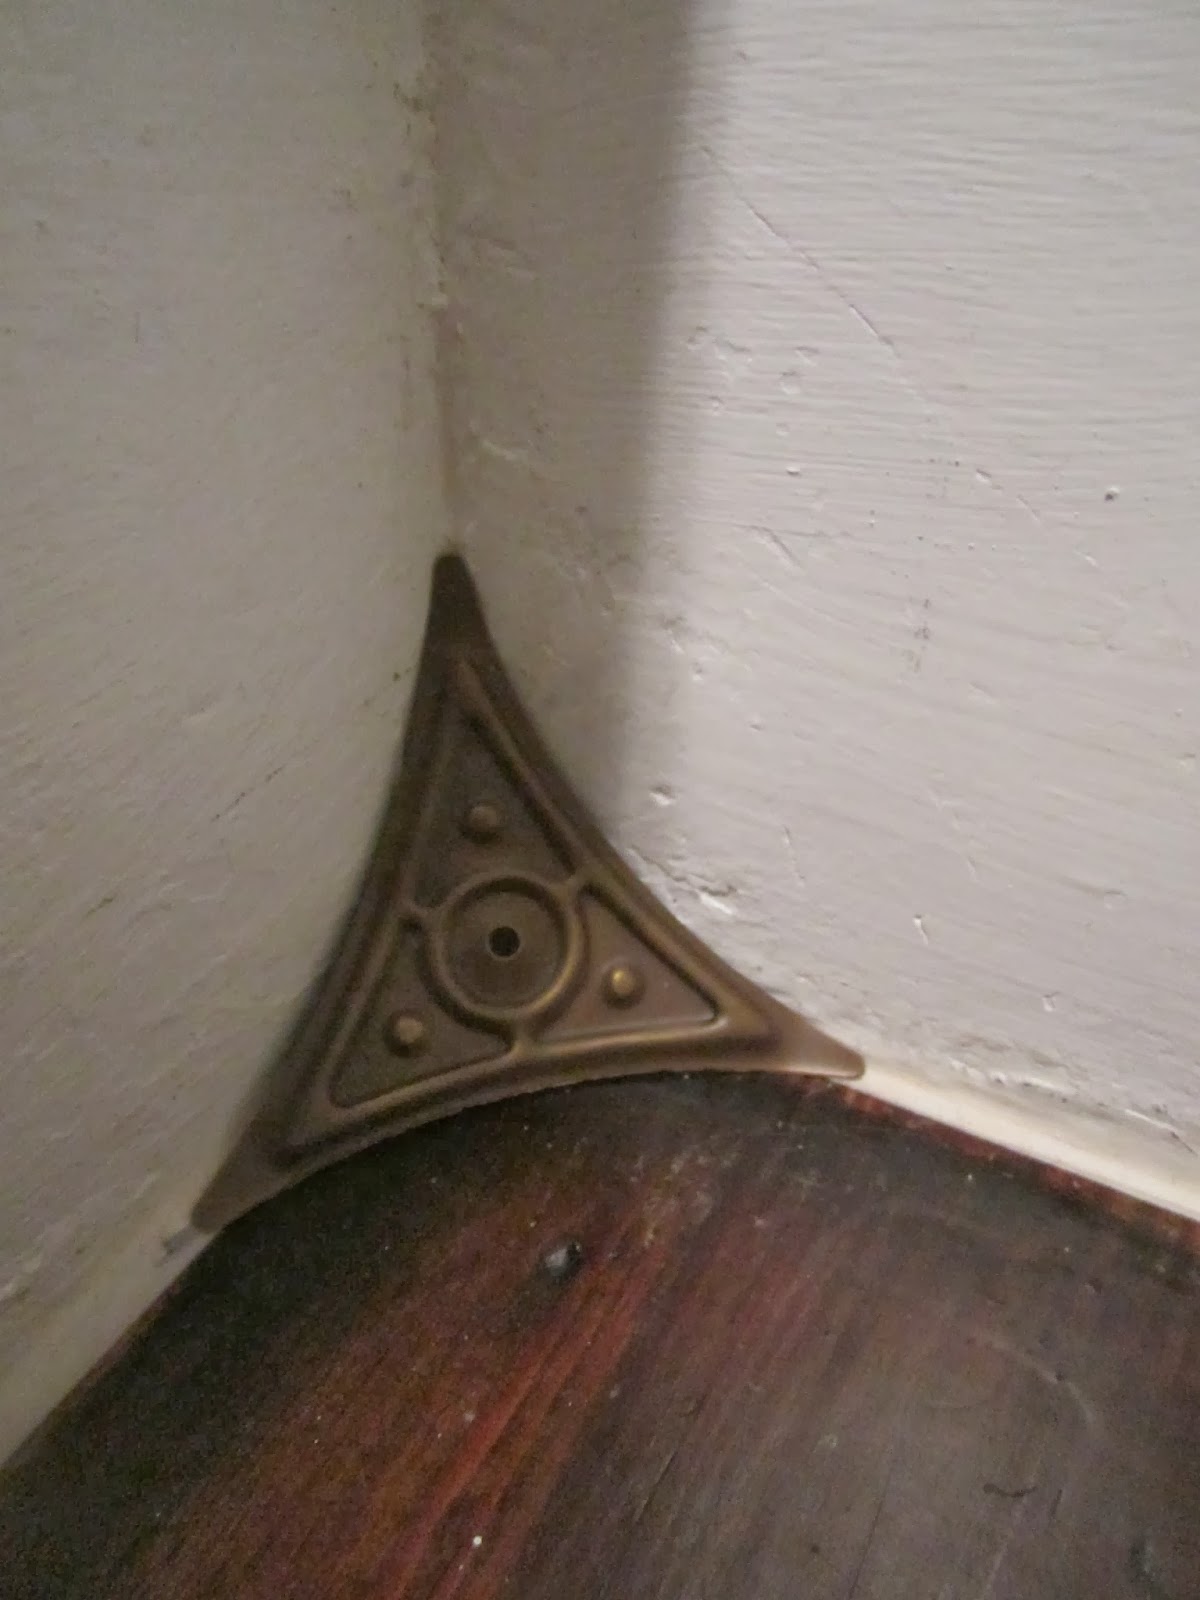
These nifty little brass corners are "dust corner" - a rather simple, yet ingenious and very decorative way to keep your stairs cleaner. Nailed into the corners of your steps, they prevent dust from accumulating in those tight spots and make sweeping down your stairs a breeze! They became popular in the 1890s but remained popular for quite a while.

Our little old house is bereft of many original features so if there is an opportunity to add a little flair of bygone times, I get giddy like a little school girl and just can't wait to get started. Fortunately, life is a real master at throwing me curve balls and so this project fell to the wayside and was delayed quite a bit.

Until now!


Upstair's steps before the attack - clearly in need of a few touch-ups (does anybody else always yell "Don't hold on to the wall!" to their children? Sheeesh ...)and they are already painted a low maintenance grey). The steps got dinged up a bit when we got rid of my vintage school desk. It was lovely, a solid piece of heavy duty furniture, but there was no room for it downstairs and that's where all the action happens so I decided to let it go.


Back to the dust corners. I'd ordered a first batch of corners from VanDykes restorers (here, if you are curious) waaaaay back and then got sidetracked with all kinds of other projects.
It happens.
A lot.


The dust corner kit comes complete with a handy little doodad that helps you set the nails ... if only it weren't for the really hard, old wood. That made nailing the little corners more of a task than I expected. After messing up one I have now resorted to pre-drilling a small hole before even attempting to hammer in the brass nails that come as part of each corner.

Setting them is really easy - they fit neatly into the corner where side rail, riser and step meet, and the metal is soft enough to mold it deeper into the corner by simply pushing down on it gently with your thumb. Set the nail, a few swift taps and you're done!


It does indeed keep the dust from collecting in the corners and adds a sweet unexpected touch to the stairs - I can't wait to add it to the remaining steps (and already placed the order for 38 more corners ... oy).


Tuesday, March 12, 2013

Staircase Challenge: This is not the staircase you're looking for

Whaaat?
No progress?

Nope.
None at all.

Instead we spent all weekend in Crystal River, snorkeling up to cuddly Manatees, exploring crystal-clear springs, boating through canals, discovering Native American burial and temple mounds, and eating delicious food at little hole-in-the-wall style restaurants.

Little Man, husband and I (and even the pupster who tagged along for the adventure) enjoyed ourselves a lot on our weekend away from home (and it sweetened the switch to Daylight Saving Time). Photo evidence will follow as soon as our underwater pictures are developed (Wish us luck they did turn out okay!).

Now we're back, and up and at'em, so stay tuned for some kind of project progress here at the Little Old House!

Tuesday, March 5, 2013

Staircase Challenge: Getting closer

Knock-Knock!
Who's there?
Orange?
Orange who?
Orange you glad I only post once a week about that staircase at the Little Old House?

Another week has zipped by and here we are again, time to update all y'all on the progress on project "staircase" at the Little Old House.


 The weather was PERFECT for stripping paint with the heatgun. Within a week we went from a balmy high 70s to freezing high 30s. Yep, you heard that right, a 40 degrees temperature drop within a week! Brrrrrr!
The heat gun, however, kept me nice and toasty for a couple of hours.


 And yes, there is progress! I managed to strip more spindles, and the finishing line is in sight. Only 11 more spindles to go! Hallelujah! Two thirds done (with the stripping)!


After that it's sanding, priming and finally, finally, paint! I know without this challenge that Kit from "DIY Diva" and Sarah from "The Ugly Duckling House" cooked up in - can you believe it?! - January I'd have happily procrastinated on getting started on my staircase and would have never been so close to checking off this particular project from the big list.
Or have burns on my hands.
And scrapes from trying to fit my hand and the scraper into the area where two parts of the railing overlap.

Don't forget to visit the other duelists and their mighty fine looking stair cases!
 

Tuesday, February 26, 2013

Staircase Challenge: On and on it goes

Another week, another teeny bit of progress. I'm so grateful for this challenge and for all the other inspiring ladies suffering alongside me. I'm convinced without it I'd have thrown the towel at least four weeks ago.
But ...!
Behold, there is progress!
Not an awful lot but it gives an even better idea of where I'm headed with all of this scraping and sanding and patching. One third of the staircase is now primed, and I got the first coat of darkbrown paint on the top of the newel post and the handrail. Hallelujah!


I'm becoming somewhat of a contortionist - getting the area between the upper and the stair part of the balcony scraped and sanded is .... uh, something best suited for somebody with rubber arms. I have added scrapes and bruises to my heatgun burns trying to maneuver my hand between the two sets of spindles to tackle the baseboard.
I'm thinking spray paint for a chance to actually paint this area with a smooth coat of paint but if you have any ideas, I'm definitely open for suggestions!


The first spindles are primed and ready for the first of two coats of paint. The relief of the spindles is beautifully crisp - a far cry from the gunked up mess they used to be which tickles me pink.

And that's it for this week! 
I hope to have a bit more to show for next Tuesday. Don't forget to check out how the other duelists are doing and visit


Tuesday, February 12, 2013

Dueling DIY: The Staircase Challenge

Good grief, it's Tuesday again! And that means, its time for another episode of "Spindle Stripping: Obsessive-Compulsive Disorder or Addiction?"

Last week I felt I was finally making some progress on my staircase. Even though I didn't slave away at it every day, I did manage to find some time between everything else that week to strip four spindles and finish stripping a, newel post, all risers and stringer boards.Excavating the fine relief of the spindles from underneath many layers of paints feels good, even though the repetitive nature of the task is mind-numbing. I'd love to dip-strip the spindles or even better, just wave a magic wand and have the paint fall off, but no such luck. It's slow and tedious and yet worth all the effort because I'm preserving a detail that is original to our little old house, and that matters to me.

"It's not good because it's old - it's old because it's good."

I have seen infill construction go up at an unbelievable pace in our neighborhood but I seriously doubt those new houses made to look like our historic houses will be around in another 100 or more years. How good, how solid and with how much sophisticated craftsmanship can a house be built that shoots up from the ground as quickly as mushrooms after a summer rain? Built from particle board and pale yellow pine? I s'ppose not having to pre-dill holes has some kind of benefit ...  but I digress.


The grain on the spindles is very fine and dense, and doesn't compare to the new stuff you can buy at the box stores. So, here we go, stripping one after another.

Eight done - twenty more to go! There is nothing more inspiring and encouraging than seeing the progress the other duelists are making on their own staircases. I"m loving each and every single one of them!


I also patched a few rough spots on the risers and the stringer boards with wood filler where at some point in time termites had caused some damage. Those beasts prefer the softer woods of trim to the hardier fare of structural timber just like we prefer pudding to hard tack.  There were a few places where the surface of the wooden risers was pitted and scratched up, and those got a quick skimming with wood filler as well. A quick sanding and everything is looking as good as new!

And I also put an order in for a couple of these guys here which showed up lickety-split yesterday

I mentioned these nifty dust corners in this post here waaaay back in January last year and inspired by Preservation SOS's Walnut Court House, and since the staircase is officially coming along, I officially ordered a batch last week. I can't wait to install them!


Unfortunately I'm out of primer (Gack!) and white trim paint (Double-Gack!) - I have no idea how that happened but now I have to run to the home improvement store to stock up again before I can prime and paint the risers.

In the meantime, why don't you visit the other duelists and check out their progress, and don't forget to enter yesterday's LabWeorc Give-Away for some beautiful jewelry!


Thursday, February 7, 2013

Dueling DIY: The Staircase Challenge

A day, ahem two days late and a dollar short :o)

Sorry for the delay in posting my update on the staircase challenge but while I didn't encounter any of the misfortune that the other challengers have been struggling with this past week (no flu, no bat bites, no broken bones, no exams, homework - take your pick and don't forget to swing by to wish them well; they can use it) I have probably just as much progress to show.


So I went to town after work yesterday and scraped and stripped paint for a few hours. Yay me!

...

...

...

aaaand now I don't know what else to write. After all this is - what? - the one-hundredth post on stripping paint at the little old House? Yeeesh ... but obviously people can't get enough of it and I haven't run out of episodes of "Vampire Diaries" to watch yet, so the fun continues!

I thought I'd show you just how much the gazillion layers of  paint obscure the detail on the spindles. At first glance they look just fine, except for the chippy paint and old, painted over runs. Using the heat gun works but rather than coming off in sheets, the paint needs to be lifted off piece by piece of the curvy profile.


The paint is so thick that it gunks up the nooks and crannies to the point of evening them out completely. Imagine the surprise when the bulbous parts of each spindle revealed to be several staggered curves.

More paint lifted off - Now you can see the curved profile in much cleaner clearer profile. Also proof that the baluster spindles were always painted and never stained.

The upper part of a spindle: freed from dozens of layers of paint most of which were white/off-white with the exception of a fairly recent layer of black.

Four spindles down, many (waaaaaay to many) more to go!


Show the other staircase challenge duelists some love:

Thursday, January 31, 2013

Dueling DIY: Get Your (Paint) Strippin' On

Every time I see the progress on the blogs of the other staircase challengers I start to cry.
Then I want to strangle the heat gun
And kick my staircase.

Whose idea was it to strip this mess?!

And then I remember that I love my little old house. That in a hundred years it deserves to be loved at least once, and that I need to do right by it. And there was just no way I could slap yet another coat of paint on those spindles.

So .. I'm still scraping. Still burning my hands because I'm not always paying attention (it -is- a rather, ahem, mind-numbing activity), still filling bag after bag with sheets of old paint.

That stuff is THICK!

Here's a picture to give you an idea of how thick those layers of paint are.
Chunky Monkey!
By the time the paint has cooled off it hardens again and is crunchy like a cookie, and pretty much the same thickness.
Ridiculous!

More chunks.
Paint should not come off in chunks. Nuh-uh.
Yet, it does, and it's amazing how much detail is lost beneath all of those layers, especially on those spindles.
They are taking forever, and I know that all the other challengers will leave me light-years behind in finishing this challenge. Yay you!


I may be done scraping all the baseboards and risers but those spindles ..
They are kicking my butt.

If it weren't for this challenge, I'm pretty sure I'd have abandoned it a week ago (make that two weeks, heh) so here's a big "Thank you" to DIYDiva Kit and all the other challengers for keeping me going!

If you haven't had enough of hearing about my staircase, go on and head over to the other duelists here!

Friday, January 18, 2013

Dueling DIY: Hot Stripping Action

 Oh yeah!
That's right!
I did it!

I came home.
And started strippin'.


 It got real hot at times but that's alright since we had a 20 degrees temperature drop between 2pm and 3pm (no kidding, it's cold again ..gah!)


 Soon, shreds (of paint) were flying left and right! Hot heat gun stripping action.

There are so many %$#@@&*%! layers of paint caked on top of each other, it's not even funny. Citristrip only managed to remove the topmost layers (white latex paint, I assume) and utterly  failed at removing the ominous black layer.
Bane of my existence, that layer of black paint, I'm telling you. It would be nice if you could just paint over that particular stubborn layer but unfortunately it's topping off a mess of more layers, mostly yellowed white ones, in one craggly relief of messy paint job after paint job. So it's got to come off.


 Thanks to my new best friend, El Heatgun, I now have proof that my initial guess at the original color scheme of the staircase was correct: both spindles and newel posts were originally painted a clean off-white/white while a darkbrown stained handrail and newel post tops provided strong and rich contrast.


I tell you, this staircase challenge is not not for the faint of heart.
Burns!
You know, when you get really into stripping, try not to get too carried away and get ahead of yourself. That might occasionally maneuver your hand right in front of the heat gun ... not good.My right hand looks a bit scorched now.


I called it a day at 7pm because Little Man started to inquire about dinner. It was also dark by then which makes for crappy pictures anyway. I'd been stripping for a solid three hours and what do I have to show for it? Not an impressive lot which is why this projects sucks so much that only a crazy challenge gets me going ... ha!

Want to see how the other staircases are coming along? Hop on over to


Friday, January 4, 2013

Scraping by

Here's what I'm up to when you aren't watching ...


It's a slow and tedious job.


Sure, it will be very rewarding to see the staircase in all its vintage glory again but considering that just stripping one.single. spindle takes more than an hour, you know I must be a glutton for punishment. (And really, how many posts titled "Scraped another spindle - yay!" can you write ...or stand to read?)


There are 28 spindles.
And three sections of handrails.


I'll keep you posted but it'll likely take me a while.

Wednesday, January 11, 2012

Temptation

While the pocket doors are primed and curing, I thought I'd share my latest acquisition with you:

Remember this from the house at Walnut Court?


These little dust corners were an invention of the last decade of the 1800s and a simple and decorative means to simplify the housework: they kept dust from building up in the hard to reach corners between tread and riser and cut down on time necessary for sweeping the stairs.

These soft brass corners are held in place by a nail, and were either plain or sported an embossed pattern.

Decorative? Check!
Practical? Check!
Quirky vintage type detail? Check!

All those three check marks put this feature on my must-have list for the Ugly Duckling. While you can buy original dust corners salvaged from another old house, reproduction pieces are also available. I found them at "Van Dykes Restorers" (in sets of 12) as well as "The House of Antique Hardware" (individual pieces).
[source: Van Dykes Restorers]

"Lee Valley Tools & Veritas" even sells a modern version that is glued into corners (here) if you care for the practicality but not the vintage design.

Anyways, I'm thinking about ordering a bunch of these little guys for our steps. Maybe that'll help me tackle the stair case for good. What do you think?

Wednesday, November 9, 2011

Topping it off two-tone

For the past couple of days I've been a derwish with a paint brush in the entry hall. Everything and everyone including the cat got painted if they weren't fast enough to get away!


One of the few things left to paint, other than the actual staircase, was the newel post Joe built for us to replace the one that had been chopped when the house was converted to a duplex. Looks like it came with the house, doesn't it?


[Before: Hello Newel!]


It's been sitting there primed but un-painted for quite a while. This week, I finally tackled it. You see, the newel post is part of my Nemesis project: the staircase. While we're missing the spindles and handrail along the lower part of the stairs, there are spindles and handrails along the second stretch and the cantilever balcony. Badly painted spindles and handrails. Flaking spindles and handrails. Spindles and handrails with ornate detail and nooks and crannies.


Spindles and handrails that are a bear to strip from old bad nasty paint. It's a project that'll keep me busy for a while.


The downstair's part is easy and was a joy to paint. Just white, though, didn't quite cut it, so I decided to paint the top of the newel post in a dark warm brown, picking up on the beautiful warm walnut brown of our refinished stair treads.


[After: Hellooooo, Newel!]


I love the two-tone look on our newel post. It also comes with the added benefit that it's now much more visible against the other millwork in the hall and Little Man is less likely to run into it. Yes, this has happened before and is quite painful, he can assure you.

Saturday, July 30, 2011

Bella Galleria

Even though most of our house looks like an exploded construction site, I can't help but forget about the buckets of paint and the drywall dust everywhere and simply go a-decorating! Sometimes, the decoration is triggered by a need for a solution to an ongoing ....hm, problem.

See, there's our stair case. It's now bright and open and one of the main traffic arteries of our house. Despite the fact that there is a handrail, a certain member of our family likes to use the wall on the right for additional support leaving hand prints in his wake. "Hands off the walls!" is a shout that rings through the Duckling on a fairly regular basis, yet, to no avail.

[Before: Bright airy but empty staircase]

A barrier was needed ... and quick! I gathered all the decorative frames and plaques I could find, grabbed my trusted spraypaint and went to work!


[Letters and ceramic plaque got a new coat
of paint]

[Pile of frames and art and more!]

Gallery walls have been all the rage in the blog world but frankly aside from a more contemporary styling, picture walls have always been a staple in the decoration of a family's home.

[Testing the layout]

There are plenty of posts out there all giving you plenty of detail on how others planned and laid out their gallery wall. I simply played with the frames and other objects I had, nudging them around and re-arranging them on the floor until I had an arrangement that looked like it'd work well on our staircase's wall.
And rather than cutting pieces of newspaper or cardboard to size and placing them on the wall first, I eyeballed where the center of my layout should go, grabbed the frame in the center of the layout and pounded in a nail. From there, I used the center frame as orientation point for the following pieces, and about half an hour later our staircase looked like this:


[After: A whole wall of pretty pictures!]

Loooooove!

Only regret: I started a little high(er) than I feel I should have. I usually tend to hang frames a little on the low side, so I aimed a little higher this time. What we'll need is simply more pieces of art and pictures to extend the gallery wall to the lower half of the wall. And even though the frames do not cover the target zone for hand prints, they do their job in deterring pawing the wall on the way up. Gallery wall for the win!

[Peering up the stairs]

Yep, we're definitely off to a good start here

Wednesday, June 1, 2011

Me and my stripper

Guess what?

The stair case is still not completely painted.

The culprit?

A mostly unmarred layer of black paint underneath about 4 layers of white and off-white paint (and on top of 2 layers of more off-white paint which seems to date to the very early days of the Duckling since the wood underneath that is not varnished like the window trim in the bedrooms, for example). Other than in spots with old termite damage this stuff is a solid even layer and no primer I've tried successfully elsewhere in the house will stick, not even after rubbing it down with deglosser.

It has me stumped, it has.

So, I finally broke down and brought out the big guns: a stripper! And not just any stripper but the brightest and best smelling there is!


Enter the stage: Citristrip!

Yep, we entered the stage of chemical war fare. I'd heard and read good things about citristrip and wanted to give it a shot before breaking out hammer and chisel in an attempt to get past the layer of black doom. yes, I know, we do have plans repainting the staircase in black but we sort of expect the new coat to stick and not peel off after a week or two. Armed with gloves (I skipped the goggles, I'm a dare devil like that) I poured me a cup of citristrip and slathered it on. My, it does smell nice. Not so nice too close up which lets you catch a whiff of chemical sharpness but quite pleasant when you're keeping what is usually considered a good reading distance.


Here's the staircase's cantilever balcony in all its cow-print glory: remaining patches of white paint mingle with exposed layers of the black underlayer and bare wood. Not cool. The orange-y tint of the gel goes on easily and gives everything a pinkish tinge. At least it smells nice ...


This is what happens a few minutes after applying the gel. Like skin after a mad sunburn, the layers of paint bubble up and separate from each other. It looks pretty cool!

Armed with a scraper I scraped off the loose paint. The more recent white paint came off right away, the layer of black paint is fighting tooth and nail still but it's a losing battle, thank God.

The underlaying layer of off-white vintage paint (milk paint, perhaps?) its still going strong which means I'll have to either try a second application of Citristrip or clean it up as much as I can, degloss it and call it a day. I know the primer will stick to that, fortunately.


Stripped handrail waiting for a final clean up, a sanding and a new coat of paint.

Sooo ... been stripping anything fun lately?

Saturday, May 21, 2011

Gettin' the handle on

Remember my gushing about those beautiful vintage brass hand rasil brackets from Van Dyke's (here and here)?

Yeah?

(best Agnes impression) They're so fluffy I'm gonna die!

No, really! They are! Look!


They are even prettier close up than they were in the catalogue picture. They're heavy and solid, too. And for $12 a pop, you really can't complain.


And here is one installed with the old handrail.


And here's our stair case in all its beat up, splotchy glory.


At one point we want to restore the railing leading down to its old beauty, just like railing of the cantilever balcony you can spy in the upper left corner. Until then I'll continue to gush about those pretty pretty brackets, alright?


Next step - can you guess it? Paint!