Friday, February 7, 2014

Oh No, You Didn't!

Oh yes, we did.

I know I said that 2013 would be all about getting our Little Old House's exterior spruced up. A whole new color for the ol' gal.

I wrote a detailed email about how we chose our color scheme here and even created some clip art to show everything went together, both on our house and for the big picture aka our blog of the 'hood.

Then this happened - husband finally spoke up that he really didn't like the colors we'd agreed on, and all our plans went, well, to hell in a handbasket. Back to the drawing board it was. After all, the exterior is such a big project that you better 'like' if not 'love' what you put on there since repainting it wasn't going to happen.


We spent weeks painting different shades of blue on the back of our house, until we finally broke down and mixed out own because they all were either too blue, too light, too dark, too grey, too green - well, you get the idea.

Then summer rolled around and all of our plans came to a screeching halt.
Sloshing halt, really, because last year's summer was hot and rainy and miserable.
Mosquitoes grew to the size of helicopters, it was hotter than Hades, and if it wasn't, it sure was pouring buckets whenever we had spare time to actually do paint the house.

The back of our house continued to look like this throughout the remainder of the year. Fall came, and with it nicer weather. It was still wet - wetter than in past years - but there were plenty of nice weekends, just right for painting, and yet.
No painting got done.
We deliberately procrastinated.
No kidding.
I was so not ready to pull the trigger, no matter how much I hated the scruffy look of our little old house.
Then, just a little over a week ago, I caught myself playing with the Sherwin-Williams Color Visualizer, and I realized that while we found a blue we liked, I never quite liked it for our house.

Our little old house just isn't a house that wants to be blue.
History repeating, eh? Now it was my turn with the 'I don't hate it, but ...' spiel.

Before confronting the husband with what had been nagging on my mind for the past months, I kept on playing. I'd recently hit a Craftsman style streak (more on that sometime within the next couple of weeks) and dug deep into the concept of Craftsman style sensibilities. While our house is not a proper Craftsman-style house - its architecture is a bit muddled down - it's a bit Craftsman and Bungalow influenced. We'd already talked about emphasizing rafter tails and such, but playing with the color program I decided to give our little old house a Craftsman make-over, even going so far as to playing with a two-tone color scheme.

And BAM!
That's when I found it: THE color scheme (no, really, this is it).
The moment I painted on the two-tone color scheme on the back of the house (virtually, of course), the architecture of the back of our house where all original features have been lost due to the enclosing of the two small back porches and the second-story addition which now houses our master bath and the dressing room started to make sense again instead of looking bland and faceless!

 I know that it's difficult to understand my excitement over this color scheme when all you have to look at are these pictures. They really could be better ... you know, this one was taken in really rotten weather and it doesn't do anything to prettify the back of our little old house (nor does the stack of wood leaning against the a/c compressor).
 This one - taken and modified online with the color scheme - I snapped to show the husband how the two-tone color scheme would look on the side of our house. He was a bit concerned at first about having a two-tone house in green (a dark sage green/ Sherwin-William's "Oakmoss") and gold (a rich, earthy gold / Sherwin-William's "Bosc Pear") next to a green house and a yellow house, but these colors are very different from the colors of the other two houses so there's nothing to poke fun at.

The real kicker came when I bought two testers with these colors to try them on the house. Nothing is more important than to test your paint on the object of your desire - no, really. Light, sun exposure and shade, and even the texture of your siding make a -huge-  difference in how you perceive your color and how true it will look compared to your paint chip. In all cases prior to this, every color I'd picked required massive ttweaking - going darker, going lighter, going greyer, etc.

These two?
Spot. On.
 And then I discovered this gem in one of my books - a historic craftsman influenced historic house with a two-tone color scheme (green on top) and and off-white/yellow at the bottom. Score!


I'm so stinkin' excited to get started painting I'm rotating on the spot while waiting for an available weekend with good weather!


Wednesday, February 5, 2014

Plug'er Up!

 Getting our porch light to actually light up again did require running a new cable. Running the new cable became a much more interesting project than our electrician anticipated, and in the end we ended up with a couple of holes drilled into our porch ceiling.

You know, like this ...

[I like seeing a peek of the original porch ceiling color - who would have thought it used to be such a bold shade?]

I'm a little embarrassed to say it has indeed taken me -this- long to find a round-to-it to plug up these unsightly holes. I blame their location - out of sight, out of mind - because I don't often walk across my porch looking up at the ceiling.

Aaaaaanyways ... today was the day! I even had everything in place to take care of business. No extra runs to the home improvement store necessary!


After cutting a piece of shim to size plugging up the narrow slit and plugging the drill hole with a piece of dowel I decided to mix up a small batch of Bondo to fill up the remaining spaces. I wanted to carve the channels of the beadboard into the patched surface and Bondo would take better to this kind of treatment than ordinary wood filler.


Here we are, with all holes plugged up. It's looking better already - who'd have thought!
Next: paint! However, since that's exterior paint we're talking about this opens a whole other pandora box ... stay tuned!

Monday, February 3, 2014

NomNom: Little Old House Bread Pudding


This Sunday I made bread pudding for breakfast, so I thought I'd share this little special treat with you. It's been a while since I last posted a recipe here at the Little Old House blog, so here we go.

Bread pudding is a really simple thing to make: bread, eggs, butter, brown sugar, a splash of vanilla, and maybe a handful of raisins, for kicks and giggles. Together with some crispy bacon, sweet butter, and maple syrup this is top notch comfort food, especially when the weather is miserable (or to celebrate the sun after a cold and dreary week).

There are plenty of recipes for bread pudding out there, and because I usually wing it and don't have actual measurements for the ingredients I throw into it other than a general list of things that simply belong, this is not what this "recipe" is about.

It's about using the right bread. Traditionally bread pudding calls for stale bread. I have used plain wheat toast, whole wheat toast, Challa bread, but nothing, nothing, NO-THING turns bread pudding into the decadent, "one more spoon!" kind of treat than using croissants.

Croissants.

Use them.
For your bread pudding.
You won't regret it.


Friday, January 31, 2014

Cornered!

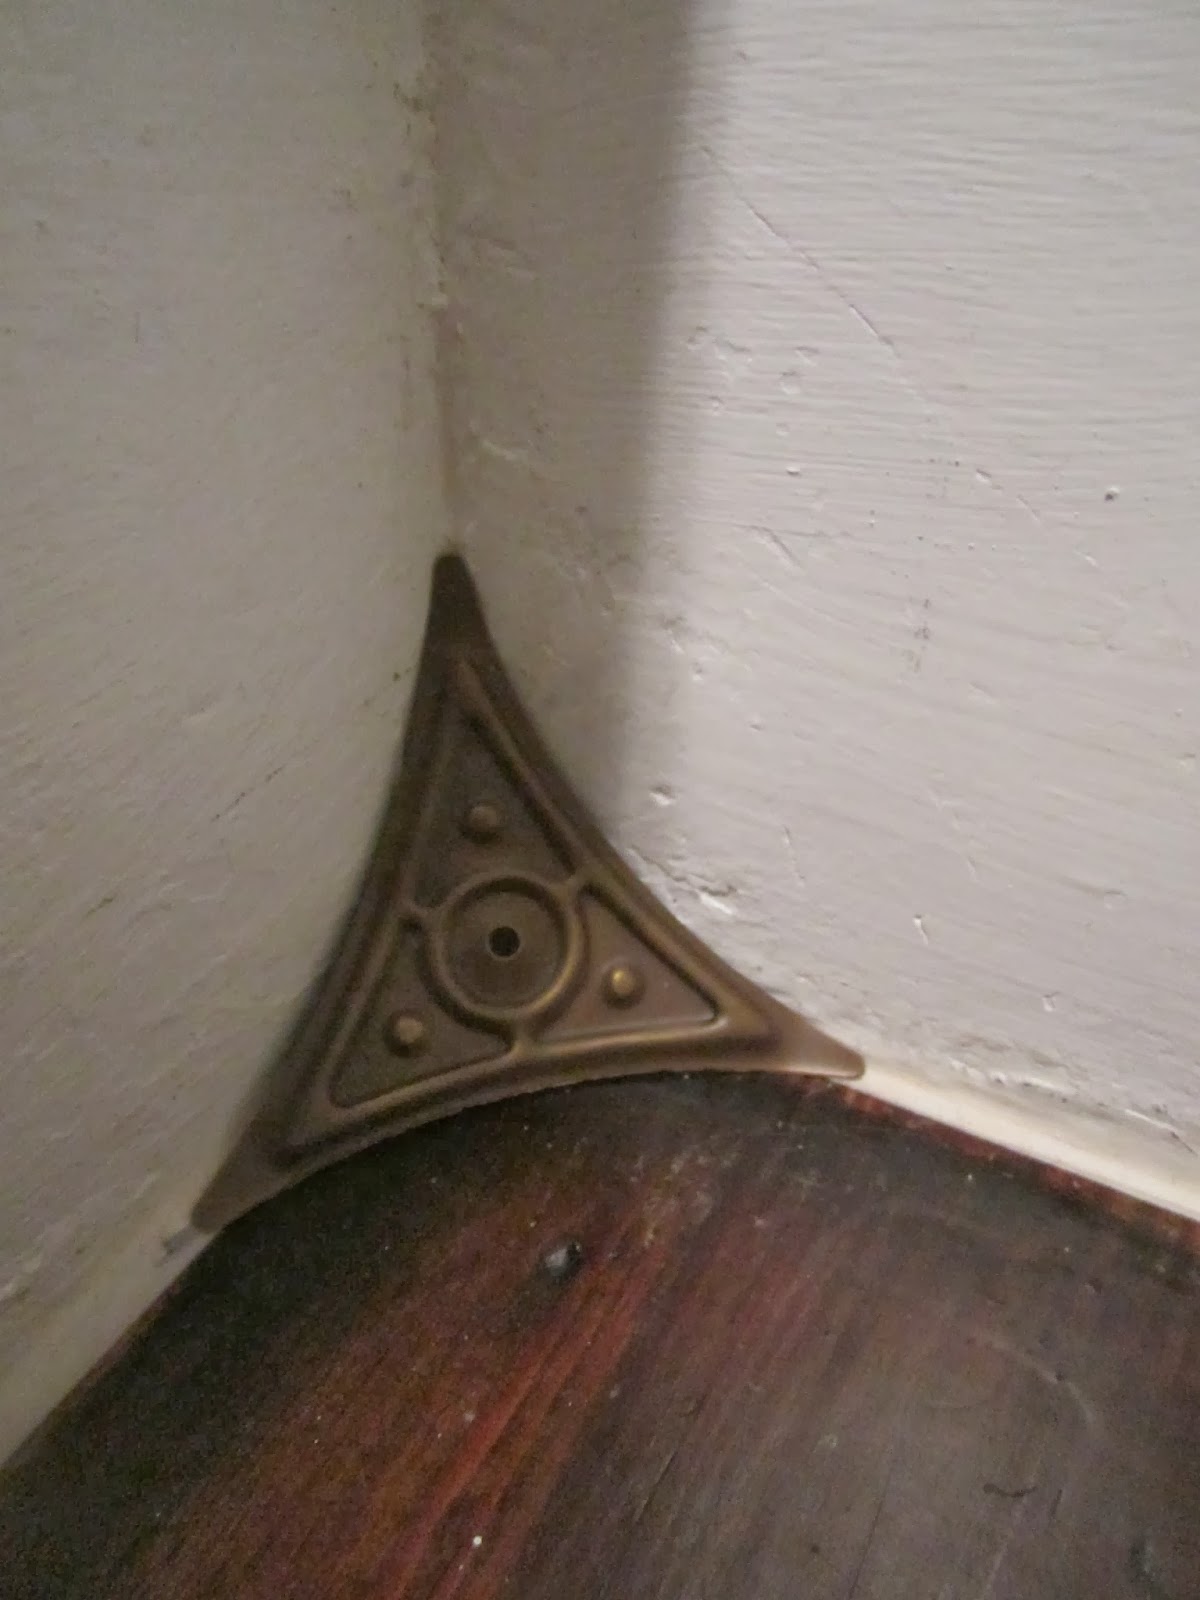
Remember how thrilled I was when I came across these little guys here in the house on Walnut Court that Preservation SOS loved on to make sure it would be preserved?


 If not, you can read the original blog post here!

These nifty little brass corners are "dust corner" - a rather simple, yet ingenious and very decorative way to keep your stairs cleaner. Nailed into the corners of your steps, they prevent dust from accumulating in those tight spots and make sweeping down your stairs a breeze! They became popular in the 1890s but remained popular for quite a while.

Our little old house is bereft of many original features so if there is an opportunity to add a little flair of bygone times, I get giddy like a little school girl and just can't wait to get started. Fortunately, life is a real master at throwing me curve balls and so this project fell to the wayside and was delayed quite a bit.

Until now!


Upstair's steps before the attack - clearly in need of a few touch-ups (does anybody else always yell "Don't hold on to the wall!" to their children? Sheeesh ...)and they are already painted a low maintenance grey). The steps got dinged up a bit when we got rid of my vintage school desk. It was lovely, a solid piece of heavy duty furniture, but there was no room for it downstairs and that's where all the action happens so I decided to let it go.


Back to the dust corners. I'd ordered a first batch of corners from VanDykes restorers (here, if you are curious) waaaaay back and then got sidetracked with all kinds of other projects.
It happens.
A lot.


The dust corner kit comes complete with a handy little doodad that helps you set the nails ... if only it weren't for the really hard, old wood. That made nailing the little corners more of a task than I expected. After messing up one I have now resorted to pre-drilling a small hole before even attempting to hammer in the brass nails that come as part of each corner.

Setting them is really easy - they fit neatly into the corner where side rail, riser and step meet, and the metal is soft enough to mold it deeper into the corner by simply pushing down on it gently with your thumb. Set the nail, a few swift taps and you're done!


It does indeed keep the dust from collecting in the corners and adds a sweet unexpected touch to the stairs - I can't wait to add it to the remaining steps (and already placed the order for 38 more corners ... oy).


Wednesday, January 29, 2014

Just In Time For Spring


Well, okay, maybe not in time for spring which seems to be ways out but at least in time for the new year I did some blog cleaning removing all those fake comments with handy-dandy links to commercial sites.
Nuh-uh, sorry, but that stuff doesn't fly here.
Besides, vinyl replacement windows? Vinyl fences?
You could at least pretend you actually read this blog but nooo ....
Too bad.

Now it's all cleaned up, and things are ready to go for another year at the Little Old House. I have been quite amiss in updating you all on what's going on over here and, granted, it's not all that much, because somehow, around Christmas, everything comes to a screeching halt and that ol' engine has one heck of a time getting back to speed.

So, we've been busy with work, little art projects, little sewing projects, Little Man's acceptance into the Duke TIP program, cub scouts and the impending cross-over to boy scouts, and much, much more.

We are slowly getting back into the swing of DIY things so chaos should be picking up here soon enough!

Saturday, December 21, 2013

A Little Bit Of Christmas

Thanksgiving zip-zoomed right by, and 'ere we realized Christmas came to town! Life has been busy at the Little Old House, not so much with home improvement projects but rather with cleaning up and hiding all of the signs of a 'work in progress' ie random tools, screws, nails, sanding paper, paint cans, brushes, and more and cleaning the house to prepare for the arrival of family staying with us over the holidays.

One by one the holiday decorations are going up: first the door wreath gets a new look, and then, slowly, it spreads through the house, adding lights here, an ornament there.


A traditional Advent wreath takes up the place of honor on the dining room table (and gets moved around a lot because the dining room is more of a living room/ family room for us - we hang out here a lot, crafting away, doing homework, and eat).


Frosted glass and glittering snowflakes create the illusion of a winter wonderland and yet, this year, winter has been surprisingly mild. Sure, we had a few cold spells, with temperatures even dipping into the low 30s but right now we are safely back to shorts and t-shirts. (And there was much rejoicing!)


While I was born, grew up and spend the first 30 years of my life in Germany, I do not miss the cold. Nor do I need cold weather to get all excited over Christmas. No, Sireeeee, no snow, no freezing temperatures for me, thank you veeeeery much!


Snow is highly overrated. Christmas is all in the lights, the sparkling ornaments, the fun of finding and hiding away the perfect gift, the spicy sweetness of all things Cinnamon. And marzipan. Cannot - must not - forget marzipan! 


And the elf.
Barrigade is back for another year of elfcapades and is still well-loved and admired by the Little Man. Every year I keep worrying/wondering if this will be the last year he believes, and I cherish every chance I have making it last.

Try hiding your elf in the freezer with an empty cup of ice cream - that'll do it ;)

Saturday, November 30, 2013

Under Pressure

One of the first steps on your list of requirements when tackling any painting job is 'cleaning.' Gotta remove all the grime, grease, and dirt that has built up on any surface before you can hope a new coat of paint will actually adhere properly and look good for many years.

For historic houses the recommended way of cleaning the old wood siding is gentle washing with a brush and water from your run of the mill garden hose or a gentle cleaning with your pressure washer to avoid damaging the old wood siding. Newer pressure washers, especially the big industrial, gas powered ones, exert too much pressure and can cause serious damage by removing the softer areas of the wood between the grain. Since we have concrete pavers to clean and maybe, someday in the future, a wooden deck as well (not to mention bikes and cars, and garden furniture), we decided to look at acquiring a low-level electric pressure washer.

I don't know about you but since our budget is small and limited, my first 'poking around' usually involves checking out what Harbor Freight has to offer. We have found that we can often find just the tool we are looking for at a very reasonable price there. Granted, these tools won't last a lifetime. They are not the kind your children will inherit and talk about with gleaming eyes, but for the occasional 'around-the-house' use, they can't be beat.


They were offering the 1650PSI electric pressure washer from Pacific Hydrostar for very little money; with a coupon it came down to a whopping $74.99 - well within the price range we'd decided on and with all the features we wanted. Also, the reviews weren't bad. When I decided to poke around on the internet to see if there were more reviews elsewhere, I discovered that the same pressure washer was also available through Amazon.


For $279.53.
Wait ....WHAT???

Yep, you read that right. I had to take a screen shot because I couldn't believe it. Long story short, I decided to buy the $279.53 pressure washer for $74.99.
It was super easy to put together, the included instructions were easy to follow, and in less than 20 minutes I had our new toy ready to go!

It's really lightweight which makes it easy to lug around and if you make sure to tighten the connectors properly the first time around, it doesn't leak. So we took it for a spin outside, playing with the different nozzle sizes and just familiarizing ourselves with it before embarking on the big adventure of using it to clean our house's siding.


Front yard - we have concrete pavers and this little retaining wall that sets our property apart from the sidewalk - both of which were dirty and in places a little mossy after the especially wet and warm summer we have had.


Yes, that's Halloween decorations - I've been a bit sidetracked lately, obviously. Heh .... anyways, this is one of the fun tools. It's easy to use and comes with instant gratification in discovering that there's a color pattern in your walkway (when you thought they were all the same color) and seeing the crusted dirt of decades wash off and reveal clean, light colored concrete underneath.


"Before" and "After" in the same picture. Isn't the difference mindboggling? Gah! I can't believe it was that filthy (and that we waited so long to deal with it).

After you are done pressure-washing anything, it's you who needs a thorough cleaning.


The backspray covers you, top to bottom, with a layer of mud - wearing wellies might be a good idea. Maybe next time, heh!