Sunday, August 14, 2011

Refinished Vintage sink

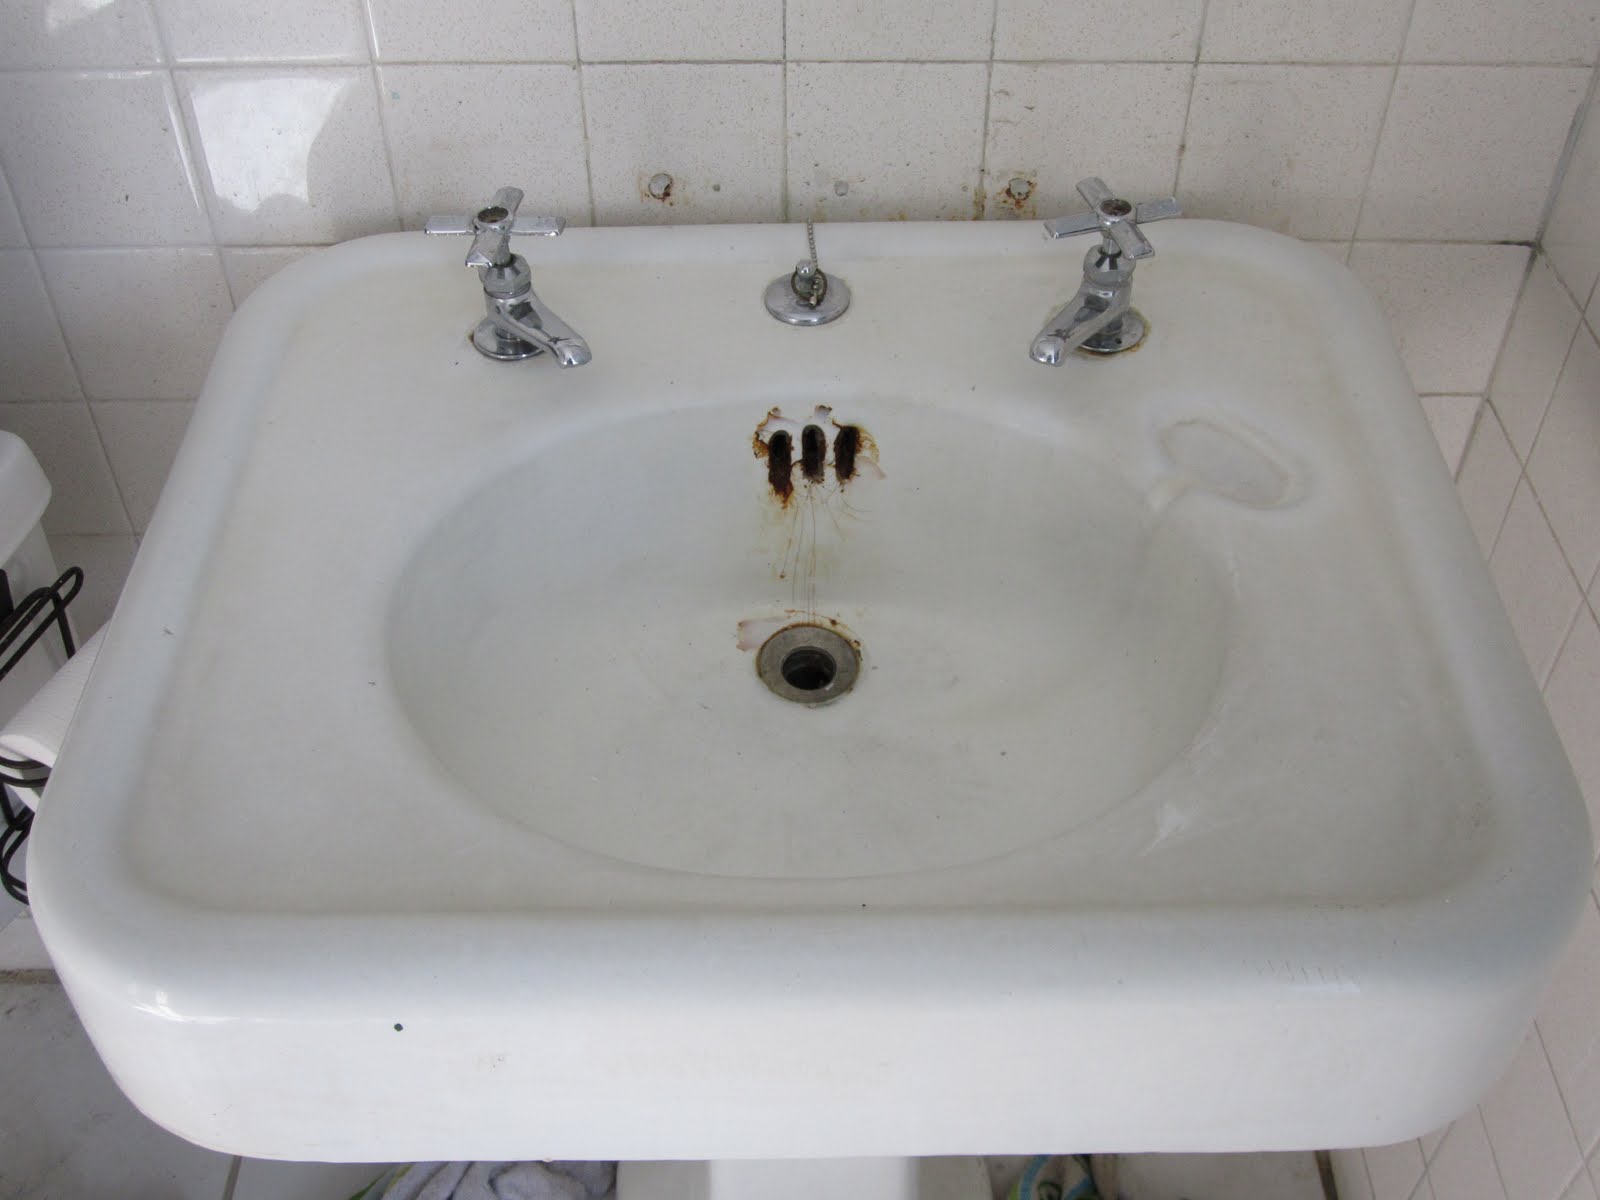
Even before moving in we learned we'd scored a great set of neighbors. John, our across-the-street neighbor, who is restoring his gorgeous Craftsman style bungalow all by himself, even gifted us with a vintage pedestal sink as a house warming gift. Sam, a member of our contractor's crew, manhandled the heavy cast-iron sink upstairs and Olin, our plumber, hooked it up. While it worked beautifully from day one, it definitely showed its age:

[Before: No denying this sink has seen some years ...]

While overall in pretty decent condition, our sink had seen a couple of hundred hand- and tooth-brushings and those years had taken its toll on it. There were scratches and rust and all kinds of other telltale signs of age and use. Still, a pretty cool vintage sink and well worth saving.


During a recent run to the box store I picked up one of these kits on sale for just about $30. trying those kits was definitely worth a shot, and I could hardly pick up a new sink for $30 anywhere, right?
[Step 1: Thorough cleaning]

The instructions were very simple and straightforward. First, a through cleaning and scrubbing with TSP followed by an overall scouring with fine steel wool to roughen the surface (yeah, I didn't think it needed anymore of that but did it anyways).


Much to my joy, the product comes as a spray paint. Woot! I'd gotten plenty of practice using spray paint over the past couple of months so my confidence went up a couple of notches; I could do this!

[In-progress: Surrounding areas taped off and the first coat sprayed on]

I taped off the surrounding areas with a big plastic drop cloth, wrapped up the taps, totally forgot about that thingamajig that the sink plug attaches to and went a-spraying. It went on like a dream and was such an easy feat that I included the top edge of our bathtub that showed the telltale signs of a then attached and now removed shower enclosure

[After: Like new!]

[After all of it: All nice and shiny!]

The vintage sink now looks like new, and so does the tub. This was definitely a project for the win, even if it meant that we couldn't use the sink for the three days it took the finish to fully cure. So far, the finish is holding up really well. You're not supposed to use any harsh chemicals and/or scrubbies on your refinished surface (and if you wipe it down regularly you really shouldn't need to) nor train or duel Beyblades on it, but, hey, that's easy enough!


Saturday, August 13, 2011

Seeing black in the kitchen

The Florida August heat has turned me positively nocturnal. It's just to hot during the day to do anything but hold a siesta in the shade with some icy lemonade in the shade near a body of cool water or indoors with the ac and the ceiling fan running. With my parents' arrival hanging over my head like my own personal version of Damocles' sword, I'm working overtime on a couple of easy and quick-to-finish projects.

No, not every bit of trim and door will be freshly painted before my parents arrive.
Yes, there'll be plenty of work left to do (not that I plan on doing anything but enjoy my family's company for those 3 weeks they are here and mmmmmaaaaaybe post the occasional update here).

However, pride doesn't allow me to slack just yet. I mean, this is the first time my folks will get to meet our Duckling house and by God, I want it to charm them just the way it did us!

One of the rooms I'm putting finishing touches on is our kitchen. It's - like pretty much all rooms - almost done (emphasis on 'almost'): I still need to build/buy/conjure open shelves to go on either side of the window, add new window treatments and finish painting the trim and door. So I thought I'd start with the 'hardware' of the room, grit my teeth and just "get'er done".


[Before: The door in the kitchen. Behind that is the laundry/mudroom]

Doesn't look so bad, eh? This is one of the nicer doors in the house. The paint job isn't as atrocious as on other doors and there's no obvious peeling. Ha! It had me fooled good - just like you. There's one teeny tiny chip that stuck out, and all I wanted to do was run the painter's tool over it to take it off ... and down came the entire paint job. Gah!

[It's raining paint chips ...]

Within seconds, the floor started to look like this. So much for an easy and quick job. I peeled and scraped and sanded and de-glossed and filled. Bleh ... While it's still my least favorite task, I've now learned to let my brain wander (which can be a bad thing ...). So, inspired by a few pictures I'd seen on pinterest and knowing I had the supplies right at hand, I went into the shed and rummaged through the paint storage for this:


Ta-da! Chalk board paint! I decided to turn the top panel of our vintage two panel door into a chalkboard for notes and reminders. The molded edge of the panel was quickly taped off and on went the first coat (of a total of four).

[Nothing is shabbier than a door in mid-progress:
first coat of spray chalk board paint]


[Better already: primed and ready for paint]

Once all the prep work was out of the way, the paint went on easily enough. Lately I've been using a dense foam roller instead of a brush and I've definitely developed a preference for it. Less chances of brush marks and easy rolling action. It also appears to be saving paint: the paint goes on thin and even and there are fewer drops and splats. Maybe I've just gotten the hang of and and am simply less messy about the process, who knows?

[After: Chalkboard message board in our kitchen]

All is well that ends well. After hours of prep work and painting, the new old door is ready to convey all kinds of messages. The chalk paint was ready just in time for a first message when the husband returned from his trip to Ukraine. He absolutely loved it!

Friday, August 5, 2011

Easy-Peasy Pillows

You know that feeling when you've seen something and you.just.have.to.make.it? This nagging little sensation, always in the back of your mind, just waiting for that little nit of spare time necessary to tackle whichever project it is you.just.have.to.make?

Yeah, that one.

Ever since I saw a certain place mat at Target, whipping up a pillow from it has been on my to-do-list. So I waited until the deadline was almost as tight as it could get, until I was in over my head in last minute but have to finish before Monday projects and swung by the store to pick up the supplies I needed:


I grabbed two place mats and a basic pillow to use as filling. Lucky me, they were on sale so my inserts only cost me $4 total!

I took the pillow and simply chopped it into half! At first I thought about pulling the pillow stuffing out and stuffing it into the place mat, but then decided I needed a solution that would allow me to take the pillows apart more easily say for washing or replacing when the mood strikes.

So I pinched each pillow half tightly (I hardly ever pin) along the open side and ran it through the sewing machine. It took a lot of pinching fu to keep the open edges together but in the end I managed. Pinning them wouldn't have made it any easier, I'm sure. The filling is so poofy, you need bodily force to squash it and keep it flat enough to end up with enough fabric for the sewing machine to catch.


Not the prettiest edge but it'll be inside the pillow case and thus invisible!


After that, things got really simple: the place mats are lined so all I did was open up the seam along a short side, squeezed the pillow insert I just made in and whip-stitched the opening close again.
Tada!
A pretty pillow!
Rinse and repeat as often as you like!

Thursday, August 4, 2011

Impromptu Patio for $25

Speaking of impromptu projects: in a fit of madness, I grabbed a bunch of pavers from the side of the house and brought them to the back to the location of the future deck. Might as well practice and dabble with the size while the deck is still in the planning stage, right?


[Impromptu patio in progress]

Not much to look at right away, but what can you really expect from a 1hr, no money spent project? At least, it gives us a better idea of the size of the future deck.

Once that was out of my system, I hopped over to the store and grabbed a coil of no-dig edging for $15 and 3 bags of pea gravel for $3.50 each. Under the watchful eyes of Seamus, I spent another hour finishing our impromptu patio by framing it with edging and filling the gaps between the octagonal pavers with pea gravel for a more finished look before going to bed.

Florida summer nights are just as god-awfully hot as the days, the air like a thick viscous liquid, but at least there's no sun burning from the sky and frying your brains. It was far more pleasant than digging up the front yard on Sunday morning. More on that later! Of course I had to wait until the next morning for a couple of pictures so here you go:


[Just three ingredients: old pavers that came with the Duckling,

pea gravel and no-dig edging]


[Rainy early morning in Florida. Check out the background:
one of my canna lilies is fixing to bloom again!]


Glamorous? No, but it looks much more like a planned project than something I threw together on a whim and the price can't be beat. This will tide us over nicely until we have the funds, time and DIY drive to build a deck in its stead next year or the year after.

Wednesday, August 3, 2011

Make-shift Outdoors

The worst thing to happen to your carefully crafted DIY project planning are those crazy "spur of the moment" projects you think you can throw into the mix at the drop of a hat because "it'll only take us a few minutes".

Rrrright!
Nothing. Absolutely nothing takes just a few minutes. Ever.
Really.

Anyways, we were just about done tiling (and with the world) when husband decided he didn't want to waste a handful of thinset left at the very bottom of the bucket. We might as well use that for the fence.

The ...wha?

The fence. This was this week's brilliant spur of the moment idea: moving our fence to the actual property line. You know, how long could it possibly take to move a fence post and connect a pipe and some chain link fencing, right? Mere minutes. Maybe an hour.
Rrrrright!

A previous owner had installed our fence about 4 feet away from the actual property line and angled one corner to create a funnel effect between our property and the neighboring one. Since it also connected to the back alley that runs the length of our block (a relic from those times when trash wasn't picked up at the curb but away from sight along the back alleys that crisscross the neighborhood) it often served as a short-cut for whoever walked down the alley. Not cool and often somewhat awkward, having friendly strangers, but strangers all the same, walk basically through your yard. Fortunately our sweet neighbor felt the same and with her blessings we moved the fence, closing off the alley access.


[After: Our yard grew about 6 feet in width and gained an entire corner.
Oh yeah, we still
have to remove part of the old fence]

Two hours and a trip to the hardware store later we had a fence that was actually following our property lines in the back. No more cutting through between the houses! And, boy, did our yard grow! Changing the fence line added a huge chunk to our yard that now feels about twice its size (even though it's still on the small side -plenty of weeds to whack for me).

So far, so good. We haven't heard any complaints but the neighborhood cats learned of the changed fence line the hard way: a late night kerfuffle ended with the sounds of a cat running into the fence and bouncing off of it. Surprise!

So, what kind of impromptu half-finished project have you thrown into your carefully planned DIY weekend lately?

Tuesday, August 2, 2011

Vanity in progress

This is Seamus, our personally assigned porch cat. He showed up one evening and after observing us carefully for about half an hour, decided we were likable people and made himself at home. Shamelessly claiming the porch and us as his home and attendants which is why we dubbed him "Seamus"; it sounds pretty much the same. Aaanyways, ...

[Seamus, oh Seamus, you are one handsome fellow]

Seamus likes to keep me company during projects on the porch. He'll pick a spot nearby and simply doze as cats are wont to do. Perfectly relaxed, no matter which power tool is in use or how often I use a can of spray paint. I have never seen a more trusting cat than Seamus.

[Seamus making sure I don't feel lonely while removing hardware]

With the bathroom making steady progress, it was about time I got started on refinishing the vanity-to-be. It was in great shape but the finish was a bit dinged up and scruffy looking in places, and since we need it to be properly waterproofed we decided we wanted to freshen it up with a new coat of paint.

[Get'er sanded]

For prep-work, I decided to sand it and rub it down with deglosser to make sure the new coat of paint would bond properly.

[All primed and ready]

I had a moment of doubt whether black was really the way we wanted to go, seeing the desk with a coat of primer, but since the vessel sink is white it just wouldn't have the beautiful crisp and stark contrast it would create if the vanity were white. Doubts swallowed, the black paint went on.

[Little black dress-er ...]

Oh-la-la! Talk about a change! I'm loving it! It's like going from slippers and a worn robe to a little sexy black dress. All of the sudden our little desk went from blah to breathtaking and looked brand-spanking new.


[After: Glossy black and silver hardware]

I'm in the process of sealing the top of our vanity-desk with several layers of Varathane for a waterproof finish before installing our sink. I still can't believe we managed find this beautiful little desk and scored it for such a low price. Take that, Craigslist ;o)

Monday, August 1, 2011

A Bathroom Glimpse Fest

Here's where we last left our heroes ...

[Hardi Backerboard installed and seams taped and mudded]


[Refresher course online]


[We used tons of those]


[Grateful for knee pads]


[So close to the finishing line]

No more, says the husband. No more ever again, in fact. Our master bathroom is a whopping 132 sqft and tiling it took much much longer than anticipated. Curse you, HGTV, with your bathroom-kitchen-yard makeovers in a weekend! Curse you!